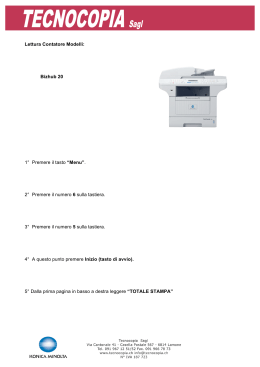
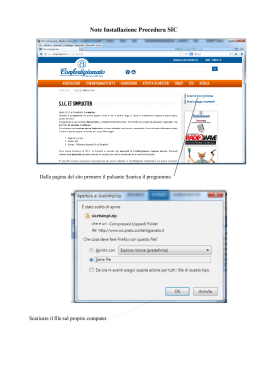
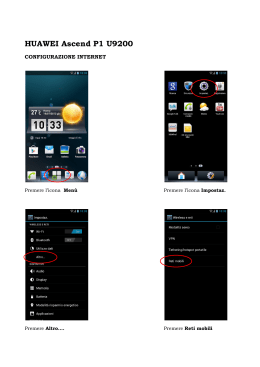
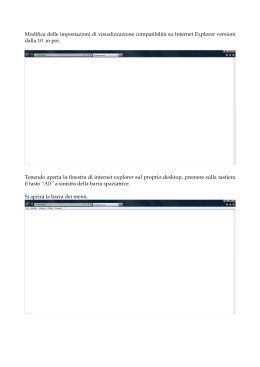
VIDEOREGISTRATORE 4 CANALI DIGITALE TVV6204LUV INDEX 1 Introduzione .......................................................................................................................................................... 3 Caratteristiche .................................................................................................................................................... 3 Specifiche........................................................................................................................................................... 3 Hardware ............................................................................................................................................................... 4 2.1 Pannello Anteriore.............................................................................................................................................. 4 2.2 Pannello Posteriore ............................................................................................................................................ 5 2.3 Allarme Esterno.................................................................................................................................................. 5 2.3.1 Allarme rilevatore di movimento e Allarme esterno ................................................................................... 5 2.3.2 Allarme perdita video ................................................................................................................................. 5 2.4 Connettori dei Terminali ..................................................................................................................................... 6 2.5 Telecomando IR ................................................................................................................................................. 7 2.6 Controller RS-485............................................................................................................................................... 7 2.7 Videocamera PTZ (PAN, TILT e ZOOM) & Controller Joystick.......................................................................... 8 2.8 Setup PTZ & controlli sul pannello anteriore ...................................................................................................... 9 2.9 RETE.................................................................................................................................................................. 9 Setup del sistema ............................................................................................................................................... 10 3.1 Elenco menu Setup .......................................................................................................................................... 10 3.2 Visualizzazione live .......................................................................................................................................... 11 3.3 Setup del Sistema ............................................................................................................................................ 11 3.4 Setup Videocamera.......................................................................................................................................... 12 3.5 Setup Movimento ............................................................................................................................................. 12 3.6 Setup registrazione .......................................................................................................................................... 13 3.7 Setup Allarme................................................................................................................................................... 14 3.8 Lista Eventi....................................................................................................................................................... 15 3.9 Gestione HDD .................................................................................................................................................. 16 3.10 Setup di rete................................................................................................................................................. 17 3.11 Aggiornamento Firmware............................................................................................................................. 17 3.12 Backup CD/DVD RW ................................................................................................................................... 18 3.13 Carica impostazioni predefinite.................................................................................................................... 18 Riproduzione DVR & BACKUP USB.................................................................................................................. 18 4.1 Ricerca registrazione........................................................................................................................................ 19 4.2 Ricerca lista eventi ........................................................................................................................................... 19 4.3 Backup USB ..................................................................................................................................................... 19 Riproduzione DVR e del Backup USB .............................................................................................................. 20 5.1 Impostazione schermata principale.................................................................................................................. 20 5.2 Interfaccia Utente ............................................................................................................................................. 21 Visualizzazione rete e riproduzione .................................................................................................................. 21 6.1 Impostazione IP sul PC .................................................................................................................................... 21 6.2 Setup opzionali per microsoft IE....................................................................................................................... 22 6.2.1 Aggiungere ai siti attendibili ..................................................................................................................... 23 6.2.2 Login ........................................................................................................................................................ 23 6.3 Visualizzazione live .......................................................................................................................................... 24 6.4 Configurazione ................................................................................................................................................. 26 6.4.1 Informazioni sul sistema .......................................................................................................................... 26 6.4.2 Gestione utente ....................................................................................................................................... 27 6.5 IP SETTING ..................................................................................................................................................... 28 6.6 PPPoE.............................................................................................................................................................. 28 6.7 DDNS SETTING............................................................................................................................................... 29 6.7.1 DDNS.CAMDDNS.COM .......................................................................................................................... 30 6.7.2 Event Setting ........................................................................................................................................... 31 6.7.3 Alarm Setting ........................................................................................................................................... 31 6.7.4 Event setting / Mail & FTP ....................................................................................................................... 32 Intervalli di tempo delle registrazioni ............................................................................................................... 33 1.1 1.2 2 3 4 5 6 7 2 Manuale Utente 1 Introduzione 1.1 Caratteristiche • • • • • Facile utilizzo; impostazioni modificabili sullo schermo. Selezione velocità multipla di registrazione in modalità normale o allarme fino a 120/fotogrammi per secondo.Multi lingua. Manuale di supporto/Allarme/Modalità programmazione registrazione. Porta RS-485 integrata per gestire videocamere PTZ o controller joystick per DVR. Supporto CDRW, DVDRW, USB e backup di rete. 1.2 Specifiche Visualizzazione in "REAL TIME" Canali di ingresso video Loop video Tensione nominale di alimentazione Connessione di rete Modalità di registrazione Risoluzione Regolazioni video Protocolli Interfaccia porta seriale Disco di memorizzazione Velocità registrazione Compressione immagine Ingressi allarme Ingressi audio Uscite video Uscite audio Uscite relè a scambio programmabili Temperatura di funzionamento Dimensioni (L) Dimensioni (A) Dimensioni (P) tramite browser Internet Explorer, o tramite software 4 4 230V~ ±5% 50Hz 10/100 BaseT Ethernet (RJ-45) Manuale / Allarme / Movimento / Timer 720(O) x 576(V) pixels luminosità , contrasto, accensione PELCO-D, DYNACOLOR RS485 160GB 720x288 (fino a 25fps), 360x288 (fino a 100fps) MPEG4 4 1 RCA 2 1 RCA 1 0°C a +40°C 432mm 55mm 321mm 3 TVV6204LUV 2 Hardware 2.1 Pannello Anteriore N. 1 2 3 4 5 6 Tasto POWER REC PLAY H.D.D. COPY Funzione DVR LED acceso/spento LED registrazione LED riproduzione LED HDD Conferma Copia Canale 1 a schermo intero & numero: uno Funzione PTZ 1 7 Canale 2 a schermo intero & numero: due 2 8 Canale 3 a schermo intero & numero: tre 3 9 Canale 4 a schermo intero & numero: quattro 4 10 Quad screen: visualizza tutte le videocamere Quad 11 Tasto registrazione Rec 12 Riavvolgimente veloce x32 Zoom OUT Ferma la riproduzione o la registrazione Auto SCAN Pausa e avanzamento per fotogrammi Home Avanzamento veloce x2, x8, x16, x32, x64 Modalità PTZ attiva/disattiva Tasto PLAY e avvia ricerca Quick Time Zoom in Muove il cursore in su. Aumenta il valore Muove il cursore in giù. Diminuisce il valore Tasto MENU per entrare o uscire dal MENU Muove il cursore a sinistra. Diminuisce il valore Muove il cursore a destra. Aumenta il valore DVD R/W Porta USB Conferma e modifica dei parametri Su Giù Setup PTZ Sinistra Rew search 13 Stop 14 Pause 15 Fwd search 16 17 18 19 20 21 22 23 24 4 Play ▲ ▼ MENU ◄ ► DVD ENTER Destra Manuale Utente 2.2 Pannello Posteriore NO. 1 2 3 ITEM LED ETHERNET CAMERA OUT 4 CAMERA IN 5 MONITOR OUT 6 7 8 9 10 S VIDEO OUT AUDIO IN / OUT ETHERNET CONNETTORE ALIMENTAZIONE RS-485 11 12 INGRESSO ALLARME RELE’ TASTO ACCENSIONE SPOT OUT FUNZIONE Riservato Riservato Uscita videocamera 1-4 con connettore BNC Uscita videocamera 1-4 con connettore BNC Uscita composita. Possibilità di connessione diretta con monitor. Supporta due uscite BNC Uscita Y/C Ingresso / Uscita Audio Interfaccia rete RJ-45 12Vcc / 5A 4-Pin. Porta per controller joystick o controllo PTZ 4-Pin. Ingresso allarme. Uscita Relè Riservato Uscita SPOT 2.3 Allarme Esterno Il sistema può essere configurato con tre tipi di allarme: • allarme rilevatore di movimento • allarme esterno • allarme perdita video. 2.3.1 Allarme rilevatore di movimento e Allarme esterno In caso di attivazione dell’allarme rilevatore di movimento o dell’allarme esterno, si presentano 5 possibili situazioni: • La velocità di registrazione passa da normale a velocità di allarme. • Se nel Setup Allarme, è attiva la visualizzazione dell'allarme, con allarme inserito, verrà visualizzato automaticamente a schermo intero il canale di allarme corrispondente; comunque, se l'allarme è inserito e si provvede a effettuare il setup entro cinque secondi, non si verificherà nessuna visualizzazione a schermo intero del canale di allarme. • L’attivazione del relay è opzionale. • L’allarme con rilevatore di movimento e quello esterno sono entrambi registrati nella lista eventi. Nel Setup allarme, alla voce Motion Detection Record, l’utente può selezionare ON o OFF per registrare o meno l'evento. • Quando è attivo il rilevatore di movimento, il colore del titolo della videocamera diventa giallo. Inoltre, quando è attivo l’allarme esterno, sullo schermo è visualizzata la scritta “ALARM”. 2.3.2 Allarme perdita video L’Allarme perdita video è abilitato di default. Il tempo di registrazione dell’Allarme perdita video dipende dal periodo di buzzer. L’evento verrà automaticamente aggiunto alla lista eventi e un messaggio di Perdita Video verrà visualizzato sul canale relativo. 5 TVV6204LUV 2.4 Connettori dei Terminali T+ TRR+ ALARM1-4 GND N.C. COM N.O. Esempio 1: Connesso allarme in Uno via PIR (Infrarossi passivi) Esempio 2: Connesso con sirena d’allarme al Relè N.O. 6 RS-485 invia + RS-485 invia RS-485 riceve RS-496 riceve + Ingresso telecamera allarme GND Relè N.C. Relè COM Relè N.O. Manuale Utente 2.5 Telecomando IR REC 1–4 QUAD MENU LEGENDA Premere una volta per registrare, due volte per fermare Seleziona canale 1 – 4 a schermo intero Visualizza le immagini in modalità QUAD Entra nel MENU del videoregistratore Riavvolgimento veloce Riavvolgimento fotogramma per fotogramma Avanzamento fotogramma per fotogramma Avanzamento veloce Riproduzione ENTER ▲ ► ▼ ◄ COPY Conferma operazione Sposta il cursore in su e aumenta il valore. Sposta il cursore a destra e aumenta il valore. Sposta il cursore in giù e diminuisce il valore. Sposta il cursore a sinistra e diminuisce il valore Copia file 2.6 Controller RS-485 RS-485 PIN R+ RT+ T- DEFINIZIONE RXDA RXDB TXDZ TXDY Formato dati Dati: 1 Byte / Parità: Nessuna / Bit in partenza: 1 / Baud: 9600 3 byte totali come segue: 1. Byte=0x10: Broadcasting DVR 2. Byte=0x80+Numero ID :Control Joystick DVR (Numero ID:1~32) 3. Byte= Tabella seguente di riferimento :Comandi di ogni tasto. 4. Byte= 1° Byte+ 2° Byte :Comando per confermare la somma. 4-ch DVR Comando 4-ch DVR Comando CH1 0x11 PLAY 0x52 CH2 0x12 UP 0x31 CH3 0x13 DOWN 0x32 CH4 0x14 MENU 0x20 QUAD 0x15 LEFT 0x33 RFAST 0x3A RIGHT 0x34 STOP 0x51 SELECT 0x35 PAUSE 0x3D ENTER 0x35 FFAST 0x3E 7 TVV6204LUV 2.7 Videocamera PTZ (PAN, TILT e ZOOM) & Controller Joystick Diagramma di una videocamera PTZ connessa al DVR con controller joystick. Accertare l’ID della VIDEOCAMERA, la frequenza di BAUD (9600 bps di default) e RS-485 +/-. Se si desidera connettere il DVR con il controller joystick, assicurarsi che ogni numero ID del DVR sia unico. 8 Manuale Utente 2.8 Setup PTZ & controlli sul pannello anteriore Esempio: Videocamera PTZ sul canale 3 con PELCO-D, 9600bps. 1. Premere il tasto del canale in modalità full screen 2. Premere ►►. In alto a destra comparirà “PTZ” REC 2005/10/10 MON 12:00:00 50% 120P PTZ 3. Premere il tasto MENU per entrare nel setup 4. Premere▲ o ▼ per cambiare la voce selezionata e ◄ o ► per modificare velocità/ protocollo e velocità di Baud REC 2005/10/10 MON 12:00:00 50% 120P PTZ PTZ SETUP O UP-DOWN SPEED: OOOOO O LEFT-RIGHT SPEED: OOOOO O AUTO SCAN SPEED: OOOOO O PROTOCOL TYPE: PELCO-D O BAUD RATE: 9600 5. Premere MENU due volte per tornare al controllo PTZ 6. Controllo videocamera PTZ tramite i tasti descritti nel paragrafo 2.1 7. Premere SEL per uscire dal controllo PTZ 2.9 RETE Una volta acceso, il DVR rileverà automaticamente la rete di connessione. Se non è presente nessuna rete di connessione, la funzione sarà disabilitata. Assicurarsi della presenza della rete di connessione prima di accendere il DVR. 9 TVV6204LUV 3 Setup del sistema 3.1 Elenco menu Setup 10 Manuale Utente 3.2 Visualizzazione live • Ricerca veloce in riproduzione In modalità visualizzazione live, premere ► PLAY per avviare la Ricerca quick time e riprodurre o effettuare ricerche per ora o evento. • Controllo PTZ a) Premere il tasto della videocamera PTZ selezionata per visualizzare l'immagine a schermo intero. b) Premere ►► per avviare la modalità PTZ; si visualizzerà un messaggio giallo indicante PTZ nell'angolo in alto a destra. c) Premere MENU per impostare il Protocollo e la frequenza di baud fra il DVR e le videocamere PTZ. d) Premere i tasti direzionali per controllare le videocamere PTZ. e) Premere ►► per uscire dalla modalità PTZ. • Selezione del canale Nella schermata multi immagine 1, 2, 3, 4, l’utente può premere il tasto canale per commutare i diversi canali in modalità schermo intero. 3.3 Setup del Sistema 1. SISTEMA FORMATO DATA Y-M-D DATA Pre ORARIO DURATA CICLICA DATA/ORA OSD TIPO DI SISTEMA BLOCCO TASTIERA NUMERO ID SELEZIONE LINGUA MODALITA’ PASSWORD USCITA 2007/03/29 10:10:10 03 SEC ON PAL OFF 01 ITALIANO OFF Premere ▲ o ▼ per selezionare la voce. Premere ◄ o ► per modificare i valori DATE FORMAT – FORMATO DATA Premere ◄ o ► per il formato Y-M-D (A-M-G), M-D-Y (M-G-A) o D-M-Y (G-M-A). DATE - DATA Premere ▲ o ▼ per selezionare la voce e ◄ o ► per modificare i valori. TIME - ORA Premere ▲ o ▼ per selezionare la voce e ◄ o ► per modificare i valori. AUTO SWITCH DWELL – TEMPO DI COMMUTAZIONE AUTOMATICA Premere ◄ o ► per modificare i valori. Premere il tasto e poi premere ►►, per attivare la modalità commutazione automatica full screen. DATE AND TIME OSD – GIORNO E ORA OSD Premere ▲ o ▼ per selezionare la voce e o ► per modificare i valori. SYSTEM TYPE - TIPO DI SISTEMA NTSC o PAL. KEYBOARD LOCK – BLOCCO TASTIERA Premere ◄ o ► per modalità ON/ OFF. OFF:SBLOCCATA. ON: BLOCCATA. Dopo il setup del blocco tastiera, impostare una PASSWORD Senza la scelta di una password, qualsiasi utente non autorizzato potrà accedere al setup del sistema e apportare modifiche. ID NUMBER – NUMERO ID Premere ◄ o ► per modificare i valori. In caso di connessione con il controller joystick, è necessario un numero identificato per differenziare ogni DVR. LANGUAGE SELECT – SELEZIONE LINGUA Premere ◄ o ► per cambiare la lingua OSD. PASSWORD MODE - PASSWORD Premere ▲ o ▼ per selezionare la voce e ◄ o ► per modificare i valori. Password predefinita: 1111 11 TVV6204LUV 3.4 Setup Videocamera 2. IMPOSTAZIONE TELECAMERE TELECAM. CAM01 VISUALIZZ. ON LUMINOSITA’ 50 CONTRASTO 50 TINTA 50 COLORE 50 TITOLO CAM 01 Premere ▲ o ▼ per selezionare la voce. Premere ◄ o ► per modificare i valori CAMERA - VIDEOCAMERA Premere ◄ o ► per cambiare canale. DISPLAY - DISPLAY Premere ◄ o ► per cambiare il valore della relativa videocamera visualizzata. BRIGHTNESS - LUMINOSITÀ Premere ◄ o ► per cambiare il grado di luminosità. CONTRAST - CONTRASTO Premere ◄ o ► per cambiare il grado di contrasto. HUE - TONALITÀ Premere ◄ o ► per cambiare il grado di tonalità. COLOR - COLORE Premere ◄ o ► per cambiare il grado di colore. CAMERA TITLE - TITOLO VIDEOCAMERA Premere ▲ o ▼ per selezionare la voce e ◄ o ► per modificare il carattere. 3.5 Setup Movimento 3. IMPOSTAZIONE MOTION DETECTOR CAMERA CAM01 MOTION DETECTION ON BUZZER OFF SENSITIVITY 080 AREA SETUP [<] USCITA Premere ▲ o ▼ per selezionare la voce. Premere ◄ o ► per modificare i valori CAMERA - VIDEOCAMERA Premere ◄ o ► per cambiare canale. MOTION DETECTION – RILEVATORE MOVIMENTO Premere ◄ o ► per modificare i valori del rilevatore di movimento. BUZZER Premere ◄ o ► per cambiare il valore del buzzer durante il rilevamento. SENSITIVITY - SENSIBILITÀ Premere ◄ o ► per cambiare il valore di sensibilità da 001 (minimo) a 100 (massimo). AREA SETUP – SETUP DELL’AREA Premere ENTER per accedere alle impostazione dell’area di movimento. 1. Premere i tasti direzionali per selezionare il blocco necessario. 2. Premere ► per aggiungere una linea di area rilevamento di movimento. 3. Premere ►►per eliminare una linea di area rilevamento di movimento. 4. Premere MENU per uscire dal setup dell'area rilevamento di movimento. 12 Manuale Utente 3.6 Setup registrazione 4. IMPOSTAZIONI REGISTRAZIONE TIMER REGISTRAZIONE OFF REG. NORMALE PPS 30P REG. SU ALLARME PPS 30P MODO REGISTRAZIONE MUX DURATA REG. SU ALLARME 10SEC QUALITA’ REGISTR. ALTA REGISTR. AUDIO ON USCITA Premere ▲ o ▼ per selezionare la voce. Premere ◄ o ► per modificare i valori SCHEDULE RECORD - PROGRAMMAZIONE REGISTRAZIONE Premere ◄ o ► per modificare i valori della funzione di programmazione. SCHEDULE RECORD SETUP – SETUP PROGRAMMAZIONE Quando è attiva la modalità programmazione premere ENTER per visualizzare il setup programmazione. SETUP PROGRAMMAZIONE WEEKDAY: LUN-VEN INIZIO-FINE TIPO 01-00 [X] 00-01 [0] PPS 20P 20P WEEKEND: SAB-DOM INIZIO-FINE TYPE 24H/24H [X] ALM PPS 60P 60P PPS 20P Premere ▲ o ▼ per selezionare la voce. Premere ◄ o ► per modificare i valori ALM PPS 60P USCITA WEEKDAY & WEEKEND Il setup della programmazione è diviso in due parti, weekday e weekend. Sono impostati con PPS diversi. Esempio 1: La voce weekday copre da lunedì a venerdì e weekend da sabato e domenica. Esempio 2: La voce weekday copre da mercoledì a venerdì e weekend copre da sabato a martedì. Esempio 3: La voce weekday copre da lunedì a mercoledì e weekend copre da giovedì a domenica. Esempio 1 Esempio 2 Esempio 3 LUN MAR WEEKDAY WEEKEND WEEKDAY MER GIO VEN WEEKDAY WEEKEND SAB DOM WEEKEND WEEKEND START-STOP Le 24 ore possono essere impostate in modalità ALL TIME o SEPARATED HOURS. 1. ALL TIME Applica la stessa modalità di registrazione e di PPS per tutto il giorno. 2. SEPERATED HOUR Come per i settaggi weekday e weekend, l’utente può suddividere le 24 ore in 2 parti e impostare diversi PPS. Esempio 1: Orario lavorativo: 8am - 16pm. Off: 16pm - 8am. Esempio 2: Orario lavorativo: 10am-20pm. Off: 22pm - 10am. 2 4 6 8 10 12 14 16 18 20 Esempio 1 OFF ORARIO LAVORATIVO OFF Esempio 2 OFF ORARIO LAVORATIVO 22 24 OFF 13 TVV6204LUV TYPE Premere ◄ o ► per cambiare modalità di registrazione. A O X Registrazione solo su allarme Registrazione full time Nessuna registrazione PPS Premere◄ o ►per cambiare il numero di fotogrammi/sec. registrati normalmente. ALM PPS Premere ◄ o ► per cambiare il numero base di fotogrammi/sec. registrati su allarme. NTSC 30 / 15 / 10 / 5 / 3 / 2 / 1 PPS PAL 25 / 12 / 10 / 5 / 3 / 2 / 1 PPS B. NORMAL RECORD PPS – PPS REGISTRATI NORMALMENTE Premere ◄ o ► per cambiare i PPS registrati normalmente. C. ALARM RECORD PPS - PPS REGISTRATI SU ALLARME Premere ◄ o ► per cambiare i PPS registrati su allarme. D. RECORD MODE – MODALITÀ REGISTRAZIONE Premere ◄ o ► per passare dalla modalità MUX alla QUAD. In MUX, la risoluzione è 720 x 240 (NTSC)/ 720 x 288 (PAL). In QUAD, la risoluzione è 360 x 240 (NTSC)/ 360 x 288 (PAL). E. ALARM RECORD DWELL – TEMPO DI REGISTRAZIONE SU ALLARME Premere ◄ o ► per impostare il tempo di registrazione su allarme. F. RECORD QUALITY – QUALITÀ REGISTRAZIONE Premere ◄ o ► per selezionare LOW/ MEDIUM/ HIGH/ BEST. G. AUDIO RECORD – REGISTRAZIONE AUDIO Premere ◄ o ►per attivare o disattivare la registrazione audio. NOTA: In modalità Duplex, l’audio è disabilitato durante la riproduzione 3.7 Setup Allarme 5. IMPOSTAZIONI ALLARME BUZZER DURATA BUZZER/ALLARM. PERDITA SEGNALE VIDEO BUZZER SU ALLARME USCITA RELE’ ALLARME VISUALIZZ. ALLARME EVENTI MOTION RELE’ USCITA RELE’ ALLARME RELE’ PERDITA VIDEO USCITA RELE’ MOT. 05SEC ON ON N.C OFF OFF Premere ▲ o ▼ per selezionare la voce. Premere ◄ o ► per modificare i valori ON ON ON BUZZER A. BUZZER/ ALARM DWELL – BUZZER/TEMPO DI ALLARME Premere ◄ o ► per selezionare il tempo di BUZZER/ ALLARME. B. VIDEO LOSS ALARM - ALLARME PERDITA VIDEO Premere ◄ o ► per attivare o disattivare l’allarme perdita video. C. AUDIBLE ALARM – ALLARME ACUSTICO Premere ◄ o ► per attivare o disattivare l’allarme acustico. D. EXT. ALARM MODE – MODALITÀ ALLARME ESTERNO Premere ◄ o ► per attivare o disattivare il dispositivo allarme esterno. N.C: Normal Close. N.O: Normal Open. E. ALARM DISPLAY MODE – MODALITÀ VISUALIZZA ALLARME Premere ◄ o ► per attivare o disattivare la visualizzazione a schermo intero dell’allarme. F. MOTION EVENT – MOVIMENTO Premere ◄ o ►per modificare per scegliere se registrare o meno un movimento quando viene rilevato. 14 Manuale Utente RELAY G. EXT. ALARM RELAY – RELAY ALLARME ESTERNO Premere ◄ o ► per modificare il valore al trigger del relay allarme esterno. H. VIDEO LOSS RELAY – RELAY PERDITA VIDEO Premere ◄ o ► per modificare il valore al trigger del relay perdita video. I. MOTION RELAY – RELAY DI MOVIMENTO Premere ◄ o ► per modificare il valore al trigger del relay di movimento. 3.8 Lista Eventi 6. LISTA EVENTI NO YY/MM/DD 01 05/10/10 02 05/10/10 03 05/10/10 04 05/10/10 05 05/10/10 06 05/10/10 07 05/10/10 08 05/10/10 09 05/10/10 MASTER PAGINA : 001 HH:MM:SS CH TIPO 00:01:00 – REGISTR. 00:02:00 – REGISTR. 00:03:00 01 V.LOSS 00:04:00 02 ALARM 00:05:00 03 MOTION 00:06:00 – REGISTR. 00:07:00 -- ALARM 00:08:00 01 V.LOSS 00:09:00 02 ALARM Premere ▲ o ▼ per selezionare la voce. Premere ◄ o ► per modificare i valori A. NO - NUMERO Premere ▲ o ▼ per selezionare la voce e ◄ o ► per cambiare pagina. Ogni HDD può registrare 3000 eventi, due HDD registrano 6000 eventi. Sullo schermo è visualizzata la lista eventi MASTER o SLAVE. B. DD/MM/YY – GG/MM/AA Visualizza la data dell’evento. Il formato è modificabile nel setup del sistema. C. HH:MM:SS – HH:MM:SS Visualizza l’ora dell’evento. D. CH - CANALE Visualizza il canale dell’evento registrato. E. TYPE - TIPO Visualizza il tipo di evento nel seguente modo. POWER REGISTR. V. LOSS ALLARM MOTION In caso di perdita di tensione da parte del DVR, verrà registrata la data e l’ora del reboot In caso di pressione del tasto REC , l’evento sarà registrato nella lista eventi. In caso di perdita di segnale video di una videocamera, saranno registrati la data, l’ora e il canale relativo. Con allarme inserito, verrà registrata la data, l’ora e il canale relativo. In caso di rilevamento di movimento, verrà registrata la data, l’ora e il canale relativo. 15 TVV6204LUV 3.9 Gestione HDD 7. GESTIONE HDD SOVRASCRITTURA HDD FORMATTAZIONE HDD USCITA OFF 20% HDD MASTER SLAVE CAPACITA’ 80GB 41% NESSUNO DISP. Premere ▲ o ▼ per selezionare la voce. Premere ◄ o ► per modificare i valori A. OVERWRITE MODE – MODALITÀ SOVRASCRITTURA Premere ◄ o ► per attivare o disattivare la modalità sovrascrittura. B. CAPACITY WARNING – AVVISO DI SPAZIO RESIDUO Premere ◄ o ► per modificare il valore a 20/ 15/ 10 o 5% se la sovrascrittura è disattivata. In caso di spazio residuo inferiore a quello impostato, si udirà un allarme acustico (se è attivo l’allarme acustico del buzzer nel setup di allarme). C. HDD FORMAT SETUP – SETUP FORMATO HDD GESTIONE HDD PASSWORD PROTEZ. HDD FORMATTAZIONE USCITA OFF [<] C-1. HDD PASSWORD PROTECT – PROTEZIONE PASSWORD HDD Premere ◄ o ► per abilitare o disabilitare la protezione della password per il formato dell’HDD. C-2. HDD PASSWORD – PASSWORD HDD Premere ▲ o ▼ per selezionare la voce e ◄ o ► per modificare il valore. Password predefinita: 1111 C-3. FORMAT - FORMATO Premere ENTER per accedere al setup del formato. Premere ◄ o ► per selezionare YES o NO e poi ENTER per inviare [ ATTENZIONE ] TUTTI I DATI SARANNO PERSI SEI SICURO? ˙SI ˙NO 16 Manuale Utente 3.10 Setup di rete 8. IMPOSTAZIONI RETE LAN TITLE DVR MODO IP STATICO IND. IP 192.168.001.220 SUBNET 255.255.255.000 GATEWAY 192.168.001.254 DNS1 168.095.001.001 DNS2 168.095.192.001 PORTA VIDEO 00080 USCITA Premere ▲ o ▼ per selezionare la voce. Premere ◄ o ► per modificare i valori A. TITLE - TITOLO Premere ▲ o ▼ per selezionare la voce e ◄ o ► per cambiare carattere. Il titolo del DVR è mostrato nell’IP installer. B. IP MODE – MODALITÀ IP Premere ▲ o ▼ per selezionare la voce e ◄ o ► per attivare l’ip statico o dinamico. C. IP ADDR – INDIRIZZO IP Premere ▲ o ▼ per selezionare la voce e ◄ o ► per cambiare l’indirizzo IP. D. SUB NET - SOTTORETE Premere ▲ o ▼ per selezionare la voce e ◄ o ► per cambiare la maschera. E. GATEWAY - GATEWAY Premere ▲ o ▼ per selezionare la voce e ◄ o ► per cambiare il gateway. F. DNS1 – DNS1 Premere ▲ o ▼ per selezionare la voce e ◄ o ► per cambiare dns. G. DNS2 – DNS2 Premere ▲ o ▼ per selezionare la voce e ◄ o ► per modificare altri dns. H. HTTP PORT – PORTA HTTP Premere ▲ o ▼ per selezionare la voce e ◄ o ► per modificare la porta http 3.11 Aggiornamento Firmware 9 AGGIORNAMENTO FIRMWARE INIZIO AGGIORN. FIRMWARE [<] Premere ENTER per aggiornare il firmware. Dopo l’aggiornamento il DVR si riavvierà automaticamente. Non riavviare il DVR manualmente. NOTA: formattare la flash memory USB utilizzando FAT32 17 TVV6204LUV 3.12 Backup CD/DVD RW 10. CD/DVD RW BACKUP INS. DATA/ORA INIZIO INIZIO: FINE : DIM.BACKUP SU: CHIUSURA DVDRW: CANCELLAZIONE DVDRW: INIZIO BACKUP DVDRW: USCITA [<] 2006/11/20 00:00:00 2006/11/20 02:00:00 0000MB YES NO [<] Premere ▲ o ▼ per selezionare la voce. Premere ◄ o ► per modificare i valori A. START TIME SETUP – SETUP ORA INIZIO Premere ENTER nel menu setup ora inizio, poi premere ▲ o ▼ per selezionare la voce e ◄ o ► per cambiare i numeri. Premere di nuovo ENTER per confermare l’ora di inizio. Il sistema cercherà automaticamente l’ora e tornerà al backup cd/dvd rw. B. BACKUP SIZE – GRANDEZZA BACKUP Premere◄ o ►per modificare la grandezza del file di backup; l’ora di fine si cambierà automaticamente. C. CLOSE DISK – CHIUSURA DISCO Premere ◄ o ► per permettere la scrittura di altri dati sul CD/DVD. YES: Sul CD/DVD non saranno scritti altri dati. Il sistema bloccherà l’anello interno sul disco e non sarà possibile scrivere altri dati; altrimenti utilizzare CD RW/DVD RW e la funzione Cancella disco. NO: Il CD/DVD resta scrivibile fino alla capacità massima. D. ERASE DISK – CANCELLA DISCO Premere ◄ o ► per scegliere se cancellare i dati sul CD RW/DVD RW. YES: Cancella i dati presenti sul CD RW / DVD RW. Il sistema eliminerà tutti i dati sui CD RW/DVD RW; non sui CD R/ DVD R. NO: I dati sul CD RW / DVD RW non saranno cancellati. E. BACKUP START – INIZIO BACKUP Premere ENTER per iniziare il backup. Assicurarsi che nel masterizzatore sia presente un CD/DVD. Premere ENTER per iniziare il backup. Terminato il backup, il masterizzatore espellerà il CD/DVD automaticamente. F. BACKUP FILE NAME – NOME DEL FILE DI BACKUP Ogni file di backup verrà nominato come ora di inizio. Esempio 1: 11201817.IN indica il 20 Nov 18:17 3.13 Carica impostazioni predefinite Premere ENTER per caricare le impostazioni predefinite del sistema. Sullo schermo verrà visualizzato il messaggio LOAD DEFAULT! fino al termine del recupero. 4 Riproduzione DVR & BACKUP USB RICERCA RAPIDA RICARCA PER DATA/ORA RICARCA PER EVENTO 18 In modalità visualizzazione live, premere ► o PLAY nella ricerca Quick Time. Premere ▲o ▼ per accedere alla modalità di ricerca. Manuale Utente 4.1 Ricerca registrazione RICERCA PER DATA/ORA AAAA/MM/GG HH:MM:SS 2006/11/20 00:01:00 [MASTER HDD] ORARIO INIZIO: 2006/11/20 ORARIO ARRESTO: 2006/11/20 [SLAVE HDD] ORARIO INIZIO: 2006/11/20 ORARIO ARRESTO: 2006/11/20 00:00:00 02:00:00 Premere ▲ o ▼ per modificare i numeri e ◄ o ► per selezionare le voci. Premere ENTER per iniziare la riproduzione o LIVE per tornare alla visualizzazione live. 00:00:00 02:00:00 4.2 Ricerca lista eventi RICERCA PER DATA/ORA AAAA/MM/GG HH:MM:SS 2006/11/20 00:01:00 [MASTER HDD] ORARIO INIZIO: 2006/11/20 ORARIO ARRESTO: 2006/11/20 [SLAVE HDD] ORARIO INIZIO: 2006/11/20 ORARIO ARRESTO: 2006/11/20 00:00:00 02:00:00 Premere ▲ o ▼ per modificare i numeri e ◄ o ► per selezionare le voci. Premere ENTER per iniziare la riproduzione o LIVE per tornare alla visualizzazione live. 00:00:00 02:00:00 4.3 Backup USB I diversi driver di ogni USB rendono diverse le compatibilità. Questo sistema è compatibile con la maggior parte delle flash memory USB. Consultare l’APPENDICE B in caso di dubbio. Formattare la memoria utilizzando FAT32. PRIMA DEL BACKUP A. Inserire un dispositvo USB nella relativa porta del DVR in modalità visualizzazione live. B. Accedere alla modalità riproduzione tramite la ricerca play time o per lista eventi. Riprodurre i video che devono essere sottoposti a backup. BACKUP VIDEO In modalità multiplexer o schermo interno, premere REC per iniziare il backup. Ripremerlo per terminarlo. Il sistema inizierà il backup automaticamente. BACKUP FOTOGRAMMA In modalità multiplexer o schermo interno, premere ► e poi REC Il sistema inizierà il backup fotogramma per fotogramma. BACKUP FILE NAME Ogni file di backup verrà rinominato come ora di inizio. ESEMPIO: 11201817.IN indica 6 Nov. 18:17 DOPO IL BACKUP Dopo il backup, il sistema copierà automaticamente sul dispositivo USB il file “player.exe” con il quale l'utente potrà riprodurre il file. 19 TVV6204LUV 5 Riproduzione DVR e del Backup USB REQUISITI DEL SISTEMA: CPU: Intel Pentium III 1G o superiore. MEMORIA: 512 MB o superiore. VGA: 32MB/64MB o superiore. OS: Microsoft Windows XP SP2 o superiore. RISOLUZIONE VGA: 1024*768 o superiore. 5.1 Impostazione schermata principale a) Schermata principale b) Aprire un’unità disco che contenga il file di backup (es. F:) o una qualsiasi altra cartella che contenga il file. Ogni file di backup sarà rinominato come ora di inizio. ESEMPIO: 11201817.IN indica 6 Nov. 18:17 c) Cliccare su File Player (riproduce file avi) o Image Viewer (riproduce per singolo fotogramma), verrà visualizzato il seguente messaggio. Aprire il file da riprodurre. 20 Manuale Utente 5.2 Interfaccia Utente AVI FILE BACKUP PICTURE BY PICTURE BACKUP SCREEN FORMAT 6 Visualizzazione rete e riproduzione CPU: Intel Pentium III 1G o superiore. Memoria: 512 MB o superiore. VGA: 32MB/64MB o superiore. OS: Microsoft Windows XP SP2 o superiore. RISOLUZIONE VGA: 1024*768 o superiore. 6.1 Impostazione IP sul PC Installare le videocamere all’interno di una rete LAN o usare cavi rete intrecciati per connetterle al PC. Il file IPInstallerEng.exe imposterà gli indirizzi IP delle videocamere. Se il SO è Windows XP SP2 o superiore, verrà visualizzata la seguente finestra di Windows Security Alert. Selezionare Unblock. Si visualizzerà la finestra di IPInstallerEng.exe: L’ndirizzo IP predefinito del DVR è 192.168.1.220 NOTA: Inserire i parametri di rete esatti e senza spazi. La Device Lists, elenca tutti i server. Un volta selezionato un server, compariranno sulla destra i settaggi dell’IP relativo. Inserire i parametri e clickare su Submit, si visualizzerà a questo punto la seguente finestra di dialogo. Il dispositivo verrà riavviato con nuovi parametri. 21 TVV6204LUV 6.2 Setup opzionali per microsoft IE A. IE > Strumenti > Opzioni internet > Protezione > Livello personalizzato > Impostazioni Protezione carica controlli ActiveX non contrassegnati > Attiva o Chiedi conferma (raccomandato). B. IE > Strumenti > Opzioni internet > Protezione > Livello personalizzato > Impostazioni Protezione > Inizializza ed esegui script controlli ActiveX non contrassegnati come sicuri > Attiva o Chiedi conferma (raccomandato). Le tre opzioni su indicate si basano sulla selezione di chiedi conferma. Nella seguente finestra di dialogo selezionare "YES." 22 Manuale Utente 6.2.1 Aggiungere ai siti attendibili IE - Strumenti - Opzioni Internet - Protezione - Siti attendibili - Siti 6.2.2 Login INSTALLA ACTIVEX INIZIA INSTALLAZIONE DI ACTIVEX LOGIN: ACCOUNT & PASSWORD Dopo aver impostato l’IP ed essersi connessi alla rete o al LAN, digitare l’indirizzo IP sul browser IE. Si aprirà questa finestra di login con User name & Password. User name predefinito: admin Password predefinita: admin 23 TVV6204LUV 6.3 Visualizzazione live A. DVR CONFIGURATION Accede al menu di rete del DVR. B. SYSTEM TIME Modalità visualizzazione live: ora della visualizzazione attuale. C. SCREEN FORMAT Cambia il formato dello schermo. Il doppio click cambia i diversi canali a schermo intero. D. Snapshot. E. Full Screen. Cliccare di nuovo per tornare indietro. F. REC. I video sono salvati come file AVI. G. Playback Time Search. Cliccando su 24 , verrà visualizzata la finestra di Time Search. Manuale Utente LISTA EVENTI Selezionare un HDD per visualizzare la lista eventi sull’HDD master o slave. Per riprodurre l’evento selezionato fare doppio click con il pulsante sinistro del mouse. TIME SEARCH Inserire Data e Ora e cliccare su Search per avviare la riproduzione. H. Pannello di controllo PTZ Quando un determinato canale è connesso con una videocamera PTZ, viene visualizzato il pannello di controllo PTZ. 25 TVV6204LUV 6.4 Configurazione 6.4.1 Informazioni sul sistema • INFORMAZIONI SUL SISTEMA NOME SERVER: Il nome sarà visualizzato sull’IP Installer. LINGUA: Inglese, cinese classico e cinese semplificato. Dopo aver selezionato la lingua, apparirà questa finestra di dialogo che chiederà all'utente di confermare. • IMPOSTAZIONE ORA NTP SERVER: Sincronizza con il server Network Time Protocol dalla porta 123, dopo aver cliccato su Apply o dopo il riavvio del DVR. INSERIRE DATA E ORA: Possibilità di sincronizzazione con l’ora del PC o di inserimento da parte dell’utente. 26 Manuale Utente 6.4.2 Gestione utente L’User Management prevede 3 livelli di autorità: Administrator (il più alto), User, e Anonymous. Account predefinito dell’administrator: Username: admin Password: admin ANONYMOUS USER LOGIN: YES: È consentito l’accesso a utenti anonimi senza password. NO: Non è ammesso il login di utenti anonimi. USER MANAGEMENT: Add: Inserire Username e Password. Cliccare su Add/Set per salvare. Modify: Cliccare sull’User name selezionato dalla User List. Si aprirà questa finestra. Dopo aver riempito i campi Password e Confirm Password, cliccare su OK Remove: cliccare su un Username della lista utenti e poi su Remove. 27 TVV6204LUV 6.5 IP SETTING IP ASSIGNMENT DHCP: In modalità Dynamic Host Configuration Protocol (DHCP), il server DHCP effettuerà il setting in maniera automatica. STATIC IP: Inserire l’indirizzo IP, la Maschera di Sottorete, e il Gateway basato sull’ambiente della rete PORT ASSIGNEMENT In presenza di condivisione di IP (Router), è necessario settare le seguenti porte per risolvere eventuali conflitti. 6.6 PPPoE PPPoE SETTING Selezionare Enabled per abilitare la conessione ADSL. Username: Username per l’account ADSL. Password: Password per l’account ADSL. Dopo la composizione, apparirà un nuovo indirizzo IP. SEND MAIL AFTER DIALED Selezionare Enabled per abilitare la funzione SEND MAIL AFTER DIALED. SUBJECT Oggetto della mail. 28 Manuale Utente 6.7 DDNS SETTING Selezionare Enabled per abilitare la funzione DDNS. • DYNDNS.ORG DDNS SETTING - DYNDNS.ORG PROVIDER: Selezionare dyndns.org HOSTNAME: L’hostname registrato in DYNDNS.ORG. USERNAME: Lo username registrato in DYNDNS.ORG. PASSWORD: La password registrata in DYNDNS.ORG. SCHEDULE UPDATE: Lasso di tempo per aggiornare l'indirizzo IP. STATE 1. Updating: Aggiornamento informazioni. 2. Idle: Servizio fermo. 3. DDNS registered successfully, now log by http://<username>.ddns.camddns.com: Registrazione riuscita. 4. Updating Failed, the name is already registered. – Registrazione non riuscita, nome già registrato 5. Updating Failed, please check your internet connection. – Registrazione non riuscita, verificare la connessione internet 29 TVV6204LUV 6.7.1 DDNS.CAMDDNS.COM DDNS SETTING – DDNS.CAMDDNS.COM PROVIDER: Selezionare ddns.camddns.com USERNAME: Lo user name registrato in DDNS.CAMDDNS.COM. SCHEDULE UPDATE: Lasso di tempo per aggiornare l’indirizzo IP. STATE a) b) c) d) e) • Updating: Aggiornamento informazioni. Idle: Servizio fermo. DDNS registered successfully, now log by http://<username>.ddns.camddns.com: Registrazione riuscita. Updating Failed, the name is already registered. – Aggiornamento non riuscito, nome già presente Updating Failed, please check your internet connection. – Aggiornamento non riuscito, controllare la connessione internet A/V Setting Audio Enabled: Abilita la trasmissione audio da DVR a PC. Disabled: Disabilita la trasmissione audio da DVR a PC. 30 Manuale Utente 6.7.2 Event Setting MOTION DECTECTION ACTION SETTING È possibile impostare azioni diverse per rilevare il movimento per ogni canale. Rilevato il movimento, verrano inviati email o caricati i file al FTP. SUBJECT Oggetto del mail. INTERVAL Intervallo di tempo fra due email, in caso di invio frequente di messaggi elettronici. 6.7.3 Alarm Setting EXTERNAL ALARM ACTION SETTING È possible impostare azioni diverse di allarme diverso per ogni canale. Attivato l’allarme esterno, verrano inviati email o caricati i file al FTP. SUBJECT Oggetto del mail. INTERVAL Intervallo di tempo fra due email, in caso di invio frequente di messaggi elettronici. 31 TVV6204LUV 6.7.4 Event setting / Mail & FTP MAIL & FTP SETTING Le impostazioni mail ed FTP sono intese per le azioni di rilevamento di movimento e di allarme esterno. Rilevate entrambe le azioni, verranno inviati email o caricati i file al FTP 32 Manuale Utente 7 Intervalli di tempo delle registrazioni 33 TVV6204LUV 34 Manuale Utente 35 TVV6204LUV 36 VIDEORECORDER 4 DIGITAL CHANNEL TVV6204LUV INDEX 1 Introduction......................................................................................................................................................... 39 Feature ............................................................................................................................................................. 39 Specification ..................................................................................................................................................... 39 Hardware ............................................................................................................................................................. 40 2.1 Front Panel....................................................................................................................................................... 40 2.2 Back Panel ....................................................................................................................................................... 41 2.3 External Alarm.................................................................................................................................................. 41 2.3.1 Motion Detection Alarm and External Alarm............................................................................................ 41 2.3.2 Video Loss Alarm..................................................................................................................................... 41 2.4 Terminal Connectors ........................................................................................................................................ 42 2.5 IR Remote Control............................................................................................................................................ 43 2.6 RS-485 Controller............................................................................................................................................. 43 2.7 PTZ (PAN, TILT AND ZOOM) Camera & Joystick Controller .......................................................................... 44 2.8 PTZ SETUP & Front Plane Control .................................................................................................................. 45 2.9 Network ............................................................................................................................................................ 45 System setup ...................................................................................................................................................... 46 3.1 Menu Setup List ............................................................................................................................................... 46 3.2 Live Viewing ..................................................................................................................................................... 47 3.3 System Setup ................................................................................................................................................... 47 3.4 Camera Setup .................................................................................................................................................. 48 3.5 Motion Setup .................................................................................................................................................... 48 3.6 Record Setup ................................................................................................................................................... 49 3.7 Alarm Setup...................................................................................................................................................... 50 3.8 Event List.......................................................................................................................................................... 51 3.9 HDD Management............................................................................................................................................ 52 3.10 Network Setup ............................................................................................................................................. 53 3.11 Firmware Update ......................................................................................................................................... 53 3.12 CD/DVD RW Backup ................................................................................................................................... 54 3.13 Load Default................................................................................................................................................. 54 DVR Playback & USB Backup ........................................................................................................................... 55 4.1 Play time search............................................................................................................................................... 55 4.2 Event list search ............................................................................................................................................... 55 4.3 USB Backup ..................................................................................................................................................... 55 DVR playback & USB Backup Playback ........................................................................................................... 56 5.1 Main screen setting .......................................................................................................................................... 56 5.2 Player User Interface........................................................................................................................................ 57 Network viewing & playback ............................................................................................................................. 57 6.1 IP Address setup on PC site ............................................................................................................................ 57 6.2 Optional Microsoft Internet Explorer Setup ...................................................................................................... 58 6.2.1 Add to trusted sites .................................................................................................................................. 59 6.2.2 Login ........................................................................................................................................................ 59 6.3 Live viewing...................................................................................................................................................... 60 6.4 Configure.......................................................................................................................................................... 62 6.4.1 System Information.................................................................................................................................. 62 6.4.2 User Management ................................................................................................................................... 63 6.5 IP Setting.......................................................................................................................................................... 64 6.6 PPPoE.............................................................................................................................................................. 64 6.7 DDNS Setting ................................................................................................................................................... 65 6.8 DDNS.CAMDDNS.COM................................................................................................................................... 66 6.8.1 Event Setting ........................................................................................................................................... 67 6.8.2 Alarm Setting ........................................................................................................................................... 67 6.8.3 Event setting / Mail & FTP ....................................................................................................................... 68 Recording Time Lapse ....................................................................................................................................... 69 1.1 1.2 2 3 4 5 6 7 38 User Manual 1 Introduction 1.1 Feature • • • • • • Easy operation; setting can be easily modified on screen. Multi-speed recording selection on normal or alarm recording mode up to 120/ 100 (NTSC/ PAL)) pictures per second. Multi language. Support Manual/ Alarm/ Schedule recording mode. Built-In RS-485 port to control PTZ cameras or Joystick controllers for DVR. Support CDRW, DVDRW, USB, and Network Backup. 1.2 Specification "REAL TIME" visualization Input video channels Loop video Power supply voltage Network connection Recording mode Resolution Video adjustment Protocols Serial interface ports Storage Recording speed Image Compression Alarm input Audio inputs Video outputs Audio outputs Programmable relay outputs Operating temperature Dimensions (W) Dimensions (H) Dimensions (D) by Internet Explorer browser or software 4 4 230V~ ±5% 50Hz 10/100 BaseT Ethernet (RJ-45) Manual / Alarm / Timer / Motion 720(H) x 576(V) pixels brightness; contrast; power PELCO-D, DYNACOLOR RS485 160GB 720x288 (up to 25fps), 360x288 (up to 100fps) MPEG4 4 1 RCA 2 1 RCA 1 0°C ÷ +40°C 432mm 55mm 321mm TVV6204LUV 2 Hardware 2.1 Front Panel N. 1 2 3 4 5 6 Tasto POWER REC PLAY H.D.D. COPY Funzione DVR Power status LED Recording status LED Playback status LED HDD LED Confirm or copy Channel One Full Screen & Number: One. Funzione PTZ 1 7 Channel Two Full Screen & Number: Two. 2 8 Channel Three Full Screen & Number: Three. 3 9 Channel Four Full Screen & Number: Four. 4 10 Quad screen: all cameras are displayed. Quad 11 Recording button. Rec 12 Fast Backward x 32 Zoom out Press STOP to stop playback or recording. Auto scan Auto scan Pause & Field by Field Forward Home Fast Forward x2, x8, x16, x32, x64 Enter or Exit PTZ mode Tasto PLAY e avvia ricerca Quick Time Zoom in Move upward or increase the number Move downward or decrease the number Press MENU to enter or exit MENU Move leftward or decrease the number Move rightward or increase the number. DVD R/W USB connector Confirm Up Down PTZ Setup Left Right Rew search 13 Stop 14 Pause 15 Fwd search 16 17 18 19 20 21 22 23 24 40 Play ▲ ▼ MENU ◄ ► DVD ENTER User Manual 2.2 Back Panel NO. 1 2 ITEM LED Ethernet 3 CAMERA OUT 4 CAMERA IN 5 MONITOR OUT 6 7 8 S VIDEO OUT Audio in / out Ethernet RS-485 9 10 11 12 ALARM IN Relay Power/ Power Switch Power Spot OUT FUNZIONE Reserve. Reserve. Camera 1-4 video output with BNC connector. Camera 1-4 video input with BNC connector. Composite Output can connect with the monitor directly and support two BNC outputs. Y/C Output. (Optional) Audio Input/ Output. RJ-45 Network Interface. 4-Pins. Connect to Joystick controller or PTZ control. 4-Pins. Alarm input. Relay output. Reserve. DC 12V /5A. Spot output 2.3 External Alarm There are three types of alarms that the system can be configured: • Motion Detection Alarm • External Alarm • Video Loss Alarm 2.3.1 Motion Detection Alarm and External Alarm When Motion Detection or External Alarm was triggered, there are 5 possible actions will be taken. • Recording speed changed from normal to alarm recording. • If Alarm Display Mode of Alarm Setup is ON, when the alarm is triggered, the corresponding full screen alarm channel will be displayed automatically; however, if the alarm is triggered and the setup is done within five seconds, the corresponding full screen alarm channel won’t be displayed. • It’s optional to activate Relay. • Motion Detection and External Alarm both will be recorded in the event list. In Motion Detection Record of Alarm Setup, the user can set up ON or OFF to record the motion event or not. • When Motion Detection was triggered, the color of camera title will be transformed into yellow. In addition, when External Alarm was triggered, “ALARM” text will be displayed on the screen. 2.3.2 Video Loss Alarm The default setting of Video Loss Alarm is enabled. The recorded time of Video Loss Alarm depends on the time of buzzer. The event will be added into the event list automatically and Video Loss text will be displayed on the corresponding channel. 41 TVV6204LUV 2.4 Terminal Connectors T+ TRR+ ALARM1-4 GND N.C. COM N.O. Example 1: Connect Alarm In One with PIR (Passive Infrared) Example 2: Connect with Alarm Siren at Relay N.O. 42 RS-485 sends + RS-485 sends RS-485 receives RS-496 receives + Camera alarm input GND Relay N.C. Relay COM Relay N.O. User Manual 2.5 IR Remote Control REC 1–4 QUAD MENU ITEM Press REC to start recording and press twice to stop Select channel 1 – 4 to full screen Show the pictures in QUAD mode Enter or Exit Main Menu Fast backward. Picture by picture backward. Picture by picture forward. Fast Forward. Play video forward. ENTER ▲ ► ▼ ◄ COPY Confirm operation Move upward or increase the number. Move rightward or increase the number. Move downward or decrease the number. Move leftward or decrease the number. Copy the file 2.6 RS-485 Controller RS-485 PIN R+ RT+ T- DEFINE RXDA RXDB TXDZ TXDY Data Format: Data: 1 Byte / Parity: None / Start Bit: 1 / Baud: 9600 Totally 3 bytes as follows: 1. Byte=0x10: Broadcasting DVR 2. Byte=0x80+ID Number :Joystick Control DVR (ID number:1~32) 3. Byte= Tabella seguente di riferimento :Commands of each button. 4. Byte= 1° Byte+ 2° Byte : Command for confirm checksum. 4-ch DVR Command 4-ch DVR Command CH1 0x11 PLAY 0x52 CH2 0x12 UP 0x31 CH3 0x13 DOWN 0x32 CH4 0x14 MENU 0x20 QUAD 0x15 LEFT 0x33 RFAST 0x3A RIGHT 0x34 STOP 0x51 SELECT 0x35 PAUSE 0x3D ENTER 0x35 FFAST 0x3E 43 TVV6204LUV 2.7 PTZ (PAN, TILT AND ZOOM) Camera & Joystick Controller The following diagram is for DVR connect PTZ camera with joystick controllers. Make sure CAMERA ID, BAUD RATE (default at 9600 bps) and RS-485 +/-. If the user wants to connect DVR with joystick controllers, please make sure each DVR ID Number is unique. 44 User Manual 2.8 PTZ SETUP & Front Plane Control Example: A PTZ camera at channel 3 with PELCO-D, 9600bps. 1. Press the channel button 3 with full screen mode 2. Press ►► and “PTZ” will appear at right upper corner REC 2005/10/10 MON 12:00:00 50% 120P PTZ 3. Press the MENU button to get into setup mode 4. Press▲ or ▼ to switch item & by ◄ or ► to ch’ange SPEED/PROTOCOL & BAUD RATE REC 2005/10/10 MON 12:00:00 50% 120P PTZ PTZ SETUP O UP-DOWN SPEED: OOOOO O LEFT-RIGHT SPEED: OOOOO O AUTO SCAN SPEED: OOOOO O PROTOCOL TYPE: PELCO-D O BAUD RATE: 9600 5. Press MENU twice to get back to PTZ control mode 6. Control PTZ camera with key descripted in to paragrapher 2.1 7. Press SEL to quit PTZ control mode 2.9 Network When the DVR is turned on, it will detect the network connection automatically. If without network connection, the network function will be disabled. Thus, please make sure the network connection before turning on the DVR. 45 TVV6204LUV 3 System setup 3.1 Menu Setup List 46 User Manual 3.2 Live Viewing • Quick playback search With live viewing mode, press ► PLAY to get into Quick Time Search and do playback or search by time or event. • PTZ control a) Press the button of PTZ camera no. and the picture will be displayed with full b) screen mode. c) Press ►► to get into PTZ mode and PTZ text with yellow color will be d) displayed at upper right corner. e) Press MENU to set up Protocol & Baud rate between DVR and PTZ f) cameras. g) Press the direction key to control PTZ cameras. h) Press ►► to exit PTZ mode. • Selezione del canale During split channel format, 1, 2, 3, 4, the user can use the channel button to switch different channels with full screen mode. 3.3 System Setup 1. SYSTEM SETUP DATA FORMAT DATE 2007/03/29 Pre TIME AUTO SWITCH DWELL DATE AND TIME OSD SYSTEM TYPE KEYBOARD LOCK ID NUMBER LANGUAGE SELECT PASSWORD MODE EXIT Y-M-D 10:10:10 03 ON NTSC OFF 01 CH/ENG DISABLE Press ▲ or ▼ to select items. Press ◄ or ► to change values DATE FORMAT Press ◄ or ► to switch Y-M-D, M-D-Y, or D-M-Y mode. DATE Press ◄ or ► to change values.. TIME Press ◄ or ► to change values. AUTO SWITCH DWELL Press ◄ or ► to change values. Press key first and then press ►►key , system would into full screen auto switch mode. DATE AND TIME OSD Press ◄ or ► to change values. SYSTEM TYPE NTSC or PAL. KEYBOARD LOCK Press ◄ or ► for ON/OFF modality. OFF:UNLOCK. ON: LOCK. After KEYBOARD LOCK mode setup, set up PASSWORD Without password, un-authorized users could access into SYSTEM SETUP and make changes of settings easily. ID NUMBER Press ◄ or ► to change values. When connecting with the joystick controller, ID NUMBER is required to make difference of each DVR. LANGUAGE SELECT Press ◄ or ► to change OSD language. PASSWORD MODE Press ▲ or ▼ to select items and ◄ or ► to change values. Default password: 1111 47 TVV6204LUV 3.4 Camera Setup 2. CAMERA SETUP CAMERA DISPLAY BRIGHTNESS CONTRAST HUE COLOR CAMERA TITLE EXIT CAM01 ON 50 50 50 50 01 Press ▲ or ▼ to select items. Press ◄ or ► to change values CAMERA Press ◄ or ► to switch channels. DISPLAY Press ◄ or ► to change value for the corresponding camera would be displayed on the screen or not. BRIGHTNESS Press ◄ or ► to change brightness level. CONTRAST Press ◄ or ► to change contrast level. HUE Press ◄ or ► to change HUE level. COLOR Press ◄ or ► to change color level. CAMERA TITLE Press ▲ or ▼ to select items and ◄ or ► to change character. 3.5 Motion Setup 3. MOTION SETUP CAMERA MOTION DETECTION BUZZER SENSITIVITY AREA SETUP EXIT CAM01 ON OFF 080 [<] Press ▲ or ▼ to select items. Press ◄ or ► to change values CAMERA Press ◄ or ► to switch channels. MOTION DETECTION Press ◄ or ► to change value for motion detect function. BUZZER Press ◄ or ► to change value for buzzer while motion detected. SENSITIVITY Press ◄ or ► to change sensitivity value from 001 (minimum) to 100 (maximum). AREA SETUP Press ENTER to enter motion area setting. 1. Press direction keys to select which block is needed. 2. Press ► to add a line of motion detection area. 3. Press ►►to remove a line of motion detection area. 4. Press MENU to quit motion detection area setup. 48 User Manual 3.6 Record Setup 4. RECORD SETUP SCHEDULE RECORD NORMAL RECORD PPS ALARM RECORD PPS RECORD MODE ALARM RECORD DWELL RECORD QUALITY AUDIO RECORD EXIT OFF 30P 30P MUX 10SEC HIGH ON Press ▲ or ▼ to select items. Press ◄ or ► to change values SCHEDULE RECORD Press ◄ or ► to change value for schedule record function. SCHEDULE RECORD SETUP When SCHEUDLE RECORE is ON, press ENTER to enter SCHEDULE RECORD SETUP. RECORD SETUP WEEKDAY: MON-FRI START-STOP TYPE PPS 01-00 [X] 20P 00-01 [0] 20P WEEKEND: SAT-SUN START-STOP TYPE PPS ALL-TIME [X] 20P EXIT ALM PPS 60P 60P Press ▲ or ▼ to select items. Press ◄ or ► to change values ALM PPS 60P WEEKDAY & WEEKEND SCHEDULE RECORD SETUP is divided into two parts, weekday and weekend. They can be set up with different FPS. Example 1: If Weekday is from Monday to Friday, Weekend will be Saturday and Sunday. Example 2: If Weekday is from Wednesday to Friday, Weekend will be from Saturday to Tuesday. Example 3: If Weekday is from Monday to Wednesday, Weekend will be from Thursday to Sunday. Example 1 Example 2 Example 3 MON TUE WEEKDAY WEEKEND WEEKDAY WEB THU FRI WEEKDAY WEEKEND SAT SUN WEEKEND WEEKEND START-STOP 24 Hours can be set with ALL TIME or SEPERATED HOUR modes. 1. ALL TIME Apply the same recording mode and PPS whole day. 2. SEPERATED HOUR Like WEEKDAY & WEEKEND setting, the user can set 24 hours with 2 parts and set 2 different PPS. Example 1: Business Hour: 8am - 16pm. Off Time: 16pm - 8am. Example 2: Business Hour: 10am-20pm. Off Time: 22pm - 10am. 2 4 6 8 10 12 14 16 18 20 Example 1 OFF BUSINESS HOURS OFF Example 2 OFF BUSINESS HOURS 22 24 OFF 49 TVV6204LUV TYPE Press ◄ or ► to change recording mode. A Registrazione solo su allarme O Registrazione full time X Nessuna registrazione PPS Press ◄ or ► to change normal recording picture per second. ALM PPS Press ◄ or ► to change alarm recording picture per second. NTSC 30 / 15 / 10 / 5 / 3 / 2 / 1 PPS PAL 25 / 12 / 10 / 5 / 3 / 2 / 1 PPS NORMAL RECORD PPS Press ◄ or ► to switch PPS in normal recording. ALARM RECORD PPS Press ◄ or ► to switch PPS in alarm recording. RECORD MODE Press ◄ or ► to switch MUX and QUAD record mode. With MUX, the resolution is 720 x 240 (NTSC)/ 720 x 288 (PAL). With QUAD, the resolution is 360 x 240 (NTSC)/ 360 x 288 (PAL). ALARM RECORD DWELL Press ◄ or ► to set dwell time of alarm recording. RECORD QUALITY Press ◄ or ► to switch LOW/ MEDIUM/ HIGH/ BEST. AUDIO RECORD Press ◄ or ► to switch AUDIO RECORD ON or OFF. NOTE: In Duplex mode, the audio is disabled on playback. 3.7 Alarm Setup 5. ALARM SETUP BUZZER BUZZER ALARM DWELL VIDEO LOSS ALARM AUDIBLE ALARM EXT. ALARM MODE ALARM DISPLAY MODE MOTION EVENT RELAY EXT. ALARM RELAY VIDEO LOSS RELAY MOTION RELAY EXIT 05SEC ON ON N.C OFF OFF Press ▲ or ▼ to select items. Press ◄ or ► to change values ON ON ON BUZZER A. BUZZER/ ALARM DWELL Press ◄ or ► to set dwell time of BUZZER/ ALARM. VIDEO LOSS ALARM Press ◄ or ► to switch VIDEO LOSS ALARM ON or OFF. C. AUDIBLE ALARM Press ◄ or ► to switch AUDIBLE ALARM ON or OFF. EXT. ALARM MODE Press ◄ or ► to switch EXT. ALARM device ON or OFF. N.C: Normal Close. N.O: Normal Open. ALARM DISPLAY MODE Press ◄ or ► to change value for ALARM DISPLAY MODE with full screen. MOTION EVENT Press ◄ or ► to change value to record MOTION EVENT or not when the motion is detected. 50 User Manual RELAY EXT. ALARM RELAY Press ◄ or ► to change value to trigger EXT. ALARM RELAY or not VIDEO LOSS RELAY Press ◄ or ► to change value to trigger VIDEO LOSS RELAY or not MOTION RELAY Press ◄ or ► to change value to trigger MOTION RELAY or not 3.8 Event List 6. EVENT LIST MASTER PAGE : 001 NO YY/MM/DD HH:MM:SS CH TYPE 01 05/10/10 00:01:00 -- POWER 02 05/10/10 00:02:00 -- RECORD 03 05/10/10 00:03:00 01 V.LOSE 04 05/10/10 00:04:00 02 ALARM 05 05/10/10 00:05:00 03 MOTION 06 05/10/10 00:06:00 -- POWER 07 05/10/10 00:07:00 -- RECORD 08 05/10/10 00:08:00 01 V.LOSE 09 05/10/10 00:09:00 02 ALARM Press ▲ or ▼ to select items. Press ◄ or ► to change values NUMBER Press ▲ or ▼ to select items and ◄ or ► to change pages. Each HDD can record 3000 events, so two HDDs can record 6000 events. On the screen, MASTER or SLAVE of the event list is displayed DD/MM/YY Display the date of the event. Date Format can be set in SYSTEM SETUP. HH:MM:SS Display the time of the event. CHANNEL Display the channel of the event recorded. TYPE Display the type of the event as follows. POWER REGISTR. V. LOSS ALLARM MOTION If the DVR got power loss, it will record the date and time of rebooting If REC button has been pressed, it will record the date and time in the event list When a camera signal is lost, it will record the date, time, and corresponding channel. When ALARM is triggered, it will record the date, time, and corresponding channel. When MOTION is detected, it will record the date, time, and corresponding channel. 51 TVV6204LUV 3.9 HDD Management 7. HDD MANAGEMENT OVERWRITE MODE CAPACITY WARNING HDD FORMAT SETUP EXIT OFF 20% [<] DISK CAPACITY RATIO MASTER SLAVE LEFT 80GB NONE Press ▲ or ▼ to select items. Press ◄ or ► to change values 41% NONE OVERWRITE MODE Press ◄ or ► to change value OVERWRITE MODE ON or OFF. CAPACITY WARNING Press ◄ or ► to change value to 20/ 15/ 10 or 5% with non-overwrite mode. When LEFT RATIO is below the setting, it will enable AUDIBLE ALARM (If AUDIBLE ALARM of BUZZER of ALARM SETUP is ON). HDD FORMAT SETUP HDD FORMAT SETUP HDD PASSWORD PROTECT HDD PASSWORD FORMAT EXIT ENABLE 1111 [<] HDD PASSWORD PROTECT Press ◄ or ► to change value for hard disk format password protection. HDD PASSWORD Press ▲ or ▼ to select items and ◄ or ► to change values. Default password: 1111 FORMAT Press ENTER to get into FORMAT setup. Press ◄ or ► to decide YES or NO and press ENTER to execute [ATTENTION] WILL BE LOST ALL HDD-DATA ARE YOU SURE? ˙YES ˙NO 52 User Manual 3.10 Network Setup 8. NETWORK SETUP TITLE IP MODE IP ADDR SUB NET GATEWAY DNS1 DNS2 HTTP PORT EXIT DVR MAUNAL 192.168.001.220 255.255.255.000 192.168.001.254 168.095.001.001 168.095.192.001 00080 Press ▲ or ▼ to select items. Press ◄ or ► to change values TITLE Press ▲ or ▼ to select items and ◄ or ► to change characters. Here DVR TITLE is shown in IP Installer. IP MODE Press ▲ or ▼ to select items and ◄ or ► to change to STATIC IP or DHCP. IP ADDR Press ▲ or ▼ to select items and ◄ or ► to change IP ADDRESS. SUB NET Press ▲ or ▼ to select items and ◄ or ► to change SUBNET MASK GATEWAY Press ▲ or ▼ to select items and ◄ or ► to change Default GATEWAY. DNS1 Press ▲ or ▼ to select items and ◄ or ► to change DNS. DNS2 Press ▲ or ▼ to select items and ◄ or ► to change OTHER DNS. HTTP PORT Press ▲ or ▼ to select items and ◄ or ► to change WEB PAGE PORT 3.11 Firmware Update 9 FIRMWARE UPDATE FIRMWARE UPDATE START [<] Press ENTER to start firmware update. After updated, the DVR will reboot automatically. At this moment, please do not turn off the DVR manually. NOTE: Please format USB flash memory with FAT32 53 TVV6204LUV 3.12 CD/DVD RW Backup 10. CD/DVD RW BACKUP START TIME SETUP [<] START: 2006/11/20 00:00:00 END : 2006/11/20 02:00:00 BACKUP SIZE: 0000MB CLOSE DISK: YES ERASE DISK: NO BACKUP START: [<] EXIT Press ▲ or ▼ to select items. Press ◄ or ► to change values START TIME SETUP Press ENTER into START TIME SETUP menu. And, press ▲ or ▼ to select items and ◄ or ► to change numbers. Press ENTER again to confirm START TIME. Then, system will search START TIME automatically and back to CD/DVD RW BACKUP. BACKUP SIZE Press ◄ or ► to change backup size and END TIME will be changed automatically. CLOSE DISK Press ◄ or ► to make CD / DVD write in data again or not. YES: CD / DVD won’t write in data anymore. System will block the inner ring on the disk and no more data can't be written in; otherwise, using CDRW/ DVDRW & Erase Disk Function. NO: Keep CD / DVD in writable status until CD is full. ERASE DISK Press ◄ or ► to delete data on CD RW / DVD RW or not. YES: Erase all data on CD RW / DVD RW. System will remove all data on CD RW / DVD RW rather than CD R/ DVD R. NO: Keep all data on CD RW / DVD RW. BACKUP START Press ENTER to start backup. Please make sure there is CD / DVD in CDRW / DVDRW burner and press ENTER to start backup. After backup finished, CDRW / DVDRW burner will eject CD / DVD automatically. BACKUP FILE Each backup file will be named as START TIME. Example 1: 11201817 is Nov. 20th 18:17 3.13 Load Default Press ENTER to load the system default setting, and “LOAD DEFAULT!” will be displayed on the screen until recover finished. 54 User Manual 4 DVR Playback & USB Backup QUICK TIME SEARCH PLAY TIME SEARCH EVENT LIST SEARCH In live viewing mode, press ► or PLAY into QUICK TIME SEARCH and press ▲ or ▼ to enter search mode 4.1 Play time search PLAY TIME SEARCH YYYY/MM/DD HH:MM:SS 2006/11/20 00:01:00 [MASTER HDD] START TIME: 2006/11/20 00:00:00 END TIME: 2006/11/20 02:00:00 [SLAVE HDD] START TIME: 2006/11/20 00:00:00 END TIME: 2006/11/20 02:00:00 Press ▲ or ▼ to change numbers and ◄ or ► to select items. Press ENTER to start playback or press LIVE back to live viewing. 4.2 Event list search EVENT MASTER PAGE : 001 NO YY/MM/DD HH:MM:SS CH TYPE 01 05/10/10 00:01:00 -POWER 02 05/10/10 00:02:00 -RECORD 03 05/10/10 00:03:00 01 V.LOSE 04 05/10/10 00:04:00 02 ALARM 05 05/10/10 00:05:00 03 MOTION 06 05/10/10 00:06:00 -POWER 07 05/10/10 00:07:00 -RECORD 08 05/10/10 00:08:00 01 V.LOSE 09 05/10/10 00:09:00 02 ALARM 10 05/10/10 00:10:00 03 MOTION Press ▲ or ▼ to select items and press ENTER to start playback or press LIVE back to live viewing. 4.3 USB Backup Due to each USB device with different USB driver ICs, their compatibilities differ, too. This system is compatible with most of USB flash memory. If there is compatible issue, please refer to APPENDIX B. In addition, please format USB flash memory with FAT32 BEFORE BACKUP A. In live viewing mode, insert USB device into a USB port of the DVR live. B. Get into playback mode by PLAY TIME SEARCH or EVENT LIST SEARCH and play back videos that are going to be as backup. VIDEO BACKUP In modalità multiplexer o schermo interno, premere REC per iniziare il backup. Ripremerlo per terminarlo. Il sistema inizierà il backup automaticamente. PICTURE BACKUP In multiplexer or full screen mode, press ► and pressREC. The system will start backup picture by picture. BACKUP FILE NAME Each backup file will be named as START TIME. EXAMPLE: 11201817.IN is Nov. 6th 18:17 AFTER BACKUP After backup, the system will copy “player.exe” automatically on USB device for the user to play back backup file. 55 TVV6204LUV 5 DVR playback & USB Backup Playback SYSTEM REQUIREMENT: CPU: Intel Pentium III 1G or above. MEMORY: 512 MB or above. VGA: 32MB/64MB or above. OS: Microsoft Windows XP SP2 or above. RESOLUTION VGA: 1024*768 or above. 5.1 Main screen setting a) Main Screen b) Open a disk drive that is with USB Backup files (e.g. F:) or other folder that is with Backup files. Each backup file will be named as START TIME. ESEMPIO EXAMPLE: 11201817.IN is Nov. 6th 18:17 c) Click on File Player (AVI File Playback) or Image Viewer (Picture by Picture Playback) and the following message will popup. And then, open the file for playback. 56 User Manual 5.2 Player User Interface AVI FILE BACKUP PICTURE BY PICTURE BACKUP SCREEN FORMAT 6 Network viewing & playback CPU: Intel Pentium III 1G or above. Memoria: 512 MB or above. VGA: 32MB/64MB or above. OS: Microsoft Windows XP SP2 or above. RISOLUZIONE VGA: 1024*768 or above. 6.1 IP Address setup on PC site Install cameras inside in LAN or use cross-over interlaced network cable to connect with PC. This is for IPInstallerEng.exe to set up IP address of cameras. If OS is Windows XP SP2 or above, the following Windows Security Alert will popup. Then, please click on Unblock. NOTE: Please input correct network parameters without blank spaces. On Device Lists, it lists all servers. Click on one server and then its IP setting will show on the right side. After editing the parameters and clicking on Submit, the following dialogue box will popup. And, it will reboot the device with new parameters. 57 TVV6204LUV 6.2 Optional Microsoft Internet Explorer Setup a) IE > Tools > Internet Options > Security > Custom Level > Security Settings > Download insigne ActiveX controls > Enable or Prompt (recommend). b) IE > Tools > Internet Options > Security > Custom Level > Security Settings > Initialize and script Active X controls not marked as safe > Enable or Prompt (recommend). Above three options are all based on select as the prompt. As indicated in the dialogue box. Please select “YES” 58 User Manual 6.2.1 Add to trusted sites IE >Tools > Internet Options > Security > Trusted sites > Sites 6.2.2 Login INSTALL ACTIVEX START INSTALL ACTIVEX LOGIN: ACCOUNT & PASSWORD After IP setup and connect to network or LAN, type IP address on IE Browser directly. The following User name & Password Login window will popup. Default username: admin Default password: admin 59 TVV6204LUV 6.3 Live viewing DVR CONFIGURATION Ge tinto DVR network menu. SYSTEM TIME Live viewing mode: The current live viewing time. SCREEN FORMAT Switch screen format and click twice to switch different channels with full screen. Snapshot. Full Screen Click again to return. REC Videos are saved as AVI file. Playback Time Search. Click 60 , the following Time Search window will popup. User Manual Event List Select a HDD to list EVENT LIST on Master or Slave HDD. Click the left button of the mouse twice to play back the selected event. Time Search Input Date and Time and click to playback PTZ control Panel If a certain channel is connected with a PTZ camera, PTZ control panel will be displayed as below. 61 TVV6204LUV 6.4 Configure 6.4.1 System Information SERVER NAME: This name will show on the IP Installer. LANGUAGE: There are English, Traditional Chinese, and Simplified Chinese. After selecting one language, the following dialogue box will popup and ask the user to confirm. TIME SETTING NTP SERVER: Synchronize with Network Time Protocol server from port 123, after pressing Apply or reboot DVR. INPUT DATE & TIME: Choose synchronize with PC’s time or input Date and Time by the user. 62 User Manual 6.4.2 User Management User Management provides 3 levels of limits of authority: Administrator (the highest), User, and Anonymous. Default administrator account: Username: admin Password: admin Anonymous user login: YES: Accept anonymous user login without password as guest login. NO: Anonymous login unacceptable. User management: Add: Input Username and Password and then click on Add/Set to save. Modify: Click on selected User name on User List and the following window will popup. After inputting Password and Confirm Password, click on OK Remove: Click on selected User name on the user list and click on Remove. 63 TVV6204LUV 6.5 IP Setting Ip assignment DHCP: In Dynamic Host Configuration Protocol (DHCP) mode, DHCP server will get setting done automatically. STATIC IP: Please input IP address, Subnet Mask, and Gateway based on network environment Port assignement With IP Share (Router), the following Ports needed to be adjusted in case of conflict. 6.6 PPPoE PPPoE SETTING Click on Enabled to enable ADSL dial function. Username: Username for ADSL account. Password: Password for ADSL account. After dialed successfully, new IP address will appear. SEND MAIL AFTER DIALED Click on Enabled to enable SEND MAIL AFTER DIALED function. SUBJECT Mail subject. 64 User Manual 6.7 DDNS Setting Click on Enabled to enable DDNS function. • DYNDNS.ORG DDNS SETTING - DYNDNS.ORG PROVIDER: Select dyndns.org HOSTNAME: The registered hostname in DYNDNS.ORG. USERNAME: The registered username in DYNDNS.ORG. PASSWORD: The registered password in DYNDNS.ORG. SCHEDULE UPDATE: A period of time to update IP address. STATE 1. Updating: Information update. 2. Idle: Stop service. 3. DDNS registered successfully, now log by http://<username>.ddns.camddns.com: Registered successfully. 4. Updating Failed, the name is already registered. 5. Updating Failed, please check your internet connection 65 TVV6204LUV 6.8 DDNS.CAMDDNS.COM DDNS SETTING – DDNS.CAMDDNS.COM PROVIDER: Select ddns.camddns.com USERNAME: The registered username in DDNS.CAMDDNS.COM. SCHEDULE UPDATE: A period of time to update IP address. STATE 1. Updating: Information update. 2. Idle: Stop service. 3. DDNS registered successfully, now log by http://<username>.ddns.camddns.com: Registered successfully. 4. Updating Failed, the name is already registered. 5. Updating Failed, please check your internet connection A/V Setting Audio Enabled: Enable the audio transmission from DVR to PC. Disabled: Disable the audio transmission from DVR to PC. 66 User Manual 6.8.1 Event Setting MOTION DECTECTION ACTION SETTING Motion detection action can be set up on each channel individually. After the motion is detected, it will trigger emails or upload files to FTP. SUBJECT Mail Subject. INTERVAL The interval time between two emails in case the mail is sent out too frequently. 6.8.2 Alarm Setting EXTERNAL ALARM ACTION SETTING External alarm action can be set up on each channel individually. After the external alarm action is detected, it will trigger emails or upload files to FTP. SUBJECT Mail Subject. INTERVAL The interval time between two emails in case the mail is sent out too frequently. 67 TVV6204LUV 6.8.3 Event setting / Mail & FTP MAIL & FTP SETTING Mail and FTP settings are for motion detection action and external alarm action. When both actions are detected, it will trigger emails or upload files to FTP 68 User Manual 7 Recording Time Lapse 69 TVV6204LUV 70 User Manual 71 TVV6204LUV 72 089YRDIE–1.00
Scarica