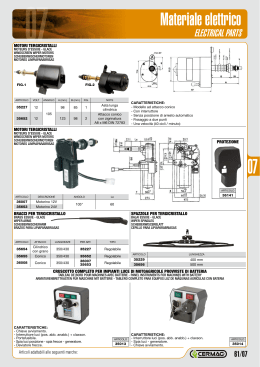
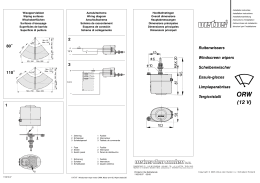
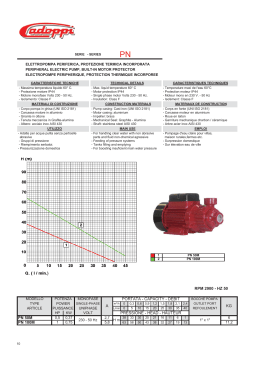
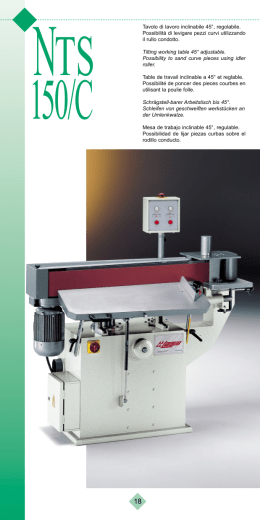
Installatie instructies
Installation instructions
Installationsvorschriften
Instructions d’installation
Instrucciones de instalación
Istruzioni per l’installazione
NEDERLANDS
ENGLISH
DEUTSCH
FRANÇAIS
ESPAÑOL
ITALIANO
Ruitenwissers
Windscreen wipers
Scheibenwischer
Essuie-glaces
Limpiaparabrisas
Tergicristalli
HDM
C o p y r i g h t © 1 9 9 2 , 2 0 0 1 Ve t u s d e n O u d e n n . v. S c h i e d a m H o l l a n d
ENGLISH
NEDERLANDS
Algemeen
General
Bepaal de plaats waar de ruitenwisser gemonteerd moet worden.
Bepaal of er voldoende ruimte voor de wissermotor is (zie
‘Hoofdafmetingen’).
Locate mounting position of wiper assembly.
Determine whether adequate space is available for the wiper
motor (see ‘Overall dimensions’).
Wiped angle (diagram 1)
Wishoek (tekening 1)
De wishoek van de ruitenwissermotor is traploos variabel in te
stellen tussen 62˚en 92˚.
Wijzigen wishoek:
- Verwijder de deksel
- Draai de borgmoer A los
- Verkleinen wishoek: Draai de bout B rechtsom
- Vergroten wishoek: Draai de bout B linksom
- Draai na het instellen van de wishoek borgmoer A weer aan
- Breng de deksel weer aan
Parkeerstand (tekening 2)
Voordat de wishoek gewijzigd wordt, dient de wissermotor in de
parkeerstand te staan.
Sluit ter controle de min (‘-’) draad en draad ‘P’ aan op de accu.
Indien de motor nog niet in de parkeerstand staat, zal deze
gaan draaien en in de parkeerstand tot stilstand komen.
Controleer of de spanning vermeld op de wissermotor overeenkomt met de boordspanning!
Wijzigen parkeerstand:
1 Verwijder de deksel
2 Haal de arm A los van de beugel B
3 Verwijder de moer C
4 Neem de beugel B los van de elektromotor-as en draai de
beugel 180˚
The wiped angle of the windscreen wiper motor can be set at
any point between 62 and 92 degrees.
Adjusting the wiped angle:
- Remove the lid
- Loosen safety nut A
- Reducing wiped angle: Turn bolt B to the right
- Enlarging wiped angle: Turn bolt B to the left
- After setting the wiped angle, replace safety nut A
- Replace the cover
Parked position (diagram 2)
Before the parked position can be adjusteded, the wiper motor
should be in the parked position.
To check this, connect the negative (‘-’) wire and the ‘P’ wire to
the battery. If the motor is not in the parked position, it will turn
until it stops in the parked position.
Check that the voltage marked on the wiper motor is the same
as the on-board voltage!
Changing the parked position:
1 Remove the cover
2 Remove arm A from bracket B
3 Remove nut C
4 Remove bracket B from the electromotor shaft and rotate the
bracket 180 degrees.
Assemble the entire unit in the reverse order.
Monteer het geheel in omgekeerde volgorde.
Installation
Montage
Teken het asgat (ø 20) en het gat voor de hulpas (ø 12) af. Boor
de gaten.
Monteer de wissermotor met de meegeleverde ringen en moeren.
Plaats de wisserarm op de as. Controleer nadat de bedrading
is aangesloten de positie van de wisserarm op de as en de
ingestelde lengte van de wisserarm.
Elektrische installatie
Controleer of de spanning vermeld op de wissermotor overeenkomt met de boordspanning!
De minimale draaddoorsnede van de aansluitkabels is 2,5 mm2.
Sluit de wissermotor aan volgens het schema.
Neem in de plus (‘+’) draad een schakelaar en een zekering*
of een automatische circuit breaker* op.
*) Zekering of circuit breaker:
bij 12 Volt 16 A
bij 24 Volt 8 A
Onderhoud
Mark the shaft hole (ø 20) and hole for the help shaft (ø 12). Drill
the holes.
Fit the wiper motor with the washers and nuts supplied.
Fit the wiper arm on the spindle. When the wiring has been
connected up, check the position of the wiper arm on the spindle and the length of the wiper arm.
Electrical installation
Make sure that the voltage stamped on the wiper motor is identical as the ship’s power supply voltage!
The minimum cross-section for the connecting cables is 2.5 m2
(AWG 14). Connect wiper motor as per wiring diagram.
A switch and fuse* or automatic circuit breaker* must be incorporated in the positive cable.
*) Fuse or circuit breaker:
16 A for 12 Volt system
8 A for 24 Volt system
Maintenance
When sailing on sea-water it is recommended to rinse wiper
arm, wiper blade and motor shaft regularly with fresh water.
Bij varen op zoutwater dienen de wisserarm, het wisserblad en
de motoras regelmatig met schoon (zoet) water te worden afgespoeld.
2
11.0204
Windscreen wipers HDM
FRANÇAIS
DEUTSCH
Allgemeines
Généralités
Bestimmen Sie die Stelle, wo der Scheibenwischer montiert
werden soll.
Überprüfen Sie, ob genügend Platz für den Scheibenwischermotor (siehe ‘Hauptabmessungen’) vorhanden ist.
Déterminer l’emplacement où l’essuie-glace doit être monté.
S’assurer qu’il y a suffisamment de place pour le moteur d’essuie-glace (voir le chapitre ‘Dimensions hors-tout’).
Wischwinkel (Skizze 1)
Angle d’essuyage (dessin 1)
Der Wischerwinkel des Scheibenwischermotors kann stufenlos
variabel zwischen 62° und 92° eingestellt werden.
L’angle d’essuyage des essuie-glaces est réglable en continu
entre 62° et 92°.
Wischerwinkel verändern:
- Deckel entfernen.
- Sicherungsmutter A losdrehen.
- Wischerwinkel verkleinern: Die Schraube B nach rechts
drehen.
- Wischerwinkel vergrößern: Die Schraube B nach links
drehen.
- Nach der Einstellung des Wischerwinkels die Sicherungsmutter A wieder festdrehen.
- Deckel anbringen.
Pour modifier l’angle d’essuyage :
- Enlever le capot
- Dévisser l’écrou de sécurité A
- Pour réduire l’angle d’essuyage : Tourner le boulon B vers
la droite
- Pour augmenter l’angle d’essuyage : Tourner le boulon B
vers la gauche
- Une fois le réglage effectué, resserrer l’écrou de sécurité A
- Remettre en place le capot
Parkstellung (Skizze 2)
Position de retour (dessin 2)
Bevor die Parkstellung verändert wird, muss der
Scheibenwischermotor in der Parkstellung stehen.
Schließen Sie zur Kontrolle den Minus-(‘-’)-Draht und Draht ‘P’
an die Batterie. Falls der Motor noch nicht in der Parkstellung
steht, wird er drehen und in der Parkstellung zum Stillstand
kommen.
Kontrollieren Sie, ob die auf dem Scheibenwischermotor
angegebenen
Spannung
mit
der
Bordspannung
übereinstimmt!
Avant de procéder à la modification de la position de retour, le
moteur d’essuie-glace doit être en position de retour.
Pour s’en assurer, raccorder le fil moins (‘-’) et le fil ‘P’ à la batterie. Si le moteur n’est pas encore en position de retour, il se
mettra en route et s’arrêtera en position de retour. Vérifier que
la tension indiquée sur le moteur d’essuie-glace correspond à
la tension de bord !
Veränderung der Parkstellung:
1 Deckel entfernen.
2 Die Schraube A vom Bügel B lösen.
3 Die Mutter C entfernen.
4 Den Bügel B von der Elektromotorwelle entfernen und den
Bügel 180° drehen.
Alles in umgekehrter Reihenfolge wieder montieren.
Montage
Das Wellenloch (ø 20) und das Loch für die Hilfswelle (ø 12)
markieren. Die Löcher bohren.
Montieren Sie den Scheibenwischermotor mit den
mitgelieferten Ringen und den Muttern.
Setzen Sie den Wischerarm auf die Achse. Überprüfen Sie nach
dem Anschließen der Verkabelung die Position des
Wischerarmes auf der Achse sowie die eingestellte Länge des
Wischerarmes.
Pour modifier la position de retour:
1 Enlever le capot
2 Détacher le bras A de l’armature B
3 Enlever l’écrou C
4 Détacher l’armature B de l’axe du moteur et faire pivoter l’armature de 180°
Remonter le tout dans l’ordre inverse.
Installation
Marquer le trou de l’axe (ø 20) et le trou de l’axe auxiliaire
(ø 12). Percer les trous.
Monter le moteur d’essuie-glace avec les rondelles et l’écrou
fournis.
Positionner le bras d’essuie-glace dans l’axe. Après avoir raccordé le câblage, vérifier la position du bras d’essuie-glace
dans l’axe et la longueur réglée du bras d’essuie-glace.
Installation électrique
Elektrischer Anschluß
Kontrollieren Sie, ob die auf dem Scheibenwischermotor angegebene Spannung mit der Bordspannung übereinstimmt!
Der minimale Drahtdurchmesser des Anschlußkabels beträgt
2,5 mm2. Schließen Sie den Scheibenwischermotor gemäß des
Schemas an. Nehmen Sie in den Plus(+)Draht einen Schalter
und eine Sicherung* oder einen automatischen Circuit
Breaker* auf.
*) Sicherung oder Circuit Breaker:
bei 12 Volt 16 A
bei 24 Volt 8 A
Vérifier que la tension indiquée sur le moteur d’essuie-glace
correspond à la tension de bord!
Le diamètre minimum des câbles de raccordement est
2,5 mm2. Connecter le moteur d’essuie-glace conformément au
schéma électrique.
Prévoir un interrupteur et un fusible* ou un coupe-circuit* automatique sur le câble positif (+).
*) Fusible ou coupe-circuit:
16 A pour 12 Volts
8 A pour 24 Volts
Wartung
Entretien
Beim Fahren in Salzwasser müssen der Scheibenwischer-arm,
das Wischerblatt und die Motorachse regelmäßig mit sauberem
(Süß) Wasser abgespült werden.
Lors d’une navigation en eau salée, rincer régulièrement avec
de l’eau propre (douce) le bras et le balai des essuie-glaces
ainsi que l’arbre moteur.
Windscreen wipers HDM
11.0204
3
ESPAÑOL
ITALIANO
En general
Generalità
Determinar el lugar donde montar el limpiaparabrisas.
Determinar si hay suficiente espacio para el motor de limpiaparabrisas (véanse ‘Dimensiones principales’).
Determinare il punto in cui va montato il tergicristallo.
Determinare se c’è spazio sufficiente per il motore (vedi ‘Misure
principali’).
Ángulo de barrido (figura 1)
Angolo di pulitura (disegno 1)
El ángulo de barrido del motor del limpiaparabrisas se puede
ajustar variablemente sin escalonamientos entre 62° y 92°.
Modificar el ángulo de barrido:
- Retirar la tapa
- Soltar la tuerca de seguridad A
- Reducir el ángulo de barrido: apretar hacia la derecha el tornillo B
- Aumentar el ángulo de barrido: apretar hacia la izquierda el
tornillo B
- Una vez instalado el ángulo de barrido, volver a apretar la
tuerca de seguridad A
- Volver a poner la tapa.
L’angolo di pulitura del motore del tergicristallo può essere
regolato su un qualunque valore compreso tra 62° e 92°.
Modifica dell’angolo:
- Rimuovere il tappo
- Svitare il dado di bloccaggio A
- Riduzione dell’angolo: ruotare il dado B verso destra
- Aumento dell’angolo: ruotare il dado B verso sinistra
- Dopo avere regolato l’angolo, serrare nuovamente il dado di
bloccaggio A
- Rimontare il tappo
Posizione di stazionamento (disegno 2)
Posición de estacionamiento (figura 2)
Antes de modificar la posición de estacionamiento, es preciso
que el motor del limpiaparabrisas esté en la posición de estacionamiento.
Para verificación, conectar el hilo negativo (‘-‘) y el hilo ‘P’ en la
batería. Si el motor todavía no está en la posición de estacionamiento, el mismo se pondrá en marcha y se detendrá en la
posición de estacionamiento.
¡Controlar si la tensión indicada en el motor del limpiaparabrisas coincide con la tensión de a bordo!
Modificación la posición de estacionamiento:
1 Retirar la tapa
2 Desprender el brazo A de la abrazadera B
3 Retirar la tuerca C
4 Desprender la abrazadera B del eje del electromotor y girar
180° la abrazadera.
Montar el conjunto en orden inverso.
Instalación
Demarcar el orificio de eje (ø 20) y el orificio para el eje auxiliar
(ø 12). Taladrar los orificios.
Montar el motor del limpiaparabrisas con las arandelas y la
tuerca suministradas.
Colocar el brazo de escobilla en el eje. Conectado el cableado,
controlar la posición del brazo de escobilla en el eje y el largo
ajustado del brazo de escobilla.
Prima di modificare la posizione di stazionamento, assicurarsi
che il motore del tergicristallo si trovi in posizione di stazionamento.
Per controllo, collegare il cavo negativo (‘-’) ed il cavo ‘P’ alla
batteria. In questo modo, se il motore non si trovasse ancora
nella posizione di stazionamento, ruoterebbe fino ad arrestarsi
in tale posizione. Controllare che la tensione indicata sul motore del tergicristallo corrisponda alla tensione di bordo!
Modifica della posizione di stazionamento:
1 Rimuovere il tappo
2 Staccare il braccio A dalla staffa B
3 Rimuovere il dado C
4 Staccare la staffa B dall’asse del motore elettrico e ruotare la
staffa di 180°
Rimontare il tutto procedendo in senso inverso.
Installazione
Marcare il foro per l’asse (ø 20) ed il foro per l’asse ausiliario
(ø 12). Praticare i fori.
Montare il motore del tergicristallo servendosi delle rondelle e
del dado in dotazione.
Collocare il braccio del tergicristallo sull’asse. Dopo avere collegato i cavi, controllare la posizione del braccio sull’asse e la
lunghezza del braccio impostata.
Installazione elettrica
Instalación eléctrica
¡Controlar si la tensión indicada en el motor de limpiaparabrisas coincide con la tensión a bordo! El diámetro mínimo de hilo
de los cables de conexión es de 2,5 mm2.
Conectar el motor de limpiaparabrisas de acuerdo con el
esquema. Incluir en el hilo (+) un interruptor y un fusible* o cortacircuitos automático*.
Controllare che la tensione indicata sul motore del tergicristallo
corrisponda alla tensione di bordo!
Il diametro minimo dei cavi dell’allacciamento è di 2,5 mm2.
Collegare il motore seguendo lo schema seguente.
Inserire nel cavo più (+) un interruttore e un fusibile* oppure un
interruttore automatico*.
*) Fusibile o interruttore automatico:
*) Fusible o cortacircuitos:
con 12 Voltios 16 A
con 24 Voltios 8 A
Mantenimiento
Si se navega por agua salada con regularidad se aclararán
con agua limpia (dulce) el brazo de la escobilla, la lámina de la
escobilla y el eje motor.
4
11.0204
con 12 Volt 16 A
con 24 Volt 8 A
Manutenzione
Per la navigazione in acqua di mare il braccio del tergicristallo,
la spazzola e l’asse del motore devono essere puliti regolarmente con acqua pulita (dolce).
Windscreen wipers HDM
Wisoppervlakken
Surfaces d’essuyage
Wiping surfaces
Superficies de barrido
Wischoberflächen
Superficie di pulitura
Windscreen wipers HDM
62˚ - 92˚
(62˚ - 92˚)
A:
D:
508
838
(20”)
(33”)
B:
C:
105 - 23
523 - 731
(4.14” - 0.91”)
(20.6” - 28.77”)
A:
D:
762
1092
(30”)
(43”)
B:
C:
323 - 199
785 - 1096
(12.72” - 7.85”)
(30.90” - 43.16”)
11.0204
5
Wishoek
1
Wiping angle
Wischwinkel
Angle d’essuyage
Ángulo de barrido
Angolo di pulitura
Parkeerstand
2
Park position
Parkstellung
Position de retour
Posición de
estacionamiento
Posizione di
stazionamento
Installatie
3
Installation
Montage
Installation
Instalación
Installazione
6
11.0204
Windscreen wipers HDM
4
Aansluitschema
Wiring diagram
Anschlußschema
Schéma de raccordement
électrique
Esquema de conexión
Schema di collegamento
Hoofdafmetingen
Overall dimensions
Hauptabmessungen
Dimensions hors-tout
Dimensiones principales
Misure principali
Windscreen wipers HDM
11.0204
7
FOKKERSTRAAT 571 - 3125 BD SCHIEDAM - HOLLAND - TEL.: +31 10 4377700 - TELEX: 23470
TELEFAX: +31 10 4372673 - 4621286 - E-MAIL: [email protected] - INTERNET: http://www.vetus.nl
Printed in the Netherlands
11.0204 I.HDM 12-92 Rev. 10-01
Scaricare