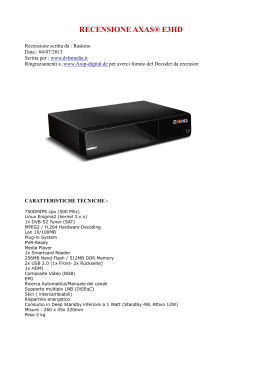
1 2 3 4 5 6 7 8 9 Norme di sicurezza................................................................................................................................... 2 Descrizione prodotto e collegamenti......................................................................................................... 3 2.1 Pannello frontale............................................................................................................................ 3 2.2 Pannello posteriore e connessioni ................................................................................................. 3 2.3 Telecomando ................................................................................................................................. 4 2.3.1 Batterie.................................................................................................................................. 4 2.3.2 Tasti e funzioni del telecomando ........................................................................................... 4 Primo avvio del ricevitore ......................................................................................................................... 5 Menu e sub-menu .................................................................................................................................... 5 4.1 Setup ............................................................................................................................................. 5 4.1.1 Installazione .......................................................................................................................... 5 4.1.2 Impostazione tv ..................................................................................................................... 6 4.1.3 Password .............................................................................................................................. 7 4.1.4 Imposta timer ........................................................................................................................ 7 4.1.5 Aggiornamento SW ............................................................................................................... 7 4.1.6 Imposta predefiniti................................................................................................................. 8 TV ............................................................................................................................................................ 8 5.1.1 Elenco TV.............................................................................................................................. 8 5.1.2 Guida TV ............................................................................................................................... 8 Radio........................................................................................................................................................ 8 6.1.1 Elenco Radio......................................................................................................................... 8 6.1.2 Guida Radio .......................................................................................................................... 8 Struttura del menu.................................................................................................................................... 8 Guida alla risoluzione dei problemi........................................................................................................... 9 Caratteristiche tecniche .......................................................................................................................... 10 Gentile Cliente, Nel ringraziarLa per aver scelto il nostro prodotto, Le ricordiamo che tutte le informazioni riguardanti l’utilizzo dell’apparecchio sono contenute in questo manuale. Oltre ad essere spiegate le diverse funzionalità, sono presenti le norme di sicurezza per la corretta gestione del prodotto. La preghiamo quindi di leggere attentamente il manuale e di conservarlo per il suo utilizzo futuro. Lo staff TELE System Electronic ATTENZIONE! TELE System Electronic Srl comunica, che a seguito di eventuali modifiche software e/o hardware aventi l’obiettivo di migliorare il prodotto, si potrebbero evidenziare incongruenze tra il contenuto di questo manuale ed il prodotto in possesso. Italiano Indice TELE System 1 Norme di sicurezza Per un utilizzo sicuro dell’apparecchio, e per la vostra incolumità, leggere attentamente i seguenti consigli riguardanti le misure di sicurezza. ALIMENTAZIONE Il ricevitore deve essere collegato esclusivamente ad una presa di corrente da 230 Volt ~, 50Hz. Non rimuovere il coperchio del ricevitore. All’interno dell’apparecchio possono essere presenti tensioni superiori a quella di alimentazione che potrebbero mettere a repentaglio la sicurezza dell’utente. L’alta tensione è presente anche quando il dispositivo è in modalità standby, prima di intervenire su di esso, è necessario scollegarlo dalla rete elettrica. La rimozione non autorizzata del coperchio farà decadere immediatamente la garanzia! CAVO DI ALIMENTAZIONE Prima di installare l’apparecchio controllare l’integrità del cavo di alimentazione, prestando particolare attenzione al punto in cui entra nella presa di rete ed a quello in cui esce dal ricevitore. In caso il cavo risultasse danneggiato, non collegare il dispositivo e rivolgersi al centro assistenza. Installare il cavo di alimentazione in modo da non causarne lo schiacciamento con oggetti collocati sopra o accanto ad esso. Evitare inoltre di posizionarlo vicino a zone di passaggio dove possa essere accidentalmente calpestato, strappato o comunque danneggiato. In caso di danneggiamento del cavo, scollegare con attenzione il ricevitore dalla presa di alimentazione e rivolgersi esclusivamente a personale specializzato o al centro assistenza per la riparazione. LIQUIDI Tenere il prodotto lontano da qualsiasi tipo di liquido. Non collocare sull’apparecchio oggetti contenenti liquidi come vasi, umidificatori ecc. Esso non deve essere installato in luoghi in cui possa venire a contatto con spruzzi o schizzi di liquidi o in ambienti con alto tasso di umidità dove possano formarsi condense. Nel caso in cui il ricevitore venga accidentalmente in contatto con liquidi, togliere immediatamente la spina dalla presa di corrente. NON TOCCARE il dispositivo con le mani prima che sia stato scollegato. PICCOLI OGGETTI Tenere lontano dal ricevitore monete o altri piccoli oggetti. La caduta di oggetti all’interno dell’apparecchio, attraverso le fessure per la ventilazione, può causare seri danni. PULIZIA Prima di procedere ad operazioni di pulizia, staccate il dispositivo dalla presa di corrente. Per pulire l’esterno del ricevitore, usare un panno morbido e asciutto o leggermente inumidito d’acqua. Evitare l’uso di prodotti chimici o solventi. VENTILAZIONE Assicurarsi che nel luogo di installazione dell’apparecchio ci sia una buona circolazione d’aria, per consentire una sufficiente dissipazione del calore ed evitare surriscaldamenti. Per consentire una ventilazione adeguata, è opportuno predisporre una distanza minima di 10 cm da entrambi i lati ed una distanza di 15 cm sopra il dispositivo. Le fessure per la ventilazione devono essere libere, non ostruite dalla presenza di oggetti tipo giornali, tovaglie, stoffe da arredamento, ecc. Evitate di installare il ricevitore vicino a fonti di calore (termosifoni, stufe, ecc) o sopra ad altre apparecchiature che producono calore (videoregistratori, lettori DVD, ecc). ATTENZIONE 2 Tenere il prodotto fuori dalla portata dei bambini. I sacchetti di plastica degli imballaggi possono essere pericolosi. Per evitare soffocamenti, tenere i sacchetti lontani dalla portata dei bambini. Non esporre il ricevitore o il telecomando alla luce diretta del sole. L’apparecchio deve essere posto su una base solida e sicura. Collegare il ricevitore alla presa di corrente solo dopo aver completato l’installazione. Non disperdere il prodotto nell’ambiente per evitare potenziali danni all’ambiente stesso e la salute umana e per facilitare il riciclaggio dei componenti/materiali contenuti in esso. Chi disperde il dispositivo nell’ambiente o lo getta insieme ai rifiuti comuni è sanzionabile secondo la legislazione locale vigente. Il produttore istituisce un sistema di recupero dei RAEE del prodotto, oggetto di raccolta separata e sistemi di trattamento, avvalendosi di impianti conformi alle disposizioni vigenti in materia. Portare il prodotto non più utilizzabile (ed eventuali suoi accessori, ivi comprese le batterie) presso un centro di raccolta autorizzato a gestire rifiuti di apparecchiature elettriche ed elettroniche, in quanto non può essere unito ai rifiuti comuni oppure è sempre possibile riconsegnare allo stesso distributore l’apparecchiatura usata o a fine vita all’atto dell’acquisto di una nuova di tipo equivalente. Italiano TS6212 2 Descrizione prodotto e collegamenti 2.1 Pannello frontale 1. 2. 3. 4. 5. Tasto acceso (ON) / standby (ST.BY). ▼ Tasto cambio canale precedente. ▲ Tasto cambio canale successivo. IR Sensore a raggi infrarossi per telecomando. LED Indicatore di stato: se spento il decoder è acceso, se è Rosso il decoder è in stand-by. 2.2 Pannello posteriore e connessioni ATTENZIONE 1. 2. 3. 4. 5. 6. 7. E’ buona regola effettuare le connessioni del dispositivo con altri apparecchi (TV, VCR, HI-FI, etc.) e l’antenna prima di collegarlo all’alimentazione. Con il ricevitore in tensione è possibile infatti che, durante l’inserimento dei connettori, si creino differenze di potenziale elettrico in grado di generare correnti che possono danneggiare gli apparati. La connessione SCART diretta del dispositivo al TV dovrebbe sempre essere fatta come primo test funzionale, in quanto schemi di collegamento più complessi potrebbero portare a malfunzionamenti non riconducibili a guasti e/o difetti dei singoli apparecchi ma a problemi di incompatibilità fra gli stessi. RF IN Ingresso segnale d’antenna. RF LOOP THROUGH Uscita passante segnale d’antenna verso il TV. SPIDF Uscita Audio Digitale Coassiale per amplificatori home-theatre. VCR Presa SCART per la videoregistrazione. TV Presa SCART d’uscita verso il TV. CAVO Cavo di alimentazione integrato per il collegamento alla presa elettrica 230 Volt ~, 50Hz. ON/OFF interruttore acceso/spento 3 TELE System 2.3 Telecomando La conoscenza del telecomando costituisce la base per l’utilizzo del ricevitore e per una facile navigazione tra le varie funzioni e i menu. 2.3.1 Batterie Informazioni ed avvertenze Sostituire o inserire le batterie al primo utilizzo del prodotto o quando il telecomando non risponde più propriamente alla pressione dei tasti. Batterie compatibili: 2 x AAA, 1.5V. Per evitare che la perdita di liquido corrosivo danneggi il telecomando, si consiglia di togliere le pile quando il dispositivo non viene usato per un lungo periodo. Evitare l’utilizzo di differenti tipi di batterie o batterie scariche e nuove contemporaneamente. Inserimento e rimozione Una volta aperto lo sportellino delle batterie posto sul retro del telecomando, inserite le 2 batterie (formato AAA) rispettando le corrette polarità come indicato all’interno del vano. Chiudere quindi lo sportellino. Rimuovere le batterie esaurite, che dovranno essere smaltite separatamente dai rifiuti domestici portandole ad un qualsiasi punto vendita o di raccolta, ripetendo operazioni analoghe a quelle dell’inserimento. 2.3.2 Tasti e funzioni del telecomando 1. 2. 3. 4. 5. 6. 7. 8. 9. 10. 11. 12. 13. 14. 15. 16. 17. 18. 19. 20. 21. 22. 23. 24. 25. 4 STANDBY Accende (ON) / posiziona in Stand-by (ST.BY) il ricevitore. REW ◄◄ / FWD ►► / FILE / ■ STOP Non abilitati. ► PLAY / || PAUSE Fermo immagine FAV richiama le liste dei favoriti VCR Commuta la SCART TV per il passaggio dalla visione programmi del decoder a quelli dell’eventuale dispositivo collegato alla SCART del decoder stesso e viceversa. Tasti colorati Tasti funzione contestuale. AUDIO Scelta traccia e modalità audio. SUB Abilita i sottotitoli Standard (DVB) o Televideo indicizzati. TEXT Televideo. TIMESHIFT Non abilitato. EXIT Esce dal menu visualizzato o dalla funzione in corso. BACK Torna al menu o al canale precedente. FRECCIA ▲/▼ Navigazione tra voci e opzioni del menu. FRECCIA ◄ / ► Modifica parametri/opzioni del menu. OK Ha più funzioni: a. In modo visione: Accesso rapido alla lista canali. b. In modo menu: Conferma azioni/modifiche. PREV ▐◄◄ / NEXT ►►▌ Non abilitato INFO Visualizza informazioni inerenti il canale sintonizzato, come numero e nome canale MENU Accede al menu del ricevitore. VOL+ / VOL- Aumenta/diminuisce il livello del volume audio. CH+ / CH- Cambio canale successivo/precedente. ● Non abilitato. EPG Guida Elettronica ai Programmi. 0÷9 (tasti numerici) Inserimento valori numerici per cambio canale o per modifica di alcuni campi nel menu. TV/RADIO Seleziona i programmi TV o quelli Radio. MUTE Inibisce l’audio del ricevitore. Italiano TS6212 3 Primo avvio del ricevitore Una volta terminato il collegamento del ricevitore (par. 0) ed inserita la spina dell’alimentazione nella presa di rete, il ricevitore si avvierà automaticamente. Se non dovesse accadere, accendere il ricevitore utilizzando l’apposito tasto ON/ST.BY del pannello frontale o del telecomando. Verrà visualizzato a schermo il menu di Installazione, dove si dovranno confermare/modificare alcuni parametri. 4 Menu e sub-menu 4.1 Setup 4.1.1 Installazione Impostazione paese Definire il Paese di installazione del ricevitore tramite tasto freccia ◄/►. Passare al parametro successivo utilizzando il tasto freccia ▼. ATTENZIONE L’impostazione errata del Paese può portare ad un incompleto o al mancato rilevamento dei canali. Lingua OSD Scegliere la lingua del menu a schermo (On Screen Display - OSD) tra quelle disponibili col tasto freccia ◄/►. Premere il tasto freccia ▼ per proseguire con l'impostazione seguente. Lingua audio Scegliere la lingua preferita dell’audio tra quelle disponibili col tasto freccia ◄/► (nel caso che il programma TV sia trasmesso in più lingue il ricevitore selezionerà in automatico quella impostata, se disponibile). Premere il tasto freccia ▼ per proseguire con l'impostazione seguente. Lingua sottotitoli Scegliere la lingua preferita dei sottotitoli tra quelli disponibili col tasto freccia ◄/►(nel caso che il programma TV sia trasmesso con i sottotitoli il ricevitore selezionerà in automatico quelli impostati, se disponibili). Premere il tasto freccia ▼ per proseguire con l'impostazione seguente. LCN Grazie alla funzione di Numerazione Logica dei Canali (Logical Channel Numbering – LCN), dopo la scansione canali, la lista dei servizi TV e Radio trovati verrà ordinata in automatico, secondo la posizione richiesta dalle stesse emittenti televisive. Disattivare/attivare la funzione col tasto freccia ◄/►; si consiglia di tenerla attiva. Andare al passo successivo con il tasto freccia ▼. NOTA Se la Modalità LCN è attiva, è sconsigliato utilizzare la funzione di spostamento canali disponibile nel menu TV – Elenco TV/Radio. Auto Standby Questo ricevitore è dotato di funzione di risparmio energetico: passate tre ore in modo acceso senza alcun comando da parte dell’utente, esso si spegnerà in standby automaticamente. Due minuti prima dello spegnimento, apparirà a video un avviso, tramite il quale l’utente potrà annullare l’interruzione della visione. Scegliere ON per mantenere attiva l’opzione o OFF per disattivarla col tasto freccia ◄/►. Andare al passo successivo con il tasto freccia ▼. AVVERTENZA Prima di definire un timer di accensione-spegnimento o registrazione, dal menu Impostazione – Imposta timer, con una durata maggiore di tre ore, disattivare la funzione di spegnimento automatico. Uso GMT Selezionare col tasto freccia ◄/►: o “ON”: per mantenere la regolazione automatica della data e dell’ora legata al paese impostato. o “OFF” per regolarle manualmente. Andare al passo successivo con il tasto freccia ▼. Fuso Orario Selezionare, col tasto freccia ◄/►, il fuso orario del paese in cui è installato il decoder. Andare al passo successivo con il tasto freccia ▼. 5 TELE System Imposta data o Impostare, con i tasti numerici e il tasto freccia ◄/► e , la data corrente. (non modificabile se l’ opzione “Uso GMT” è impostata su ON). Andare al passo successivo con il tasto freccia ▼. Imposta ora Impostare, con i tasti numerici e il tasto freccia ◄/►, l’ora corrente. (non è modificabile se l’ opzione “Uso GMT” è impostata su ON). Andare al passo successivo con il tasto freccia ▼. Ricerca auto in Standby Scegliere, col tasto freccia ◄/►, la frequenza di aggiornamento dei canali in modalità standby (opzioni disponibili Giornaliero, Settimanale, Mensile e OFF). Andare al passo successivo con il tasto freccia ▼. Ora ricerca auto in Standby Impostare con i tasti numerici e il tasto freccia ◄/►, l’orario della ricerca automatica dei canali in modalità Standby. Andare al passo successivo con il tasto freccia ▼. Funzione Hotel Impostare, col tasto freccia ◄/►, ON per attivare la funzione. AVVERTENZA Una volta attivata la funzione Hotel, l’accesso al menu principale sarà disabilitato, per poter accedere nuovamente al menu principale è necessario disabilitare la funzione Hotel premendo in successione i tasti 16888+OK. Scansione Automatica Premere il tasto rosso “Ricerca Auto” per avviare la ricerca automatica dei canali (verrà richiesto l’inserimento della password). A fine scansione, se non saranno rilevati conflitti sulle posizioni LCN dei canali, il ricevitore passerà in automatico alla modalità di visione. Soluzione Conflitti LCN Se la funzione LCN è attiva (vedi sopra) e più di un servizio richiede la stessa posizione in lista canali, il sistema rileverà il conflitto e proporrà a schermo l’elenco dei canali coinvolti. Posizionarsi sul canale preferito con i tasti freccia ▼ e ▲ e confermare la scelta col tasto OK. Premere Exit per salvare e uscire dalla finestra di scelta. Se l’utente non effettuerà alcuna preferenza, dopo circa un minuto il dispositivo risolverà i conflitti in automatico. Finito questo processo, il ricevitore avvierà la visione dei canali. Ricerca Manuale Premere il tasto verde “Ricerca Man” per avviare la ricerca manuale dei canali (verrà richiesto l’inserimento della password). Tramite il tasto freccia ◄/►, selezionare la frequenza cui si desidera ricercare i canali e premere OK. 4.1.2 Impostazione tv Formato TV Permette di definire i valori del Rapporto d’Aspetto (16:9 Full Screen o 16:9 Pillar Box o 4:3 Letter Box o 4:3 Pan Scan) più adatti alle caratteristiche dello schermo collegato al ricevitore. Modalità TV Permette di scegliere lo standard (Auto, PAL, NTSC) per la ricezione dei segnale TV Trasparenza OSD Permette di variare la trasparenza del menu OSD quando viene richiamato. Durata banner Permette di variare il tempo di visione del banner del canale Output video Permette di definire il valore dell’Uscita Video (RGB o CVBS) più adatti alle caratteristiche dello schermo collegato al ricevitore. Miglioramento Video Permette, tramite la regolazione di due parametri (Tonalità pelle ed Estensione bianco/nero) di adattare l’immagine secondo le caratteristiche della trasmissione, della stanza in cui si trova il televisore e non ultimo del proprio gusto personale. 6 4.1.3 Password Per la modifica di parametri importanti del menu o l’accesso ad eventi protetti tramite Controllo Parentale, il ricevitore richiede l’inserimento di una password numerica a quattro cifre (PIN). Tale codice è predefinito al valore “0000” (quattro volte zero), ma può essere personalizzato tramite l’opzione Cambia password Imp Blocco menu Se impostato su ON l’accesso al menu principale verrà protetto da password. Blocco canale Se impostato su ON, sarà possibile bloccare manualmente e singolarmente i canali, tramite l’opzione Blocca presente sui menu “Elenco TV” o “Elenco Radio” Blocca censura (controllo parentale) La funzione di protezione minori, comunemente chiamata anche Controllo Parentale, permette di attuare un controllo sulla visione di alcuni eventi sensibili. Quando il canale sintonizzato trasmette un evento con informazione di protezione di visione da parte di un pubblico di età uguale o superiore al livello impostato a menu, il ricevitore bloccherà il canale. Apparirà quindi a video la richiesta di sblocco visione canale tramite inserimento del codice PIN (vedi par. 4.1.3). Il livello d’età è predefinito a 18 anni; è possibile modificarlo col tasto freccia ◄/►. Cambia password Permette di modificare a piacimento il codice PIN. ATTENZIONE Annotare e conservare il nuovo codice PIN in un luogo sicuro. Nel caso lo si dimenticasse, utilizzare il codice universale “8888”, col quale si potrà sempre accedere al menu Password per l’impostazione di una nuova password. 4.1.4 Imposta timer Per impostare un timer di accensione e spegnimento del decoder: premere il tasto rosso “Aggiungi”, inserire i dati richiesti e premere OK. 4.1.5 Aggiornamento SW Al fine di apportare migliorie o aggiungere eventuali nuove funzioni del ricevitore, il produttore può rilasciare aggiornamenti software. Si consiglia di tenere sempre aggiornato il ricevitore. Aggiornamento da OTA Il ricevitore è in grado di prelevare, dal segnale digitale terrestre proveniente dall’antenna, i dati dell’aggiormento software, quando esso è trasmesso da un’emittente televisiva. AVVERTENZA L’operazione di scarico ed installazione di un nuovo software, può richiedere diverso tempo, soprattutto in caso di ricezione difficoltosa. Durante tale periodo non interagire col ricevitore e non staccare l’alimentazione: rischio di blocco irreversibile del ricevitore! Manuale Accedere al menu “Aggior SW - Aggiornamento da OTA” e premere OK per avviare la funzione di ricerca manuale di un nuovo aggiornamento software. Automatico Accedere al menu “Aggior SW - Aggiornamento da OTA” per personalizzare la ricerca automatica di un eventuale aggiornamento software. In particolare, si distinguono due casi, a seconda del valore del parametro “OTA in modalità Operativa”: OFF: quando il controllo nuovo software in modalità d’uso (operativo) non è attivo, la ricerca in “Modalità Standby” (se attiva) avverrà singolarmente quarantacinque minuti dopo lo spegnimento in stand.by. ON: attivando l’ “OTA in modalità Operativa”, il ricevitore eseguirà un controllo giornaliero all’orario indicato nel campo Ora e con la frequenza indicata nel campo “Frequenza OTA”. In questo caso, anche il controllo in “Modalità Standby“(se attivo) avverrà solamente all’ora riportata a menu. 7 Italiano TS6212 TELE System 4.1.6 Imposta predefiniti Se necessario, è possibile riportare il ricevitore alle condizioni di fabbrica mediante un reset software. Tale operazione è attuabile premendo il tasto OK del telecomando in corrispondenza del menu “Strumenti Ripristino Impostazioni di Fabbrica”; verrà richiesta conferma. ATTENZIONE L’operazione di reset comporta l’annullamento di tutti i canali memorizzati e delle personalizzazioni effettuate dall'utente, senza comunque la perdita dell’ultima versione software installata. 5 TV 5.1.1 Elenco TV L’accesso alla lista canali permette di modificare e gestire sia la lista stessa che ogni singolo canale. È possibile creare delle liste preferiti, spostare e/o saltare dei canali per creazione di una lista personalizzata; bloccare/rinominare/eliminare uno o più canali. Per l’accesso verrà richiesto l’inserimento del codice PIN. 5.1.2 Guida TV Dalla guida elettronica dei programmi (EPG) è possibile consultare la programmazione televisiva dei singoli canali, prenotare un evento per la visione e/o registrazione dello stesso. NOTA La presenza delle informazioni nella EPG è subordinata all’invio delle stesse da parte delle emittenti televisive. 6 Radio 6.1.1 Elenco Radio L’accesso alla lista canali Radio permette di modificare e gestire sia la lista stessa che ogni singolo canale. È possibile creare delle liste preferiti, spostare i canali Radio per creare una lista personalizzata, bloccare/rinominare/eliminare uno o più canali Radio. l’accesso verrà richiesto l’inserimento del codice PIN. 6.1.2 Guida Radio Dalla guida elettronica dei programmi (EPG) è possibile consultare la programmazione televisiva dei singoli canali Radio, prenotare un evento per la visione e/o registrazione dello stesso. NOTA La presenza delle informazioni nella EPG è subordinata all’invio delle stesse da parte delle emittenti televisive. 7 Struttura del menu Il menu del ricevitore è così strutturato: Impostazione TV Radio ▼ ▼ ▼ - Installazione - Elenco TV - Elenco Radio - Impostazione TV - Guida TV - Guida Radio - Password - Imposta timer - Aggiornamento SW - Imposta predefiniti NOTA La navigazione tra i menu è semplice ed intuitiva. Utilizzare i tasti MENU, BACK, EXIT, cursore (frecce ed OK) e numerici del telecomando. Attenersi inoltre alle indicazioni poste su ogni finestra di dialogo. 8 Italiano TS6212 8 Guida alla risoluzione dei problemi PROBLEMA 1. 2. 3. 4. 5. 6. 7. 8. Il ricevitore è alimentato ma non si vede nessun segnale Video o Audio sul televisore POSSIBILI CAUSE COSA FARE -La spina di alimentazione non è correttamente inserita nella presa di corrente. -La spina è inserita ma il box non funziona ugualmente. -L’interruttore posteriore del ricevitore è sulla posizione spento. - Il ricevitore è accesa su un canale che non trasmette nessun segnale video -Volume audio basso o nullo. -Il segnale d’antenna non c’è o è debole. -Cavo SCART o cavo segnale antenna sconnesso o danneggiato. -Il TV non è commutato sull’apposito canale audio/video. -Controllare che la spina sia inserita correttamente nella presa di corrente. Provare la presa con un altro dispositivo -Dopo aver tolto la spina dalla presa, controllare l’integrità del cavo di alimentazione (Attenzione: pericolo di scossa elettrica!). -Portare sulla posizione 1 l’interruttore posteriore -Provare a premere il tasto di avanzamento canale -Controllare che il volume del TV e del ricevitore non siano a zero. -Controllare il collegamento SCART, l’installazione dell’antenna, la qualità del segnale ricevuto. -Eseguire reset di fabbrica e provare a reinstallare i canali. -Controllare che il TV sia commutato nel canale AV (consultare il manuale operativo del TV). I canali non vengono -Mancanza di segnale d’antenna. -Verificare la presenza di segnale d'antenna caricati -L’impianto d’antenna non è adeguato tramite il ricevitore. al sistema digitale terrestre. -Consultare un installatore di fiducia. -Effettuare una ricerca canali manuale. -Eseguire reset di fabbrica. Le regolazioni impostate -Mancata conferma dopo una modifica -Prima di uscire dal menu premere l’eventuale non sono state delle impostazioni. tasto di conferma. memorizzate. Il telecomando non -Il ricevitore è in standby. -Premere il pulsante ON/ST.BY sul pannello funziona. -Il telecomando non è puntato frontale per verificare il buon funzionamento correttamente verso il sensore del ricevitore. infrarossi del ricevitore. -Verificare che non vi siano ostacoli davanti al -Le batterie sono scariche. pannello frontale. -Le batterie sono cariche ma non -Sostituire le batterie. inserite nel verso corretto. -Controllare il corretto inserimento delle -Il telecomando vi è caduto e i batterie. componenti interni si sono -Rivolgersi al proprio rivenditore per l’acquisto danneggiati. di un nuovo telecomando. Avete dimenticato la -Il PIN predefinito è 0000 (quattro volte zero). Password. I timer programmati non -L’orario del ricevitore non è impostato -Regolare l’orario. funzionano correttamente correttamente. Il Box non interagisce -Blocco momentaneo del ricevitore. -Scollegare l’alimentazione del box per un con i tasti del -Un’emittente trasmette dati errati. minuto e poi ripristinarla. telecomando. -Problemi con il telecomando. -Riavviare il box con l’antenna scollegata, cancellare il canale problematico, poi ripristinare la connessione antenna. Il ricevitore si spegne in - Funzione Auto-Spegnimento attiva automatico. -Disattivare la funzione per il risparmio energetico. AVVERTENZA Generalmente, in caso di comportamento anomalo del ricevitore, un ripristino delle impostazioni di fabbrica tramite reset (par. 4.1.6 Imposta predefiniti) può aiutare a risolvere il problema riscontrato. 9 TELE System 9 Caratteristiche tecniche Tipo prodotto Frequenza in ingresso Larghezza di banda di canale Display Lingue menu OSD menu Televideo (ETSI EN 300 472) Sottotitoli ( ETSI EN 300 706) Guida Elettronica ai Programmi (EPG) Modulatore RF Modem integrato Rapporto di formato video Uscita Audio Digitale Coassiale (SPDIF) Uscita Audio Digitale Ottica (SPDIF) Uscita SCART TV Presa SCART VCR Connettori (RCA) Audio Stereo Connettore (RCA) Video Aggiornamento software Funzione reset di fabbrica Lista canali favoriti Programmazione Timer Auto-spegnimento (risparmio energia) Auto-aggiornamento canali Alimentazione antenna attiva Alimentazione Consumo Dimensioni 10 Ricevitore digitale terrestre (ETSI EN 300 744) per canali in chiaro 147÷230 MHz (VHF) / 470÷862 MHz (UHF) 6 / 7 / 8 MHz 6 : Ita– Rus –Eng – Deu – Fra– Esp ● ● ● ● 4:3 Letter Box / 4:3 Pan Scan / 16:9 Full / 16:9 Pillar Box ● Out: Video RGB / CVBS, audio L+R Out/In: Video CVBS, audio L+R Via etere (OTA) ● ● Accensione e spegnimento ● (disattivabile) ● (disattivabile) 230V~ 50Hz Modo attivo: (Max) 5,0 W Modo stand-by: (Max) 0.96 W 215 x 119 x 33 mm Italiano TS6212 11 Index 1 2 3 4 5 6 7 8 9 Safety regulations..................................................................................................................................... 2 Product description and connections........................................................................................................ 3 2.1 Front panel .................................................................................................................................... 3 2.2 Back panel and connections .......................................................................................................... 3 2.3 Remote control .............................................................................................................................. 4 2.3.1 Batteries ................................................................................................................................ 4 2.3.2 Remote control buttons and functions ................................................................................... 4 First time installation................................................................................................................................. 5 Menu and sub-menus............................................................................................................................... 5 4.1 Setup ............................................................................................................................................. 5 4.1.1 Installation ............................................................................................................................. 5 4.1.2 TV setup................................................................................................................................ 6 4.1.3 Password .............................................................................................................................. 7 4.1.4 Advance Timer ...................................................................................................................... 7 4.1.5 SW update ............................................................................................................................ 7 4.1.6 Factory reset ......................................................................................................................... 7 TV ............................................................................................................................................................ 8 5.1.1 TV list .................................................................................................................................... 8 5.1.2 TV guide................................................................................................................................ 8 Radio........................................................................................................................................................ 8 6.1.1 Radio list ............................................................................................................................... 8 6.1.2 Radio guide ........................................................................................................................... 8 Menu organisation.................................................................................................................................... 8 Troubleshooting guide .............................................................................................................................. 9 Technical specifications.......................................................................................................................... 10 Dear Customer, Thank you for choosing our product. In this manual you will find all the necessary information regarding the use of this appliance. Besides explaining the different functionalities, this manual contains safety regulations for the correct use of this product. Please read the manual carefully and preserve it for future reference. The TELE System Electronic staff CAUTION! TELE System Electronic Srl states that modifications made to software and/or hardware in order to improve the product could result in incongruities between this manual and the product in your possession. 1 Safety regulations We advise you to read the following information concerning the safety regulations carefully in order to ensure safe use of the appliance. ELECTRICAL SUPPLY The receiver must be supplied by a 230 Volt AC, 50Hz current. Do not remove the cover. The inside of the appliance could contain high voltages which could endanger the user. High voltage is also present when the appliance is on standby. The receiver should be disconnected from the power supply before performing an intervention. Non-authorised removal of the cover will mean that the warranty is no longer valid! POWER CABLE Before installing the appliance, make sure the cable is intact, paying particular attention to its connection to the power supply and to the receiver. If the cable is damaged do not attempt to connect the appliance and refer the problem to an authorised centre for assistance. When installing the cable make sure that it can not be flattened in any way by items placed above or next to the appliance. Avoid placing the cable in an area where it could accidentally be stepped on, removed from the wall or damaged in any way. If the cable is damaged in any way carefully disconnect the receiver from the power supply and refer to specialised technicians or to the centre for assistance for repair. LIQUIDS Keep the appliance far from any liquids. Do not place objects containing liquids on the appliance, such as vases, humidifiers, etc. The appliance must not be installed in areas where it could come in contact with sprays or drops of water or in an environment with a high level of humidity where condensation could occur. If the receiver should accidentally come in contact with liquids, immediately disconnect it from the power socket. DO NOT TOUCH the appliance until it has been disconnected. SMALL OBJECTS Keep the receiver away from coins or other small objects. Objects which fall into the appliance via the ventilation gaps could cause serious damage. CLEANING Before cleaning, disconnect the receiver from the power supply. To clean the outside of the receiver use a soft and dry or slightly damp cloth. Avoid using products which contain chemicals or solvents. VENTILATION Make sure that the area where the appliance is to be installed has good air circulation so that the heat can be dissipated well in order to avoid overheating. In order to allow enough ventilation it is necessary to have a distance of at least 10 cm on either side of the appliance and 15 cm above the appliance. The vents must be kept clear of any obstructions such as newspapers, tablecloths, furniture materials, etc. Avoid installing the receiver close to any heat sources (i.e. radiators, stoves, etc.) or on top of any other appliances which omit heat (video recorders or DVD players, etc). WARNING! Keep the appliance out of the reach of children. The plastic bags used for packaging can be dangerous. To avoid suffocating keep the bags out of the reach of children. Do not expose the receiver or remote control to direct sunlight. The appliance must be placed on a solid and stable base. Connect the receiver to the power supply only after installation is complete. Dispose of the product correctly so as to avoid damage to the environment and human health as well as to facilitate recycling of the components/materials in the appliance. If the product is not disposed of properly this could be punishable according to the existing law. The manufacturer recommends that the parts be recycled separately and be taken to sites which conform to current regulations. When no longer usable, take the product (including accessories and batteries), which must be kept separate from regular household waste, to a collection point authorised to handle waste from electrical or electronic appliances. Otherwise, it is possible to return the used or unusable appliance to your distributor when you decide to purchase a new one. 2 English TELE System TS6212 2 Product description and connections 2.1 Front panel 1. 2. 3. 4. 5. ON / Standby (ST.BY) button. ▼ Previous channel. ▲ Next channel. IR Infrared sensor for remote control. LED : if lit on the receiver is in Standby mode, if lit off the the receiver is in operative mode 2.2 Back panel and connections CAUTION! 1. 2. 3. 4. 5. 6. 7. 3 It is good practise to connect the appliance to other devices (e.g. TV, VCR, HI-FI, etc.) and the antenna before plugging in into the main power supply. When the receiver is powered electrical voltage differences may be created when plugging in the jacks, which may generate currents that could damage the devices. The direct TV Scart connection should always be used as a first operating test since other more complex connection sequences could lead to malfunctions that are not caused by faults and/or defects of the actual devices but by problems of incompatibility. RF IN Antenna signal input. RF LOOP THROUGH Loop through antenna signal to TV. SPIDF Coaxial digital audio output for home-theatre amplifiers. VCR Scart connection for video recording. TV Scart output connection for TV. CABLE Integrated power cable for connection to a 230 Volt AC, 50Hz power socket. ON/OFF on/off switch 2.3 Remote control Get well-acquainted with your remote control and you will find it much easier to navigate through the various menu options. 2.3.1 Batteries Information and warnings Substitute or insert the batteries the first time you use the product or when the remote control doesn’t properly respond to pressure on the buttons. Compatible batteries: 2 x AAA, 1.5V. To avoid having corrosive liquid damage the remote control, remove the batteries when the appliance is not used for long periods of time. Avoid using different kinds of batteries or old and new batteries at the same time. Insertion and removal Open the battery cover on the back of the remote control and insert 2 AAA batteries making sure their polarity matches that indicated inside the compartment. Close the cover. Remove used batteries and insert new batteries. The used batteries should be disposed of separately and taken to sites which conform to current regulations. 2.3.2 Remote control buttons and functions 1. 2. 3. 4. 5. 6. 7. 8. 9. 10. 11. 12. 13. 14. 15. 16. 17. 18. 19. 20. 21. 22. 23. 24. 25. STANDBY Turns the receiver on (ON) / or puts it on Standby (ST.BY). REW ◄◄ / FWD ►►/ FILE / ■ STOP Not available. ► PLAY / || PAUSE Freeze image FAV Favourites list. VCR Swap between the TV SCART connection. Go from viewing the decoder’s channels to those of the device connected to the decoder’s SCART and viceversa. Colour buttons Context function buttons. AUDIO Select tracks and audio mode. SUB Activates DVB subtitles or indexed Teletext. TEXT Teletext. TIMESHIFT Not available EXIT Quits current menu or operation. BACK Returns to the previous channel or menu. ▲ / ▼ ARROWS Navigate between menu items and options. ◄ / ► ARROWS Modify menu parameters/options. OK Has several functions: a. In viewing mode: Direct access to channel list. b. In menu mode: Confirm selection/modification. PREV ▐◄◄ / NEXT ►►▌ Not available. INFO View information a. In viewing mode: View information on current channel (i.e. channel number and name). b. In USB mode: View information on the reproduction or recording underway. MENU Main receiver menu. VOL+ / VOL- Volume up/down. CH+ / CH- Next/previous channel. ● Not available. EPG Electronic Program Guide. 0-9 number buttons Select channels or modify some menu fields. TV/RADIO Select TV or Radio programs. MUTE Audio mute button. 4 English TELE System TS6212 3 First time installation After connecting the receiver (section 0) and inserting the power cable in the main power socket, the receiver will automatically turn on. If this doesn’t happen, turn on the receiver using the ON/ST.BY button on the front panel or on the remote control. The Installation menu will appear on the screen where you will have to confirm or modify some parameters. 4 Menu and sub-menus 4.1 Setup 4.1.1 Installation Country setting Press the ◄/► arrows to select your Country from the list. Press the ▼ arrow to go to the next parameter. CAUTION! Wrong Country setting can cause you to receive few or no channels at all. OSD language Using the ◄/► arrows, select the language desired from the On Screen Display (OSD). Press the ▼ arrow for the next setup. Audio language Using the ◄/► arrows, select the audio language desired from those available (in case the TV program is transmitted in several languages the receiver will automatically choose the language selected, if available). Press the ▼ arrow for the next setup. Subtitles language Using the ◄/► arrows, select the subtitles language desired from those available (in case the TV program is transmitted with subtitles the receiver will automatically choose the language selected, if available). Press the ▼ arrow for the next setup. LCN 1. After scanning the channels, Logical Channel Numbering (LCN) automatically orders the list of TV and Radio channels according to the position requested by television stations. We advise you keep this function active. However, you can modify it using the ◄/► arrows. Press the ▼ arrow for the next step. NOTE If the LCN Mode is active, we suggest you not use the move channel function available from the TV – TV/Radio List menu. Auto stand by This receiver comes with an energy saving function: after three hours of user inactivity, the receiver will automatically go into standby mode. Two minutes before this happens, a message will appear on the screen so that the user can stop the appliance from going into standby. Using the ◄/► arrows, chose ON to keep the option active, or OFF to deactivate it. Press the ▼ arrow for the next step. CAUTION If the on-off timer or a recording from the menu System Setup – Program Timer is set to more than three hours, it is suggested you deactivate Sleep timer GMT Usage Select using the ◄/► arrows: o “ON”: date and time related to the Country chosen are set automatically. o “OFF”: user manually sets the date and time. Press the ▼ arrow for the next step. Time zone Using the ◄/► arrows, select the time zone of the country where the decoder is installed. Press the ▼ arrow for the next step. 5 Set Date o Using the numbers buttons and the ◄/► arrows, set the current date (the date cannot be modified if “Use of GMT” is set to ON). Press the ▼ arrow for the next step. Set Time Using the numbers buttons and the ◄/► arrows, set the current hour (the hour cannot be modified if “Use of GMT” is set to ON). Press the ▼ arrow for the next step. Auto scan channels in Standby Using the ◄/► arrows, select the frequency with which you want the channels to be updated in standby mode (available options are: Daily, Weekly, Monthly and OFF). Press the ▼ arrow for the next step. Auto scan in Standby time Using the numbers buttons and the ◄/► arrows, set the time for an automatic channels search in Standby mode. Press the ▼ arrow for the next step. Hotel mode Using the ◄/► arrows, set to ON to activate the function. CAUTION! Once the Hotel function has been activated, you will no longer have access to the main menu. To access the main menu again you need to deactivate the Hotel function by pressing the following buttons in order 16888+OK. Auto scan Press the red “Auto search” button to start an automatic channel search (you will be requested to insert your password). At the end of the scan, if no LCN channel position conflicts are detected, the receiver will automatically go into viewing mode. LCN conflict solutions If the LCN function is on (see above) and more one TV or radio station has requested the same position on the channels list, the receiver will detect the conflict and a list of the stations involved will appear on the screen. With the ▼ / ▲ arrows select a channel and confirm with the OK button. Press Exit to memorise your choice and close the display window. If the user doesn’t intervene, the receiver will automatically resolve the conflicts after about one minute and the user can proceed with viewing the channels. Manual scan Press the green “Man Search” button to manually search for channels (you will be requested to insert your password). Using the ◄/► arrows, select the frequency on which you want to search for channels and press OK. 4.1.2 TV setup TV format Define the Video Format Rate value (16:9 Full Screen/Pillar Box or 4:3 Letter Box/Pan Scan) best fitted to the characteristics of the TV screen connected to the receiver. TV mode Choose the standard (PAL or NTSC) in which to receive TV signals. OSD transparency Modify the transparency of the OSD menu when recalled. Banner display time Modify the viewing time of the channel banner. Video output Define the value of the video output (RGB or CVBS) best fitted to the characteristics of the TV screen connected to the receiver. Video Enhancement Adapt the image on screen, by regulating two parameters (Flesh tone and Black/white extension), according to the characteristics of the transmission, the TV room, and personal taste. 6 English TELE System TS6212 4.1.3 Password To modify some important menu parameters or view programs protected by Parental Lock, the receiver requires a PIN (a four number password). The factory set password is “0000” (four times zero), but it can be personalised through the Change password option. Setup Menu lock If set to ON access to the main menu is protected by password. Channel block If set to ON, you can manually and individually block channels, using the Block option on the “TV list” or “Radio list” menu. Censorship Lock The Parental Lock function allows for the viewing of sensitive material to be controlled. If a channel transmits a program with view control aimed at a public of the same age or older than the age level selected from the menu, the receiver will block the channel and a message will appear on the screen. To see the program, the PIN must be entered. (see section 4.1.3). The default age level is 18 years old. To modify the age level, use the ◄/► arrows. Change password Personalise password (PIN). CAUTION! Write down and save your new PIN in a secure place. If you forget it, use the universal code “8888” to access the Password menu and set a new password. 4.1.4 Advance Timer To set the decoder’s on-off timer: press the red button, insert the data requested and press OK. 4.1.5 SW update In order to improve or add new functions to the receiver, it may be necessary update the software. Keeping the receiver updated is advised. Via OTA (Over the Air) The receiver can detect the software updating data from the digital terrestrial signal coming from the antenna when the data is transmitted by a television station. CAUTION! Downloading and installing new software can require a lot of time especially with bad reception. During the process, do not interact with the receiver or unplug the power cable: the receiver may be irreversibly blocked! Manually Access the “SW Update – Update via OTA” menu and press OK to start the manual search function to update new software. Automatically Access the “SW Update – Update via OTA” menu to personalise the automatic search for software updates. Two options will appear from the “OTA in Operative Mode” parameter: OFF: when the new software control in operative mode is deactivated, a search in “Standby Mode” (if activated) will start up 45 min. after going into standby. ON: by activating “OTA in Operative mode”, the receiver will control the time indicated in the Time field on a daily basis and with the frequency indicated in the “OTA Frequency” field. In this case, a control in “Standby Mode“ (if active) will start only at the time displayed in the menu. 4.1.6 Factory reset If necessary, reset the receiver to its factory settings through a software reset. Go to the Set Default menu and press the OK button. You will be asked to confirm. CAUTION! Factory Reset means you will lose all the channels that were memorised and all personalised settings, but not the last version of the software installed. 7 TELE System English 5 TV 5.1.1 TV list Access to the channels list allows you to modify and organise the list itself and each channel. It is possible to create favourites lists, to move and/or jump channels to create a personalised list or to block/rename/eliminate one or more channels. A PIN number is required to access this function. 5.1.2 TV guide It is possible to view the TV programming of each channel, reserve the viewing of a program and/or record it from the Electronic Program Guide (EPG). NOTE The information present in the EPG depends on the information sent by television stations. 6 Radio 6.1.1 Radio list Access to the Radio channels list allows you to modify and organise the list itself and each channel. It is possible to create favourites lists, to move the Radio channels to create a personalised list or to block/rename/eliminate one or more Radio channels. A PIN number is required to access this function. 6.1.2 Radio guide It is possible to view the TV programming of each Radio channel, reserve the viewing of a program and/or record it from the Electronic Program Guide (EPG). NOTE The information present in the EPG depends on the information sent by television stations. 7 Menu organisation The receiver menu is organised as follows: Setup TV ▼ ▼ Radio ▼ - Installation - TV list - Radio list - TV setup - TV guide - Radio guide - Password - Advance Timer - SW update - Set default NOTE Navigating the menus is simple and intuitive. Use the MENU, BACK, EXIT, arrow, OK and numerical buttons on the remote control. Follow the indications on each menu display window. 8 TS6212 8 Troubleshooting guide PROBABLE CAUSE SOLUTION 1. No image or sound PROBLEM -The receiver is not plugged into the power socket. -The receiver is plugged in but the box still doesn’t work. - The power switch on/off into rear panel is into off position - The receiver is turned onto a channel that doesn’t transmit a video signal. - Antenna signal weak or absent.. -The SCART cable or antenna cable is disconnected or damaged. -Low or no volume. -The TV is not switched on to the appropriate audio/video channel. 2. Channels don’t load -Lack of antenna signal. -The antenna system is not compatible with the digital terrestrial system. 3. The settings aren’t memorised. 4. The remote control doesn’t work. -Did not confirm after modifying the settings. -The receiver is on standby. -The remote control is not pointed at the infrared sensors on the receiver. -Flat batteries. -Batteries are charged but inserted in the wrong way. -The remote control was dropped and the internal components are damaged. 5. Forgotten password. 6. The programmed timers don’t work correctly. The receiver doesn’t respond to the remote control buttons. -Make sure the power cable is properly plugged into the power socket. -After unplugging the receiver, check that the power supply cable isn’t damaged (Warning!: Danger of electrical shock!). - Set the power switch into position on -Make sure the SCART is properly connected, check the antenna installation and the quality of the signal received. -Make sure the volume on the TV or the receiver is not at zero. -Make sure the TV is switched to the AV channel (consult TV manual). -Perform Factory reset. -Check that there is an antenna signal coming through the receiver. -Consult a trusted technician. -Perform a manual channels search. -Perform Factory reset. -Before exiting a menu, press the corresponding confirm button. -Press the ON/ST.BY button on the front panel to check that the receiver is working. -Make sure there are no obstacles in front of the front panel. -Insert new batteries. -Make sure the batteries are inserted correctly. -Contact a distributor to purchase a new remote control. -The factory set PIN is 0000 (four times zero). -Set the time. 7. 8. -The receiver’s time is not set correctly. - Receiver is temporarily blocked. -A television station is transmitting wrong data. - Problem with the remote control. The receiver automatically shuts - Sleep timer function active. down. -Disconnect the receiver from the power supply for at least a minute then re-connect. -Re-start the receiver with the antenna disconnected, delete the problematic channel and re-connect the antenna. -Deactivate function. the energy saving INFORMATION Generally, in case the receiver doesn’t respond correctly, a Factory Reset (section 4.1.6 Factory reset) can help solve the problem. 9 TELE System Type of product Input frequency Channel bandwidth Display Language menu OSD menu Teletext (ETSI EN 300 472) Subtitles ( ETSI EN 300 706) Electronic Program Guide (EPG) RF modulator Integrated modem Video Format Rate Coaxial Digital Audio Output (SPDIF) Optical Digital Audio Output (SPDIF) TV SCART output VCR SCART connection RCA Audio Stereo Connectors RCA Video Connector RS232 Data Serial Port Software updating Factory reset function Favourite Channels List Event timer Sleep timer (energy saving) Auto-updating of channels Active antenna power supply Power supply Power Consumption Dimensions English 9 Technical specifications Digital terrestrial receiver (ETSI EN 300 744) for free to air channels 147÷230 MHz (VHF) / 470÷862 MHz (UHF) 6 / 7 / 8 MHz 6 : IT– RU –EN – DE – FR– SP ● ● ● ● 4:3 Letter Box / 4:3 Pan Scan / 16:9 Full / 16:9 Pillar Box ● Out: Video RGB / CVBS, audio L+R Out/In: Video CVBS, audio L+R Via OTA (Over the Air) ● ● On-Off / recording ● (can be disabled) ● (can be disabled) 230V~ 50Hz ON mode: (Max)5,0 W Standby mode: (Max) 0.96 W 215 x 119 x 33 mm 10 TELE System TS6212 Dichiarazione di conformità CE / Conformity declaration CE Codice Prodotto 21005200 - Ricevitore Digitale Terrestre Zapper Product Code 21005200 - Zapper Digital terrestrial receiver Tele System Electronic dichiara sotto la propria responsabilità che questo prodotto soddisfa i requisiti fondamentali delle direttive europee 2004/108/EC (EMC Electromagnetic Compatibility), 2006/95/EC (LVD - Low Voltage Directive) e 2009/125/EC ( ERP - ecodesign requirements for energy-related products), rispettando le seguenti normative tecniche: Tele System Electronic states that this product meets the basic European requirements of 2004/108/CE (EMC Electromagnetic Compatibility), 2006/95/CE (LVD - Low Voltage Directive) and 2009/125/CE (ERP-Ecodesign requirements for energy-related products), following the technical directives: Compatibilità elettromagnetica / Electromagnetic Compatibility: EN 55013: 2001 + A1:2003 + A2:2006 EN 55020: 2007 EN 61000-3-2: 2006 EN 61000-3-3: 2008 Bassa Tensione / Low Voltage: EN 60065: 2002 + A11:2008 Bressanvido,O7/2011 Flavio de Poli General Management ITALY TELE System Electronic Via dell’Artigianato 35 36050 Bressanvido (VI) Internet: www.telesystem-world.com Rev00 31/07/2011 Customer Assistance 199 214 444 (only Italy)
Scaricare