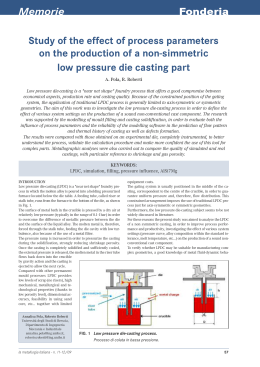
PADDLE MECHANICAL PADDLE V 1.3 MANUAL & PARTS CATALOG English MECHANICAL PADDLE Manual and parts catalog Sections: pag. Introduction 3 Inside the Paddle 4 Paddle valve's parts 7 Machine's parts 8 Description of the parts 11 Maintaining the O-rings 12 Changing the O-rings 13 Removing the body valve and restrictor 17 Adjusting the valve position 19 Adjusting the microswitch position 20 Technician's tool kit 21 1 English MECHANICAL PADDLE Introduction: The La Marzocco Paddle is an innovative device which controls coffee brewing through an external lever, activated by the barista to pre-infuse the coffee ground on one or more groups simultaneously. The lever lifts a shaft into the inner valve from the off position to the pre-infusion position and ends with extraction. With the La Marzocco mechanical Paddle, the barista has a direct impact on every espresso he prepares, by manually profiling each extraction. Thanks to the La Marzocco Paddle, it is now possible to: ? pre-infuse at main pressure shifting the mechanical valve inside the group head ? pre-infuse at main pressure on all groups at the same time, even when the pump is running ? manually adjust the water flow on the coffee puck This technical document is specific to those machines that are equipped with the Paddle. It is to be used in addition to the manual you already have on hand in regards to each of our machines, including the Linea, FB/70, GB/5, FB/80, Mistral and GS/3. We would like to highlight our warning about the machine's technological system, which is half electrical and half mechanical, reminding experts to proceed caution and work carefully. 3 English MECHANICAL PADDLE The Paddle: off valve exhaust valve inlet valve exhaust valve inlet Off position: the shaft keeps the brewing system closed and the filter basket is connected to the drain tube. 4 English MECHANICAL PADDLE pre-infusion valve exhaust valve inlet valve exhaust valve inlet Pre-infuse position: the shaft release the flow of water from the group at main pressure onto the coffee puck. The pump is off. 5 English MECHANICAL PADDLE extraction valve exhaust valve inlet valve exhaust valve inlet Extraction position : the lever turns the pump on and the shaft release water at 9 bar onto the coffee puck. 6 English MECHANICAL PADDLE Parts catalog: L120/2 A.4.003 RONDELLA6X12 L120/2 F.3.020 RONDELLA6X12 A.1.014 F.4.008 H.1.016 F.4.009 I.1.005 A.5.003 (GS/3 & MISTRAL) F.3.022 A.5.005 (LINEA & FB/70) F.3.023 (GB/5 & FB/80) F.3.025 DADO5M A.1.010 F.4.010 I.3.004 DADO3M C.1.067 VITE5X10 E.2.011 A.1.015 L120/2 VITE3X25ES L120/2A L103/P B.2.015 H.1.011 B.2.014 T.1.101 F.2.003 (GS/3 & MISTRAL) TL30/P L100/5 B.2.012 H.1.010 A.5.008 (LINEA & FB/70 - GB/5 & FB/80) T.1.100 7 English GB/5 & FB/80 C.1.025.*.01 C.2.031 C.2.030 E.1.009 L286/1 Linea & FB/70 CL14/* P C.2.021 C.2.020 E.3.002 E.3.001 L285/2 * = number of groups / numero gruppi 8 English F.1.022 GS/3 I.1.028 T.2.120 F.1.020 C.1.068.01 F.1.021 C.2.020 B.2.008 T.2.105.01 B.2.008 E.1.015.P L137 L137/4 (x2) T.2.119 9 English Note: 10 English DESCRIZIONE DEI CODICI/PARTI Description of the parts A.1.014 A.1.015 A.4.003 A.5.003 A.5.005 A.5.008 B.2.008 B.2.012 B.2.014 B.2.015 C.1.025.*.01 C.1.067 C.1.068.01 C.2.020 C.2.021 C.2.030 C.2.031 CL14/* P DADO3M DADO5M E.1.009 E.1.015.P E.2.011 E.3.001 E.3.002 F.1.020 F.1.021 F.1.022 F.2.003 F.3.020 F.3.022 F.3.023 F.3.025 F.4.008 F.4.009 F.4.010 H.1.010 H.1.011 H.1.016 I.1.005 I.1.028 I.3.004 L103/P L120/2 L120/2A L137 L137/4 L285/2 L286/1 RONDELLA6X12 T.1.100 T.1.101 T.2.105.01 T.2.119 T.2.120 TL30/P VITE3X25ES VITE5X10 Part Number/Codice BRONZE WASHER HEX PADDLE ROND BRONZO GUIDA ES. PADDLE BRASS WASHER PADDLE VALVE ROND OTT PREMICORPO VALVOLA PADDLE BRASS NUT HEX 27 H 5 PADDLE DADO OTTONE ES 27 H 5 PADDLE SHAFT FOR PADDLE ALBERINO X PADDLE ACTUATOR FOR PADDLE MICRO ATTUATORE ACC. PER MICRO PADDLE CONTRODADO VALVOLA PADDLE INOX NUT PADDLE VALVE S/S CHECK VALVE FOR GS/3 VALVOLA NON RITORNO GS/3 PADDLE BODY VALVE CORPO VALVOLA PADDLE DISTANCER FOR PADDLE O-RING DISTANZIALE PER O-RING PADDLE INTERNAL SPACER FOR PADDLE PREMISTOPPA X PADDLE GB/5 & FB/80 CONTROL PANEL FOR PADDLE PANNELLO DI CONTROLLO PER GB/5 & FB/80 PADDLE MICRO SUPPORT PADDLE SWITCH SUPPORTO MICRO INTERRUTTORE PADDLE S/S RING FOR PADDLE GROUP ANELLO C/FERITOIA PADDLE GS/3 BAKELITE PADDLE HANDLE MANIGLIA PADDLE BAKELITE BAKELITE FRAME FOR LINEA PADDLE MOSTRINA PADDLE IN BAKELITE LINEA GB/5 BAKELITE PADDLE HANDLE MANIGLIA PADDLE GB/5 BAKELITE BAKELITE FRAME FOR GB/5 PADDLE MOSTRINA PADDLE GB/5 BAKELITE LINEA & FB/70 CONTROL PANEL FOR PADDLE PANNELLO DI CONTROLLO PER LINEA & FB/70 PADDLE BRASS NUT M3 DADO OTTONE 3M UNI 5588 S/S NUT 5 DADO 5 ACC INOX KEYPAD WITH ALUMINIUM SWITCH PULSANTIERA 6T IN ALLUMINIO DISPLAY & KEYPAD BOX FOR GS/3 SCATOLA DISPLAY + PULSANT PADDLE GS/3 AUTOSTEAM MICRO MICRO PER AUTOSTEAM PRESS.GAUGE GB/5 0-15bar MANOMETRO C. SAT GB/5 0-15bar+CAPILLARE PRESS.GAUGE GB/5 0-3bar MANOMETRO C. VAP. GB/5 0-3 bar+CAPILLARE GROUP PROTECTIVE COVER X PADDLE COPERCHIO PER GRUPPO PADDLE GROUP PROTECTIVE BOTTOX X PADDLE ANELLO INFERIORE PER GRUPPO PADDLE CAP BOLT COVER X PADDLE COPRI VITE X PADDLE GIGLEUR IN SYNTH. RUBY FOR GROUP COVER GIGLER PER COPERCHIO IN RUBINO S/S BRACKET FOR PADDLE CAVALLOTTO INOX X PADDLE GS/3 PADDLE LEVER GS/3 LEVA INOX X PADDLE LINEA & FB/70 PADDLE LEVER LINEA & FB/70 LEVA INOX PADDLE GB/5 & FB/80 PADDLE LEVER GB/5 & FB/80 LEVA INOX PADDLE GB/5 TEFLON RING FOR PADDLE DIAM.45 ANELLO TEFLON X PADDLE DIA 45 TEFLON RING FOR PADDLE DIAM.38 ANELLO TEFLON X PADDLE DIA 38 O RING PTFE FOR PADDLE 23,40X3,53 O RING PTFE X PADDLE 23,40X3,53 OR 3087 EPDM 70 SHA PADDLE OR 3087 EPDM 70 SHA PADDLE OR 110 EPDM 70 SHA PADDLE OR VITON OR108 70 SHA PADDLE OR 137 DIA INT 29,75 - 3,53 OR 137 DIA INT 29,75 CORDA 3,53 3X8 FLARED SOCK.HEAD S/S SCREW VITE 3X8 TESTA SVASATA BRUGOLA CAP BOLT PADDLE M5 EX. CH4 VITE A BRUGOLA M5, CH4 SPACER 3,5X2,5 DISTANZIALE ALL. 3,5X8X2,5 CHROME PLATED COVER FOR PADDLE COPERCHIO CROMATO X PADDLE LEVEL DRAIN BOLT BULLONE ACC.INOX 6X10 T.BRUG. COPPER WASHER RONDELLA RAME 12X6X1 11 MM.FERRULE WITH 8,2 MM.HOLE GHIANDINA DM.11 FORO 8,2 11 MM. BLIND FERRULE GHIANDINA DM.11 CHIUSA SWITCH WITH RED LE INT/RE TASTO BIANCO LED ROSSO WHITE PUSH BUTTO PULSANTE TASTO BIANCO S/S WASHER 6X12 1,5 THICK RONDELLA INOX 6X12 SP.1,5 TUBE, WATER EXHAUST, MECH PADDLE VALVE TUBO SCARICO ACQUA VALVOLA PADDLE WATER INLET TUBE FOR PADDLE VALVE TUBO CARICO ACQUA VALVOLA PADDLE TUBE STEAM BOILER INLET MAINFOLD FOR GS/3 PADDLE TUBO PER GS/3 PADDLE ANCORAGGIO CALDAIA VAP. INCOMING HOT WATER TUBE FOR PADDLE TUBO INGRESSO ACQUA CALDA CAFFE X PADDLE INOX TUBE FOR PADDLE GS/3 TUBO INOX PADDLE GS/3 GRUPPO ONLY FOR GS/3 INTERNAL GROUP TUBE FOR PADDLE TUBO INTERNO GRUPPO X PADDLE SOLO X GS/3 M3 X25 TB SCREW VITE M3 X25 TB AISI300 M5X10 FLAT SCREW PADDLE VITE AISI300 M5X10 PIANA PADDLE DESCRIPTION DESCRIZIONE * = number of groups / numero gruppi 11 English MECHANICAL PADDLE How to maintain the O-rings of the body valve: There are three O-rings inside the Paddle, separeted by two spacers, all securely kept in position by a cylindrical cap (fig. 1). It could happen that after a long period of intense operation, the Paddle become gradually stiff. In this case, it is necessary to lubricate (fig. 3) the shaft, part# A.5.003, using a small brush and the grease provided with the spare parts kit. This will make the shaft glide more smoothly on part# A.1.014. 3 2 1 The O-rings, which are employed in many mechanical applications, are commonly used as seals. Substitution is rarely necessary and is most likely required only when dismantling all spare parts for the eventual cleaning of mineral deposits. fig.1 Since its wear is relatively limited, after an extended period of time it may be necessary to change the O-ring part# H.1.011 strictly following the instructions here below and using the adequate remover complete O-ring remover assembly(fig. 2), part# Ut004. UT004 fig. 3 O-Ring Remover Silicon based lubrication for O-rings fig. 2 12 English MECHANICAL PADDLE Instructions to substitute the O-rings H.1.011: Dismantle all spare parts as described below: Before any maintenance and/or cleaning operations, turn the main switch, which is located on the front left of the machine, to the 0 or OFF position, and disconnect the machine from the electrical supply by unplugging the cord or by switching off the relative circuit breaker. For any cleaning operation, follow only those instructions from the standard manual which come with the coffee machine. Close the water valve that supplies the machine and move the Paddle lever to the brewing position, with the paddle placed all the way to the left until boiler pressure drops to 0 atm. Dismantle all spare parts as described below: fig. 4 fig. 5 fig. 6 1. Remove the handle and the lever. 2. Loosen (without removing the nut) item A.4.003 (fig. 4). 3. Remove F.3.020 by unscrewing the bolts, placed on the side of the bracket, L120/2 (fig. 5 ) and remove together with items A.1.014 and A.4.003. 4. Remove in order: F.4.008, F.4.009, A.5.003, A.1.010, F.4.010. 5. At this point, item A.1.015 is visible and removable (fig. 6). H.1.016, fig. 7 13 English MECHANICAL PADDLE 3 4 5 2 1 fig. 8 The remover (fig. 8) works as follows: While holding item 3 still carefully rotate (tighten) item 4 in a clockwise fashion. Item 2 will push against the 4 wings of the tip at the end of item 3, and spread them out. In turn, the tip will grasp the bushing O-rings and spacers. To facilitate the release of these latter parts, it is necessary to close the tip by unscrewing item 4 while holding 3 still. fig. 9 6. 14 Tighten the first nut at the top of the shaft of the remover to push the pin (fig. 9, 10). fig. 10 English MECHANICAL PADDLE 8. Bring the weight of the remover towards the upper part with a firm, yet not too strong of a j o l t (fig. 11). 9. Remove the remover together with the bushing O-ring and spacers. 10. To replace the new O-rings, it is enough to insert the components on the shaft, item A.5.003, in the following sequence: bushing (B.2.015) O-ring (H.1.011) spacer (B.2.014) O-ring (H.1.011)- spacer ( B.2.014) O-ring (H.1.011), lubricate with silicone grease and reassemble the shaft in its place (fig. 12). NOTE: before inserting the O-rings check if the inside of the body valve is free of dirt. 11. Put the thumb on the top the bushing and pull out all the O-ring and spacers togheter. 12. Reassemble, beginning with cap A.1.015 (fig. 13). fig. 11 fig. 12 fig. 13 15 English 16 MECHANICAL PADDLE 13. Place the entire paddle, including the central shaft A.5.003 as follows: F.4.010, A.1.010, A.5.003, F.4.009, H.1.016, F.4.008, A.1.014, F.3.020, A.4.003 but tighten it lightly, L120/2, A.4.005. 14. Reassemble bracket C.1.067, complete with its micro-switch. 15. Reassemble lever F.3.023 and its related handle. 16. Reassemble lever F.3.023 above A.1.010 push the shaft A.5.003 downwards and, while holding it pressed downwards, move the lever F.3.023 to the right, to the resting position the Paddle (drain position). 17. Tighten nut A.4.003. 18. In this configuration, the micro-switch, which activates the pump, is placed on the cap, item L103/P, the back, with bracket C.1.067 , thereby making possible both horizontal and vertical regulation so that pin A.5.005, which is attached to item A.1.010, can activate the pump during the brewing phase. English MECHANICAL PADDLE Instructions to disassemble and reassemble the body valve and restrictor: The following procedure is useful for substuiting the gaskets of the body valve or cleaning or replacing the flow restrictor 1. Remove all parts of the mechanical valve placed onto the cap, L103/P (fig. 14), L120/2 and L120/2A. 2. Remove the banjo bolt which holds the cap and the bajonet ring (fig. 15). 3. Loosen, but do not remove, the fitting of the valve inlet tube T.1.101(fig. 16), while holding with the cutted cap the body valve. 4. Loosen and disconnect the fitting of the valve exhaust tube T.1.100 5. Carefully slide the body valve out of the group 6. Now it is possible to regenerate the body valve and replace the O-ring gaskets as described in the previous section, Instructions to substitute 0-rings H.1.011 and H1.010. fig. 14 fig. 15 fig. 17 fig. 16 Notice: It is very important to keep the valve inlet tube fitting linked to the body valve to avoid its falling into the coffee boiler. On the contrary, the exhaust valve tube is connected to the side of the group by the nut, L100/5, besides the other end tight to the body valve. We suggest a cap sectioned to firmly hold the body valve while you tighten the inlet valve tube and exhaust tube fitting. 17 English MECHANICAL PADDLE fig. 16 fig. 17 18 7. Inside the group there is an adaptor, A.5.008, (fig. 16 which connects and seals together the body valve to the group. At the bottom, there is an O-ring, H.1.010, to seal the adaptor to the group which we suggest you replace each time you open the group. 8. With the body valve in your hand, it is possible to clean or replace the synthetic ruby restrictor (fig. 17). English MECHANICAL PADDLE Instructions to adjust the valve position: 1. Loosen the nut A.4.003, (fig. 18). 2. Push down the shaft and keep the lever on the off position and then tighten the nut (fig. 19). fig. 18 fig. 19 3. fig. 20 Check all posistions: when the lever is in the off position, there is no leaking from the screen diffuser or through the drain box where the drain tube is connected. When the lever is in the middle position, water flow from the screen diffuser is very weak. When positioned to the left, the motor pump is on and the pressure for brewing coffee is at 9 bar. Notice: The angular position of A.1.014 determines where the lever begins to lift the shaft, therefore when nut A.4.003 is loosened, it is possible to calibrate the three Paddle positions as described above (fig. 20). 19 English MECHANICAL PADDLE Instructions to adjust the position of the microswitch: G 1. Loosen the two screws placed on the back of the group which hold the microswitch support, C.1.067 (fig. 21)and/or the two screws which hold the microswitch to the support. 2. Turn the support either to the left or right, up or down so that the microswitch activates the pump before the lever will be half way to the extraction position (fig. 22). 3. Tighten the screws. fig. 21 pre-infusion pump on extraction off fig. 22 Notice: The lever of the microswitch, if positioned incorrectly, can be streched by the pin, A.5.005, and bent. 20 English MECHANICAL PADDLE Technician's tool kit: 1. Combination Open/Closed end wrenches 5mm to 36mm 2. Metric Allen wrench set 3mm to 10mm with ball end odd angle access 3. 1#, 2# phillips screwdriver 4. O-ring remover 5. Cap sectioned 21 English MECHANICAL PADDLE Note: 22 23 La Marzocco S.r.l. Via La Torre, 14/H - Loc. La Torre 50038 - Scarperia - Firenze - Italy Tel +39.055.849191 Fax +39.055.8491990 [email protected] www.lamarzocco.com
Scarica