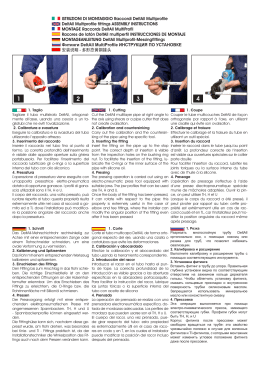
ISTRUZIONI DI MONTAGGIO Raccordi DeltAll Gas Multiprofile
DeltAll Gas Multiprofile fittings ASSEMBLY INSTRUCTIONS
MONTAGE Raccords DeltAll Gas MultiProfil
Racores de latón DeltAll Gas Multiperfil INSTRUCCIONES DE MONTAJE
MONTAGEANLEITUNG DeltAll Gas Multiprofil-Messingfittings
Фитинги DeltAll Gas MultiProfile ИНСТРУКЦИЯ ПО УСТАНОВКЕ
安装说明 - GAS多形体黄铜接头
1
2
3
4
1. Taglio
Tagliare il tubo multistrato DeltAll Gas, ortogonalmente all’asse, usando una cesoia o un tagliatubi che ne
eviti l’ovalizzazione.
2. Calibratura e svasatura
Eseguire la calibratura e la svasatura del tubo utilizzando l’apposito attrezzo. L’operazione di calibratura
determina il corretto diametro interno del tubo e va
ad eliminare un’eventuale ovalizzazione. L’operazione di svasatura permette invece di creare uno
smusso all’estremità interna del tubo che evita lo
spostamento e/o il danneggiamento delle guarnizioni o-rings dalla loro sede nella fase di inserimento
del raccordo.
3. Inserimento del raccordo
Inserire il raccordo nel tubo fino al punto di fermo.
La corretta profondità dell’inserimento è visibile dalle apposite aperture sulla ghiera portabussola. Se
durante quest’operazione si incontra una resistenza
eccessiva significa che le operazioni di calibratura
e svasatura non sono state eseguite correttamente.
In questo caso, l’inserimento del raccordo nel tubo
deve essere evitato ed è necessario ripetere le operazioni di calibratura e svasatura.
4. Pressatura
L’operazione di pressatura viene eseguita con un’apposita pressatrice elettro-pneumatica dotata di opportune ganasce. I profili di ganascia utilizzabili sono
il TH, H e U. Aprire le ganasce ed inserire il raccordo
da pressare avendo cura che il collarino di guida
dell’anello in plastica sia correttamente posizionato.
Quindi azionare la pressatrice.
1. Cutting
Cut the DeltAll multilayer pipe at right angle to the
axis using shears or a pipe cutter that does not create ovalisation.
2. Calibration and countersinking
Carry out the calibration and the countersinking of
the pipe using the specific tool. The calibration operation determines the correct internal diameter of the
pipe and eliminates any ovalisation. The countersinking operation makes it possible to create a bevel
at the inner extremity of the pipe, which avoids the
movement and/or the damage of the O-rings while
the fitting is being inserted.
3. Inserting the fitting
Insert the fitting on the pipe up to the stop point. The
correct depth of insertion is visible from the inspection holes on the bushing ring nut. If you encounter
excessive resistance during this operation, it means
that the calibration and countersinking operations
have not been carried out correctly. In this case, do
not insert the fitting on the pipe, and repeat the calibration and countersinking operations.
4. Pressing
The pressing operation is carried out using an electropneumatic press tool equipped with suitable jaws.
The jaw profiles that can be used are TH, H and U.
Open the jaws and insert the fitting to be pressed,
taking care that the guide collar of the plastic ring is
correctly positioned. Then operate the press.
1. Coupe
Couper le tube multicouches DeltAll de façon
orthogonale par rapport à l’axe, en utilisant une
cisaille qui évite son ovalisation.
2. Calibrage et fraisure
Effectuer le calibrage et la fraisure du tube en utilisant un outil spécial.
3. Insertion du raccord
Insérer le raccord dans le tube jusqu’au point
d’arrêt. La profondeur correcte de l’insertion est
visible aux ouvertures spéciales sur le collier porte
douille
Pour faciliter l’insertion du raccord, lubrifier les
joints toriques ou la surface interne du tube avec
de l’huile à la silicone.
4. Pressage
L’opération de pressage s’effectue à l’aide d’une presse électropneumatique spéciale munie
de mâchoires adaptées. Ouvrir la pince, on peut
utiliser TH, H et U
Lorsque le corps du raccord a été pressé, il peut
pivoter par rapport au tube: cette propriété est
extrêmement utile en cas de raccord coudé et
en TL, car l’installateur peut modifier la position
angulaire du raccord même après pressage.
1. Schnitt
Das DeltAll-Mehrschichtrohr rechtwinkelig zur
Achse mit einer entsprechenden Zange oder
einem Rohrschneider schneiden, um eine ovale
Verformung zu vermeiden.
2. Kalibrierung und Spitzsenken
Das Rohr mit einem entsprechenden Werkzeug
kalibrieren und spitzsenken.
3. Einschieben des Fittings
Den Fitting bis zum Anschlag in das Rohr schieben. Die richtige Einschiebtiefe ist an den entsprechenden Öffnungen an der Hülsenhaltemutter
erkennbar. Um das Einschieben des Fittings zu
erleichtern, die O-Ringe bzw. die Rohrinnenfläche
mit Silikonöl schmieren.
4. Pressen
Der Pressvorgang erfolgt mit einer entsprechenden elektropneumatischen Presse mit angemessenen Spannbacken. TH, H und U - Spannbackenprofile können eingesetzt werden.
Die Fittinghülse kann sich, nachdem diese gepresst wurde, am Rohr drehen, was besonders bei
Knie- und TI - Fittings praktisch ist, da der Installationstechniker die Winkelposition des Fittings auch
nach dem Pressen verändern kann.
1. Corte
Corte el tubo multicapa DeltAll, de forma ortogonal respecto del eje, usando una cizalla o cortatubos que evite las deformaciones.
2. Calibración y abocardado
Efectúe la calibración y el abocardado del tubo
usando la herramienta correspondiente.
3. Introducción del racor
Introduzca el racor en el tubo hasta el punto de
tope. La correcta profundidad de la introducción
es visible gracias a las aberturas específicas en
la abrazadera portacasquillo. Para facilitar la instrucción del racor, lubrique las juntas tóricas o la
superficie interna del tubo con aceite de silicona
4. Prensado
La operación de prensado se realiza con una
prensadora electroneumática específica, dotada de mordazas adecuadas. Los perfiles de
mordaza que pueden usarse son el TH, H y U.
El cuerpo del racor, una vez prensado, puede
girar respecto del tubo: esta propiedad es extremadamente útil en el caso de racores en codo y
en T, en los cuales el instalador puede modificar
la posición del racor incluso después del prensado.
1. Резка
Разрезать
многослойную
трубу
DeltAll
ортогонально оси, с помощью ножниц или
резака для труб, что позволит избежать
овализации.
2. Калибровка и расширение
Выполните калибровку и расширение трубы с
помощью соответствующего инструмента.
3. Установка фитинга
Вставить фитинг в трубу до упора. Правильная
глубина установки видна по соответствующим
отверстиям на зажимном кольце держателя
гильзы. Чтобы облегчить установку фитинга,
смазать кольцевые прокладки и внутреннюю
поверхность трубки силиконовым маслом.
Запрещается
использовать
минеральное
масло или консистентную смазку.
4. Прессовка
Эта операция выполняется при помощи
электро-пневматического пресса, имеющего
соответствующие губки. Профили губок могут
быть TH, H, и U
Корпус фитинга после прессовки может
свободно вращаться на трубе: это свойство
чрезвычайно полезно в случае для коленных
фитингов и TI-фитингов, с которыми монтажник
может изменить угловое положение фитинга
даже после прессовки.
Scarica