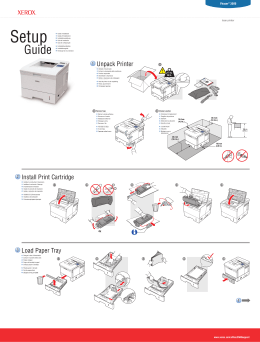
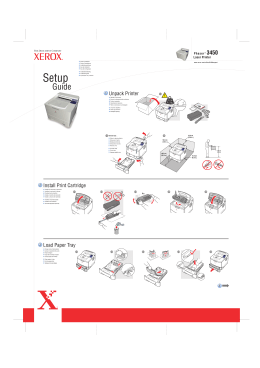
■
Upgrading a Phaser 850N Printer to a Phaser 850DP Printer
Installing the Z8450DP upgrade provides the printer with
32 Mbytes of additional memory and a new code ROM
module. The new code ROM module and the extra memory enables faster image processing, higher resolution
(1200 x 600 dots-per-inch), High Resolution/Photo printing and automatic two-sided printing. With the upgrade,
the printer also supports image pipelining for faster print
job throughput and First Page Preview for proofing the first
print of a job.
The printer’s built-in Configuration Page lists what size
SDRAM DIMM is installed in each of the printer’s RAM
DIMM slots. To determine what size and type of SDRAM
DIMMs are installed in your printer, scroll through the front
panel to Printer Configuration and press Select to print
the Configuration Page.
1.
Turn off the printer; do not unplug the printer.
Disconnect all host interface cables.
2.
Remove the two screws securing the board’s rear
panel to the printer.
3.
Grasp the rear panel by the retractable plastic
handle and slide the main board out of the printer
card cage.
Note The printer accepts two SDRAM DIMMs, which can
vary in size from 32 Mbytes to 128 Mbytes. Only
32-Mbyte, 64-Mbyte, 128-Mbyte, 196-Mbyte, and
256-Mbyte configurations are supported. You will
not get the full amount of memory if you mix a
32-Mbyte DIMM with any larger size. You will only
get the amount of the larger size (32 + 32 = 64,
32 + 64 = 64, 32 + 128 = 128).
6.
To install the code ROM module in the
keyed module connector, insert the
module until it locks in place. When
properly inserted, a tab on each end of
the connector slips into a notch on each
end of the ROM module.
7.
Carefully align the main board with the
board guides at the rear of the printer.
Firmly insert the main board into the
printer by pressing inward on the
indents on the rear panel. Ensure that
the main board is fully seated. Secure
the board with the two screws removed
earlier.
8.
Print a Configuration Page to check its
listing of the printer’s memory and
options. If the amount of RAM memory
does not match your installation (the
printer should now have at least
64 Mbytes of RAM), reinstall the
SDRAM DIMMs, ensuring that they are
fully seated and correctly installed.
9.
Update your host computer’s printer
driver so that the driver matches the
DP - upgraded printer; this involves
configuring the printer driver residing on
your computer. Refer to the Phaser 850
Advanced Features and Troubleshooting
Manual on the printer’s CD-ROM.
SDRAM DIMM
DIMM 2
DIMM 1
To install an SDRAM DIMM in the keyed DIMM
connector, insert the DIMM until it locks in place.
When properly inserted, a tab on each end of the
connector slips into a notch on each end of the
SDRAM DIMM.
Copyright © 1999 by Tektronix, Inc. All rights reserved.
Locate the code ROM module. To
release the installed code ROM module,
spread the latches securing each end of
the module in the connector.
Main
board
Slot DIMM 1 should already contain an SDRAM
DIMM when the printer was shipped from the
factory.
4.
5.
075-0497-AA
Code ROM module
840-4-87
Caution
■
Leave the printer plugged into its power
outlet; this preserves a ground path for
static discharges.
■
Touch the printer’s bare metal frame often
to discharge static electricity from your
body.
■
Handle the circuit board(s) by their edges
only.
■
Do not lay the board(s) on a metal
surface.
■
Avoid wearing nylon or polyester clothing;
they generate static electricity.
■
Mise à niveau d’une imprimante Phaser 850N vers une imprimante Phaser 850DP
situés de part et d’autre du connecteur
s’encastrent dans les ouvertures
correspondantes de la barrette DIMM.
La mise à niveau Z8450DP permet de bénéficier de 32 Mo
de mémoire supplémentaire et d’un nouveau module de
mémoire morte. Cela se traduit par un traitement plus
rapide des images, une meilleure résolution (1200 x 600
points par pouce) des possibilités d’impression Haute
résolution/Qualité photo et recto-verso automatique.
Grâce à la mise à niveau, l’imprimante prend également
en charge le traitement pipeline des images, ce qui
permet d’accélérer les travaux d’impression et l’affichage
de l’aperçu 1ère page.
La page de configuration interne de l’imprimante indique
la taille de la barrette DIMM (mémoire SDRAM) installée
dans chacun des emplacements correspondants. Pour
déterminer la taille et le type des barrettes actuellement
installées dans votre imprimante, faites défiler les
sélections sur le panneau avant jusqu’à Configuration de
l’imprimante et appuyez sur Select (Sélectionner) pour
imprimer la page de configuration.
1.
Mettez l’imprimante hors tension mais ne la
débranchez pas. Déconnectez tous les câbles
d’interface hôte.
2.
Retirez les deux vis qui maintiennent en place la
carte au panneau arrière de l’imprimante.
3.
Saisissez le panneau arrière par la poignée
escamotable en plastique et faites glisser la carte
principale hors de son logement.
5.
Repérez le module de mémoire morte.
Pour dégager le module déjà installé,
écartez les loquets maintenant en place
chaque extrémité du module dans le
connecteur.
6.
Pour installer le module de mémoire
morte dans le connecteur muni d’un
détrompeur, insérez-le de façon à ce
que les ergots situés de part et d’autre
du connecteur s’encastrent dans les
ouvertures correspondantes du module
de mémoire morte.
7.
Alignez avec précaution la carte
principale avec les guides
correspondants à l’arrière de
l’imprimante. Insérez-la à fond dans
l’imprimante en appuyant sur les
bords dentelés du panneau arrière.
Assurez-vous qu’elle est bien en place,
puis fixez-la avec les deux vis
antérieurement enlevées.
8.
Imprimez une page de configuration
pour vérifier la quantité de mémoire et
les options disponibles sur votre
imprimante. Si la capacité de la
mémoire RAM n’est pas celle
escomptée (vous devriez à présent
disposer d’au moins 64 Mo de mémoire
RAM), réinstallez les barrettes DIMM
SDRAM en veillant à bien les mettre en
place.
Carte principale
SDRAM DIMM
Remarque
L’imprimante accepte deux types de
barrettes DIMM (mémoire SDRAM) d’une
capacité de 32 Mo à 128 Mo. Seules les
configurations à 32 Mo, 64 Mo, 128 Mo,
196 Mo et 256 Mo sont possibles. Si vous
combinez une barrette DIMM de 32 Mo avec
une autre barrette, vous ne bénéficierez pas
de la totalité de la mémoire installée, mais
uniquement de la capacité offerte par la plus
grande barrette (32 + 32 = 64, 32 + 64 = 64,
32 + 128 = 128).
Une barrette DIMM de mémoire SDRAM a
été installée en usine dans l’emplacement
DIMM 1.
4.
Pour installer une barrette DIMM de mémoire
SDRAM dans le connecteur DIMM muni d’un
détrompeur, insérez-la de façon à ce que les ergots
DIMM 2
DIMM 1
9.
Mettez le pilote d’imprimante de votre
ordinateur hôte à jour pour qu’il
corresponde à la nouvelle imprimante
mise à niveau. Cela signifie qu’il faut
configurer le pilote d’imprimante se
trouvant sur votre ordinateur. Reportezvous au Phaser 850 Advanced Features
and Troubleshooting Manual (Manuel
des caractéristiques avancées et
dépannage Phaser 850) disponible sur
le CD-ROM de l’imprimante.
Module de
mémoire morte
840-4-87F
Attention
■
Veuillez laisser le cordon d’alimentation
branché sur le secteur pour éviter toute
décharge électrostatique.
■
Touchez régulièrement le cadre
métallique de l’imprimante pour vous
décharger de l’électricité statique.
■
Manipulez la (les) carte(s) à circuits par
les bords uniquement.
■
Ne placez pas la (les) carte(s) sur une
surface métallique.
■
Evitez de porter des vêtements en nylon
ou en polyester car ils génèrent de
l’électricité statique.
■
Aggiornamento di una stampante Phaser 850N ad una stampante Phaser 850DP
L’installazione dell’aggiornamento Z8450DP fornisce alla
stampante 32 MB di memoria aggiuntiva e un nuovo modulo
ROM di codice. Questo nuovo modulo e la memoria
aggiuntiva consentono un’elaborazione delle immagini più
rapida, una risoluzione più elevata (1200 x 600 punti per
pollice), una stampa fotografica/alta risoluzione e una
stampa automatica fronte retro. L’aggiornamento consente
alla stampante di supportare la canalizzazione delle
immagini per garantire un throughput più veloce dei lavori di
stampa e l’anteprima di stampa della prima pagina di un
lavoro.
La pagina di configurazione della stampante riporta un
elenco relativo alla dimensione del modulo DIMM SDRAM
installato negli slot DIMM RAM della stampante. Per
determinare la dimensione e il tipo di modulo DIMM
SDRAM installato nella stampante, nel pannello frontale
scorrere fino a visualizzare Configurazione della
stampante e premere Select (Seleziona) per stampare la
Pagina di configurazione.
1.
Spegnere la stampante, senza staccarne la spina.
Scollegare tutti i cavi di interfaccia host.
2.
Rimuovere le due viti che fissano il pannello
posteriore della scheda alla stampante.
3.
Afferrare la maniglia di plastica retrattile del
pannello posteriore ed estrarre la scheda
principale dal portaschede della stampante.
5.
Individuare il modulo ROM di codice.
Per rilasciare il modulo ROM di codice
installato, sbloccare i ganci che fissano
ciascuna estremità del modulo nel
connettore.
6.
Per installare il modulo ROM di codice
nel connettore del modulo, inserire il
modulo fino a bloccarlo in posizione. Se
il modulo è stato inserito correttamente,
una linguetta presente su ciascuna
estremità del connettore scorre in una
tacca posta su ciascuna estremità del
modulo ROM.
7.
Allineare la scheda principale alle
relative guide nella parte posteriore
della stampante. Inserire la scheda
principale nella stampante facendo
pressione verso l’interno sulle
rientranze presenti sul pannello
posteriore. Assicurarsi che la scheda
principale sia stata posizionata
correttamente. Fissare la scheda con le
due viti rimosse in precedenza.
Scheda
principale
8.
DIMM SDRAM
Nota La stampante consente l’inserimento di due DIMM
SDRAM, la cui capacità può essere compresa tra
32 MB e 128 MB. Sono supportate solo
configurazioni da 32 MB, 64 MB, 128 MB, 196 MB e
256 MB. Pertanto, la capacità di due DIMM di
dimensioni diverse non è cumulabile, ma sarà
possibile ottenere solo la quantità di memoria del
modulo DIMM dotato di capacità maggiore:
32 + 32 = 64, 32 + 64 = 64, 32 + 128 = 128.
Lo slot DIMM 1 dovrebbe già contenere un modulo
DIMM SDRAM installato direttamente dal produttore.
4.
Per installare un modulo DIMM SDRAM nel
connettore DIMM, inserire il modulo fino a
bloccarlo in posizione. Se il modulo è stato inserito
correttamente, una linguetta presente su ciascuna
estremità del connettore scorre in una tacca posta
su ciascuna estremità del modulo DIMM SDRAM.
DIMM 2
DIMM 1
9.
Stampare una pagina di configurazione
per verificare che la memoria e le
opzioni della stampante siano riportate
in elenco. Se la quantità di memoria
RAM non corrisponde a quella inserita
durante la procedura di installazione (la
stampante dovrebbe disporre di almeno
64 MB di RAM), reinstallare i moduli
DIMM SDRAM, verificando che siano
stati posizionati e installati
correttamente.
Per aggiornare il driver stampante del
computer host in modo che corrisponda
alla stampante aggiornata DP,
configurare il driver stampante che
risiede sul computer. Fare riferimento
alla documentazione relativa alle
funzioni avanzate e alla risoluzione dei
problemi della Phaser 850 presente nel
CD-ROM della stampante.
Modulo ROM
di codice
840-4-87I
Attenzione
■
Lasciare inserita la spina della stampante
nella presa di alimentazione. In questo
modo si predispone un percorso di messa
a terra per le scariche elettrostatiche.
■
Toccare spesso la struttura di metallo
della stampante per scaricare l’elettricità
statica dal proprio corpo.
■
Prendere la scheda o le schede di circuito
solo per i bordi.
■
Non appoggiare la scheda o le schede su
una superficie metallica.
■
Evitare di indossare indumenti in nylon o
poliestere, in quanto generano elettricità
statica.
■
Upgrade eines Druckermodells Phaser 850N auf Phaser 850DP
Durch die Installation des Upgrades Z8450DP erhält der
Drucker 32 MB mehr Arbeitsspeicher und ein neues
Code-ROM-Modul. Das neue Code-ROM-Modul und der
zusätzliche Arbeitsspeicher ermöglichen schnellere
Bildbearbeitung, höhere Auflösung (1200 x 600 dpi),
Drucken im Modus Hohe Auflösung/Foto und automatischer Duplexdruck. Mit dem Upgrade unterstützt der
Drucker auch Bild-Pipelineverarbeitung für schnellere
Bearbeitung von Druckaufträgen und die Druckvorschau
der ersten Seite eines Auftrages.
Auf der integrierten Konfigurationsseite des Druckers ist
aufgelistet, welche Kapazität die in den beiden
entsprechenden RAM-DIMM-Steckplätzen des Druckers
installierten SDRAM-DIMMs haben. Um Größe und Typ
der im Drucker installierten SDRAM-DIMMs festzustellen,
scrollen Sie am vorderen Bedienfeld zur Option
Druckerkonfiguration, und drücken Sie auf Select
(Auswählen), um die Konfigurationsseite auszudrucken.
1.
Schalten Sie den Drucker aus, trennen Sie ihn jedoch
nicht vom Netz. Ziehen Sie alle Host-Schnittstellenkabel ab.
2.
Entfernen Sie die beiden Schrauben, mit denen die
Rückseite der Platine am Drucker befestigt ist.
3.
Fassen Sie die Rückseite an dem ausziehbaren
Kunststoffgriff, und ziehen Sie die Hauptplatine aus
dem Kartengehäuse des Druckers.
Hauptplatine
5.
Suchen Sie das alte Code-ROM-Modul.
Um das installierte Modul herauszunehmen, biegen Sie die Laschen an jeder
Seite des Moduls, die das Modul im
Steckplatz sichern, leicht auseinander.
6.
Setzen Sie das neue Code-ROM-Modul
in den speziellen Modulsteckplatz ein, bis
es einrastet. Bei korrektem Einsetzen des
Moduls rastet an jedem Ende des Steckplatzes eine Lasche in je eine Nute an
jedem Ende des ROM-Moduls ein.
7.
Richten Sie die Hauptplatine sorgfältig an
den Kartenführungen auf der Rückseite
des Druckers aus. Schieben Sie die
Hauptplatine ein, indem Sie auf den
Aussparungen an der Rückseite nach
innen drücken. Überprüfen Sie, ob die
Platine richtig sitzt. Sichern Sie die Platine
wieder mit den zuvor entfernten beiden
Schrauben.
8.
SDRAM DIMM
Hinweis
In den Drucker können zwei SDRAM-DIMMs
installiert werden, deren Kapazität zwischen
32 MB und 128 MB liegen kann. Es werden nur
die Konfigurationen 32 MB, 64 MB, 128 MB,
196 MB und 256 MB unterstützt. Wenn Sie ein
32-MB-DIMM mit einem DIMM höherer
Kapazität kombinieren, erhalten Sie nicht die
volle rechnerische Kapazität, sondern lediglich
die Kapazität des größeren DIMMs
(32 + 32 = 64, 32 + 64 = 64, 32 + 128 = 128).
Im Steckplatz DIMM 1 sollte bereits ab Werk ein
SDRAM-DIMM installiert sein.
4.
Setzen Sie ein SDRAM-DIMM in den speziellen
DIMM-Steckplatz ein, bis es einrastet. Bei korrektem
Einsetzen des Moduls rastet an jedem Ende des
Steckplatzes eine Lasche in je eine Nute an jedem
Ende des SDRAM-DIMM-Moduls ein.
DIMM 2
DIMM 1
9.
Drucken Sie eine Konfigurationsseite und
überprüfen Sie die darauf aufgelisteten
Angaben über Speicher und Optionen
des Druckers. Stimmt die dort genannte
RAM-Kapazität nicht mit den installierten
Modulen überein, (der Drucker sollte nun
über mindestens 64 MB RAM verfügen),
installieren Sie die SDRAM-DIMMs
erneut, und achten Sie darauf, daß Sie
fest in den Steckplätzen sitzen und korrekt
installiert sind.
Aktualisieren Sie den Druckertreiber des
Hosts, so daß der Treiber dem nun auf DP
erweiterten Drucker entspricht. Hierzu
müssen Sie den auf dem Computer
installierten Druckertreiber konfigurieren.
Sehen Sie im Handbuch Phaser 850
Advanced Features and Troubleshooting
Manual (Erweiterte Funktionen und
Fehlerbehebung) auf der CD-ROM des
Druckers nach.
Code-ROM-Modul
840-4-87G
Vorsicht
■
Trennen Sie das Netzkabel des Druckers
nicht von der Steckdose. Über das Kabel
ist stets eine Erdung gegen statische
Elektrizität vorhanden.
■
Berühren Sie beim Arbeiten öfter den
Metallrahmen des Druckers, um die in
Ihrem Körper aufgebaute statische
Elektrizität abzuleiten.
■
Berühren Sie die Leiterplatte/n nur an den
Kanten.
■
Legen Sie die Leiterplatte/n nicht auf
metallische Oberflächen.
■
Vermeiden Sie Kleidungsstücke aus
Nylon oder Polyester, da sich in diesen
statische Elektrizität aufbaut.
■
Actualización de una impresora Phaser 850N a una Phaser 850DP
La instalación de la actualización Z8450DP proporciona a
la impresora 32 Mbytes de memoria adicionales y un
nuevo módulo ROM de códigos. El nuevo módulo ROM de
códigos y la memoria adicional permiten un procesamiento más rápido de la imagen, una mayor resolución
(1200 x 600 ppp), impresión de alta resolución/fotográfica
e impresión automática a dos caras. Con la actualización,
la impresora admite también la canalización de imágenes
para realizar más rápidamente los trabajos de impresión,
y la Presentación preliminar de la primera página para
revisar la primera impresión de un trabajo.
La página de configuración integrada de la impresora
indica el tamaño del DIMM de SDRAM instalado en cada
una de las ranuras DIMM de RAM de la impresora. Para
determinar el tamaño y el tipo de DIMM de SDRAM que
están instalados en la impresora, desplácese por el panel
frontal hasta Configuración de la impresora y pulse
Select (Seleccionar) para imprimir la página de
configuración.
1.
Apague la impresora, pero no la desconecte.
Desconecte todos los cables de interfaz con el
host.
2.
Quite los dos tornillos que sujetan el panel
posterior de la tarjeta a la impresora.
3.
5.
Localice el módulo ROM de códigos.
Para liberar el módulo ROM de códigos
instalado, abra las abrazaderas que
sujetan cada extremo del módulo en el
conector.
6.
Para instalar el módulo ROM de códigos
en el conector de módulos ranurado,
insértelo hasta que encaje en su sitio. Si
está correctamente instalado, las
pestañas situadas en cada extremo del
conector entrarán en las muescas
situadas en cada extremo del módulo
ROM.
7.
Alinee con cuidado la tarjeta principal
con las guías de la tarjeta en la parte
posterior de la impresora. Inserte
firmemente la tarjeta principal en la
impresora, presionando las muescas
del panel posterior hacia adentro.
Compruebe que la tarjeta principal esté
bien asentada. Fije la tarjeta con los dos
tornillos que quitó antes.
Tarjeta
principal
8.
Sujete el panel posterior por el asa de plástico
retráctil y deslice la tarjeta principal para extraerla
del alojamiento de tarjetas de la impresora.
DIMM de SDRAM
DIMM 2
Nota La impresora admite dos DIMM de SDRAM, cuyo
tamaño puede variar entre 32 y 128 Mbytes. Sólo
se admiten las configuraciones de 32, 64, 128, 196
y 256 Mbytes. Si combina un DIMM de 32 Mbytes
con otro de mayor tamaño, no obtendrá la cantidad
de memoria completa. Sólo obtendrá la cantidad
del DIMM de mayor tamaño (32 + 32 = 64,
32 + 64 = 64, 32 + 128 = 128).
Al recibir la impresora de fábrica, la ranura DIMM 1
ya debe contener un DIMM de SDRAM.
4.
Para instalar un DIMM de SDRAM en el conector
DIMM ranurado, inserte el módulo DIMM hasta que
encaje en su sitio. Si está bien insertado, las
pestañas situadas en cada extremo del conector
entrarán en las muescas situadas en cada extremo
del DIMM de SDRAM.
DIMM 1
9.
Imprima una página de configuración
para comprobar la lista de opciones y
memoria de la impresora. Si la cantidad
de memoria RAM no corresponde a la
instalación (la impresora debería tener
ahora por lo menos 64 Mbytes de
RAM), vuelva a instalar los DIMM de
SDRAM, asegurándose de que estén
bien asentados y correctamente
instalados.
Actualice el controlador de la impresora
del host para que coincida con la
impresora DP actualizada. Para esto,
deberá configurar el controlador de la
impresora de su ordenador. Consulte
Phaser 850 Advanced Features and
Troubleshooting Manual (Manual de
funciones avanzadas y solución de
problemas) en el CD-ROM de la
impresora.
Módulo ROM
de códigos
840-4-87S
Precaución
■
Deje la impresora conectada a la toma de
alimentación. De esta manera, se
mantiene una vía a tierra para las
descargas estáticas.
■
Toque con frecuencia el bastidor de metal
al descubierto de la impresora para
descargar la electricidad estática de su
cuerpo.
■
Manipule la(s) tarjeta(s) de circuitos
tocándola(s) únicamente por los bordes.
■
No coloque la(s) tarjeta(s) sobre una
superficie metálica.
■
Evite usar ropa de nylon o poliéster, ya
que genera electricidad estática.
.
840-4-87CHS
SDRAM DIMM
DIMM 2
DIMM 1
.
840-4-87CHT
SDRAM DIMM
DIMM 2
DIMM 1
■
Installing the Z8450DP upgrade provides the printer with
32 Mbytes of additional memory and a new code ROM
module. The new code ROM module and the extra
memory enables faster image processing, higher
resolution (1200 x 600 dots-per-inch), High Resolution/
Photo printing and automatic two-sided printing. With the
upgrade, the printer also supports image pipelining for
faster print job throughput and First Page Preview for
proofing the first print of a job.
Remove the two screws securing the board’s rear
panel to the printer.
3.
Grasp the rear panel by the retractable plastic
handle and slide the main board out of the printer
card cage.
Slot DIMM 1 should already contain an SDRAM
DIMM when the printer was shipped from the
factory.
4.
To install an SDRAM DIMM in the keyed DIMM
connector, insert the DIMM until it locks in place.
When properly inserted, a tab on each end of the
connector slips into a notch on each end of the
SDRAM DIMM.
To install the code ROM module in the
keyed module connector, insert the
module until it locks in place. When
properly inserted, a tab on each end of
the connector slips inteacend of the
9.
SDRAM DIMM
Note The printer accepts two SDRAM DIMMs, which can
vary in size from 32 Mbytes to 128 Mbytes. Only
32-Mbyte, 64-Mbyte, 128-Mbyte, 196-Mbyte, and
256-Mbyte configurations are supported. You will
not get the full amount of memory if you mix a
32-Mbyte DIMM with any larger size. You will only
get the amount of the larger size (32 + 32 = 64,
32 + 64 = 64, 32 + 128 = 128).
6.
8.
Turn off the printer; do not unplug the printer.
Disconnect all host interface cables.
2.
Locate the code ROM module. To
release the installed code ROM module,
spread the latches securing each end of
the module in the connector.
7.
The printer’s built-in Configuration Page lists what size
SDRAM DIMM is installed in each of the printer’s RAM
DIMM slots. To determine what size and type of SDRAM
DIMMs are installed in your printer, scroll through the front
panel to Printer Configuration and press Select to print
the Configuration Page.
1.
5.
DIMM 2
DIMM 1
Carefully align the main board with the
board guides at the rear of the printer.
Firmly insert the main board into the
printer by pressing inward on the
indents on the rear panel. Ensure that
the main board is fully seated. Secure
the board with the two screws removed
earlier.
840-4-87
Print a Configuration Page to check its
listing of the printer’s memory and
options. If the amount of RAM memory
does not match your installation (the
printer should now have at least
Caution
■
Leave the printer plugged into its power
outlet; this preserves a ground path for
static discharges.
■
Touch the printer’s bare metal frame often
to discharge static electricity from your bo
■
Handle the circuit board(s) by their edges
only.
■
Do not lay the board(s) on a metal
surface.
■
Avoid wearing nylon or polyester clothing;
they generate static electricity.
Scarica