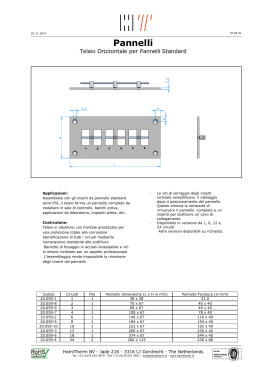
Web site: www.cflamiere.com
Instructions in all languages: http://www.cflamiere.com/dettaglio-prodotti.aspx?id=18
INDICE INDEX
Attrezzatura per il montaggio
Mounting tools and equipment
Carrello per il trasporto (opzione)
Cart for the transport (optional)
Montaggio primo pannello
Mounting of the first panel
Montaggio pannelli successivi
Mounting of the following panels
Angoli esterni e angoli a 45 gradi
Outside corners and angles to 45 degrees
Supporto piede (opzione)
Foot support (optional)
Pannello universale
Universal panel
Porte Doors
Montaggio porta ad anta
Assembling the hinge door
Montaggio porta scorrevole
Assembling the sliding door
pag. 2
pag. 2
pag. 2
pag. 2
pag. 2
pag. 2
pag. 3
pag. 3
pag. 4
pag. 4
pag. 5
pag. 5
pag. 6
pag. 6
pag. 8
pag. 8
pag. 9
pag. 9
Opzioni Optional
Controventatura
Support
pag. 10
pag. 10
1
Attrezzatura per il montaggio - Mounting tools
Chiavi da 13, chiave da 10, cacciavite esagonale da
4, martello,livella, trapano con punta da 8
Viti nell’imballo:
M8x60 flangiato e dado M8 flangiato zincato
M6x16 button e dado M6 flangiato zincato
tasselli 8x75
Wrench n. 13 and 10, hex driver n. 4, hammer,
level, drill with point n. 8.
Screws in the package:
flanged M8x60 and M8 flanged and galvanized nut
M6x16 button screws and M6 flanged and
galvanized nut
rawlplugs 8x75
CARRELLO PER IL TRASPORTO DEI PANNELLI (opzione)
CART FOR THE TRANSPORT (optional)
Estrarre il carrello dalla cassa, piegarlo sino a fare combinare i fori con le viti libere. Serrare le viti e fare scivolare il pannello a
terra. Portarlo in posizione verticale senza sollevarlo. Poi agganciare il carrello e trasportarlo.
Pull out the cart from the case, fold it till the holes combine with the free screws. Tighten the screws and slide the panel to the
ground. Put it in a vertical position without lifting it. Then hang the cart and transport it.
Montaggio dei pannelli in lamiera o in policarbonato
Mounting the sheet metal panels or polycarbonate panels
1) Montare 2 piedi al primo
pannello che si usa per iniziare la
composizione del layout.
(E’ consigliabile partire da un
angolo per evitare ribaltamenti dei
pannelli stessi)
1) Mounting 2 feet at the first
panel, wich is used to start the
composition of the layout.
(It’s recommended to start from a
corner to avoid the overtunings of
the panels)
2
2) Dal secondo pannello in poi
montare un solo piede dal lato
opposto del pannello di partenza.
2) From the second panel mounting
only one foot from the opposite
side of the starter panel.
3) Appoggiare il secondo pannello
sul piede del primo pannello, dal
lato dove non è stato montato il
piede.
3) Support the second panel on the
foot of the first panel, from the side
where the foot hasn’t been
mounted.
4) Se nel layout c’è un angolo, è
consigliabile partire da quel punto,
così che il montaggio risulterà
molto più sicuro e stabile.
4) If in the layout there’s a corner,
it’s recommended to start from that
point, so the mounting will be more
sicure and stable.
3
5) Unire i pannelli tra loro nei tre punti (alto, basso e centrale)
5) Joining the panels together in the three points (top, bottom and middle)
Per ricavare angoli esterni, angoli a
45 gradi sia esterni che interni
utilizzare l’ apposito profilo
Angolo esterno
Outside corner
To obtain the outer corners, angles
to 45 degrees both external and
internal use 'appropriate profile
Con lo stesso profilo si ricava
l’angolo a 45 gradi sia interno
che esterno
With the same profile angle is
obtained at 45 degrees, both
internally and externally
4
SUPPORTO PIEDE (opzione ) - FOOT SUPPORT (optional)
Man mano che si procede con il montaggio, usare l’apposito supporto per evitare che uno o più
pannelli si ribaltino durante la posa e prima del fissaggio a terra.
(ATTENZIONE: PER LAVORARE IN SICUREZZA, SE IL PAVIMENTO NON E’ PLANARE,
FISSARE I PANNELLI A TERRA DURANTE LA POSA.)
Proceeding with the mounting, use the appropriate support to avoid the overtunings of the panels
during the laying and before the fixing to the ground.
(ATTENTION: FOR A SAFE WORK, IF THE FLOOR IS NOT PLANE, FIXING THE PANELS
TO THE GROUND DURING THE INSTALLATION.)
Inserire
il
supporto
lateralmente alle ali del piede.
Insert the support laterally to
the foot.
Agganciare la parte dentellata del
supporto nel piede, dandogli
portanza.
Hook the notched support in the
foot, giving it lift.
Per rimuovere il supporto, usare il
cacciavite esagonale.
To remove the support, use the hex
driver.
5
Pannello universale - Universal panel
Permette di realizzare tutte le misure da 900 a 130 senza alcuna limitazione di passo.
It allows to realise all the size from 900 to 130 without any limitation of step.
Dopo aver montato a dx e a sx i
pannelli standard con i piedi,
agganciare dall’alto il pannello
universale.
After mounting to the right and to
the left the standard panels with
feet, hang from the top the
universal panel.
1) Fissare la parte superiore
del pannello universale ai
pannelli standard.
2) Fix the top of the universal
panel with the standard
panels.
2) Fissare la parte inferiore
del pannello universale ai
pannelli standard.
2) Fix the bottom of the
universal panel at the
standard panels.
3) Forare in opera il pannello
standard usando i fori del
pannello
universale
come
riferimento. Unire i pannelli con
viti button M6x16 e dado M6
flangiato.
3) Drill the standard panel using
the holes of the universal panel
as a reference. Joining the
panels with M6x16 button
screws and M6 flanged nut.
6
Alcuni esempi di impiego del pannello universale:
Some examples of the use of the universal panel:
Pannello universale usato alla
massima estensione = 900 mm
Universal panel used at the
maximum extention = 900 mm
Pannello universale montato ad angolo.
Universal panel corner mounted.
Pannello universale usato alla
minima estensione = 130 mm
Universal panel used at the
maximum extention = 130 mm
Quando si usa il pannello universale
montato
ad
angolo
fissarlo
in
corrispondenza dei fori presenti sul
pannello standard usando viti button
M6x16 e dado M6 flangiato.
Using the universal panel corner mounted,
fix it at the holes in the standard panel
using M6x16 button screws and M6
flanged nut.
7
Porta ad anta completamente montata
Hinge door completely assembled
Una volta estratta dalla cassa e fissata a
terra, regolare l’altezza del supporto micro
usando le asole in verticale ricavate nel
supporto micro stesso.
Pull out the hinge door from the case and
fix it to the ground. Adjust the hight of the
micro support using the slots in vertical
formed in the micro support.
Pannello lato micro con supporto micro e
piede più corto già montati.
Panel micro side with micro support and
shorter foot pre-mounted.
Porta unita al pannello affianco
mediante cerniere.
Regolare in altezza
montata sulla porta.
la
ruota
Hinge door joined by hinges to the
next panel.
Adjust the height of the wheel
mounted on the hinge door.
8
Porta scorrevole completamente montata
Sliding door completely assembled
fig. 1
fig. 4
Montare per prima cosa la
guida superiore. Infilare le
ruote della porta e
montare le staffe dentro la
guida tenendo la porta
inclinata. (fig. 1)
Montare i supporti guida
inferiore (fig. 2/3) sui
pannelli affianco alla
porta.
Regolare la posizione
dell’attuatore per l’innesto
nel micro. (fig. 4)
Fist mounting the upper
guide. Put the wheels of
the door in the guide and
mount the brackets inside
the guide holding the door
sloping. (fig. 1)
Mounting the bottom
guide support (fig. 2/3) on
the panels near the door.
Adjust the position of the
actuator
for
the
engagement in the micro.
(fig. 4)
fig. 2
fig. 3
9
Controventatura (opzione)
Support (optional)
Per dare al pannello più consistenza
e una resistenza maggiore alla
spinta laterale, si può montare come
opzione il supporto per pannello.
Fissare la controventatura al
pannello usando 1 vite M6x16
button con dado M6 flangiato.
Fissare la controventatura a terra
con un tappo da muro M8.
E regolare l’inclinazione del
pannello tramite le asole presenti
sulla controventatura.
To give more consistency and more
resistance to the lateral push, can be
mounted as an option the panel
support.
Fix the bracing to the panel using a
M6x16 button screw with M6
flanged nut.
Fix the bracing to the ground with a
M8 wall plug.
Adjust the inclination of the panel
using the slots of the bracing.
10
Scarica