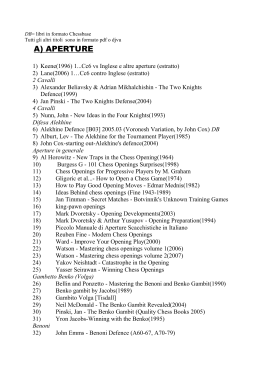
Chapter Five
Gambit Lines
In the final chapter of this book we’ll look at four diverse gambit lines for Black and one
avoidance measure versus the Marshall Attack for White:
1. The Schliemann Defence: 1 e4 e5 2 Ìf3 Ìc6 3 Íb5 f5.
2. The Steinitz Deferred, Siesta Variation: 1 e4 e5 2 Ìf3 Ìc6 3 Íb5 a6 4 Ía4 d6 5 c3 f5.
3. The Gajewski Gambit in the Chigorin: 1 e4 e5 2 Ìf3 Ìc6 3 Íb5 a6 4 Ía4 Ìf6 5 0-0
Íe7 6 Îe1 b5 7 Íb3 d6 8 c3 0-0 9 h3 Ìa5 10 Íc2 d5.
4. The Marshall Attack: 1 e4 e5 2 Ìf3 Ìc6 3 Íb5 a6 4 Ía4 Ìf6 5 0-0 Íe7 6 Îe1 b5 7
Íb3 0-0 8 c3 d5.
5. The Anti-Marshall with 8 h3: 1 e4 e5 2 Ìf3 Ìc6 3 Íb5 a6 4 Ía4 Ìf6 5 0-0 Íe7 6 Îe1
b5 7 Íb3 0-0 8 h3.
The common theme in these gambits is the deflection or elimination of White’s e4pawn, which allows the black pieces more freedom than they normally achieve at an early
stage in the Ruy Lopez. Their increased energy won’t necessarily express itself in an immediate ‘do-or-die’ counterattack. As we shall see in the Marshall Attack, for example, Black’s
dynamism can be maintained into the endgame, preventing White from exploiting his extra pawn.
So let’s get down to business. The Schliemann Defence needs the most attention as it
comes right at the beginning of the Ruy Lopez – there’s no way to avoid it.
The Schliemann Defence
1 e4 e5 2 Ìf3 Ìc6 3 Íb5 f5
We have already examined 4 d3!? in Chapter One, and if you are happy with that then
you can skip the coverage of 4 Ìc3 here.
In the Schliemann, Black in effect says to his opponent: ‘You have placed your bishop on
255
The Ruy Lopez: Move by Move
the wrong diagonal. Because it is on b5 rather than c4 I can play a King’s Gambit with the
black pieces!’ Such reasoning was probably more convincing back in 1847 when Jaenisch
pioneered this defence. Nonetheless, it is alive and kicking more than 150 years later.
W________W
[rDb1kgn4]
[0p0pDW0p]
[WDnDWDWD]
[DBDW0pDW]
[WDWDPDWD]
[DWDWDNDW]
[P)P)W)P)]
[$NGQIWDR]
W--------W
It certainly doesn’t lack ambition. Without any preparation, Black challenges the e4pawn. He is willing to loosen his pawn structure, and even toy with his king’s safety, in order to increase the energy of his pieces. In other words, it is quite ‘modern’ in its aims.
There is no definite refutation, and Radjabov has played it with success at the highest
level. Playing like this requires an adventurous spirit combined with some hard knowledge
of theory.
For our first game we’ll choose a battle of the Kates: Katerina Nemcova, of the Czech
Republic, a WGM, versus Kateryna Lahno of the Ukraine, a full GM.
Game 34
K.Lahno-K.Nemcova
European Women’s Championship, Plovdiv 2008
1 e4 e5 2 Ìf3 Ìc6 3 Íb5 f5
If Black intends to attack e4, it isn’t a good idea to interpose 3...a6 4 Ía4 as after 4...f5 5
d4! is a good reply. For example 5...exd4 6 e5 followed by 7 0-0 and 8 c3 with a strong initiative. In contrast after 3...f5 4 d4?! fxe4 5 Ìxe5 Ìxe5 6 dxe5 Black has 6...c6! attacking the
white bishop, when if 7 Íe2 Ëa5+ and 8...Ëxe5 wins an important centre pawn.
4 Ìc3
The most popular response. It allows Black to build a big centre, but White aims to cut it
down to size with the help of some sharp tactics.
Another possibility is 4 d3 (see Chapter One), but let’s not take the pawn with 4 exf5? as
Black gains the initiative with 4....e4, disturbing our knight on f3.
256
Gambit Lines
W________W
[rDb1kgn4]
[0p0pDW0p]
[WDnDWDWD]
[DBDW0pDW]
[WDWDPDWD]
[DWHWDNDW]
[P)P)W)P)]
[$WGQIWDR]
W--------W
4...fxe4
The elimination of the e4-pawn is the whole point of Black’s last move.
We don’t need to worry too much about other options for Black. For example if 4...Ìd4
5 Íc4 when 5...fxe4? 6 Ìxd4 exd4 7 Ëh5+ is already winning for White. Against 4...Ìf6 5
exf5 is a good moment to accept the pawn, as 5...e4 6 Ìg5 can be followed by d2-d3, breaking up the black centre, while after 5...Íc5 6 0-0 0-0 the fork trick 7 Ìxe5! achieves the
same end after 7...Ìxe5 8 d4, when White regains the piece. Or if 7...Ìd4, the calm 8 Ìf3!
c6 9 Ìxd4 Íxd4 10 Ía4 leaves White with two extra pawns and facing no danger.
Question: Okay, but after 4...fxe4 I don’t like the way
my e-pawn has vanished and my knight can be
kicked from the centre. It looks all wrong to me.
Answer: I guess we’ve been looking at too many games with a closed pawn centre! Generally speaking in the Ruy Lopez, the downfall of the e4-pawn is a cause of celebration for
Black, and a source of regret for White.
But here things have happened very fast – the black king is still in the centre and his defences have been weakened by the removal of the f7-pawn. Does Black really have time to
construct a pawn centre and also get the king to safety? Aren’t the active white pieces going to land a blow somewhere? Let’s see how the theory unfolds.
5 Ìxe4
The knight takes up an impressive centre post. It has to be challenged by the black
pieces – but how?
257
The Ruy Lopez: Move by Move
W________W
[rDb1kgn4]
[0p0pDW0p]
[WDnDWDWD]
[DBDW0WDW]
[WDWDNDWD]
[DWDWDNDW]
[P)P)W)P)]
[$WGQIWDR]
W--------W
5...Ìf6!?
This is the most popular move at the time of writing. The ambitious alternative 5...d5,
which is examined in games that follow, has never been refuted, but armed with the necessary theory White can avoid all the traps to reach a slight, if unexciting advantage in the
middlegame.
6 Ëe2!?
Lahno defends her knight and keeps up pressure on the black centre.
Question: Why not 6 Ìxf6+ and 7 Ëe2 –
doesn’t that come to the same thing?
Answer: Be patient! The next game will answer this question.
6...d5
Black has no other good way to shake off White’s centre pressure. Still, building a broad
pawn centre was the whole point of dislodging the white pawn from e4.
W________W
[rDb1kgW4]
[0p0WDW0p]
[WDnDWhWD]
[DBDp0WDW]
[WDWDNDWD]
[DWDWDNDW]
[P)P)Q)P)]
[$WGWIWDR]
W--------W
258
Gambit Lines
7 Ìxf6+
Question: Doesn’t this strengthen the black centre
after she recaptures with the pawn?
Answer: Black does temporarily get a broad centre, but she won’t be able to keep it intact.
You could say that a centre is only as powerful as the pieces that are supporting it. That’s
why White is playing energetically to force a crisis before Black is able to complete her development.
7...gxf6!
The only way to hold onto e5. After 7...Ëxf6 8 Ëxe5+ Black is just a pawn down.
8 d4!
The key move. If now 8...e4 9 Ìh4, when besides suffering the weakening of her centre
pawns (ideally she wants to keep them on d5 and e5) Black is menaced by a queen check on
h5.
8...Íg7
At first glance this looks like a mistake, but Black is planning a temporary pawn sacrifice to catch up in development and evacuate the king from the centre.
9 dxe5
W________W
[rDb1kDW4]
[0p0WDWgp]
[WDnDW0WD]
[DBDp)WDW]
[WDWDWDWD]
[DWDWDNDW]
[P)PDQ)P)]
[$WGWIWDR]
W--------W
Exercise: See if you can guess Black’s dynamic reply.
White appears to have triumphed, as the black centre is broken up and she has won a
pawn after 9...fxe5 10 Ìxe5. But...
Answer: 9...0-0!
Black breaks the pin on c6 and removes the king from the firing line.
10 Íxc6
259
The Ruy Lopez: Move by Move
If instead 10 exf6 then 10...Ëxf6 gives Black good play for the pawn.
10...bxc6
Question: How should White prevent 11...fxe5,
when Black energizes her pieces and pawns?
Answer: 11 e6!
An excellent positional move. Instead after 11 exf6 Ëxf6 intending ...Íg4 and then
...Îae8 Black is splendidly active. Permissible is 11 0-0 by White, as long as she answers
11...Îe8 by 12 e6 returning to the main game.
Going back a move, instead of 10 Íxc6, 10 e6!? at once is sometimes played, when Black
can reply 10...Ìe5 with complications.
11...Îe8
W________W
[rDb1rDkD]
[0W0WDWgp]
[WDpDP0WD]
[DWDpDWDW]
[WDWDWDWD]
[DWDWDNDW]
[P)PDQ)P)]
[$WGWIWDR]
W--------W
Black will regain the pawn, but remains with her bishop shut in on g7 and a fractured
kingside.
12 0-0
Now it is White’s turn to whisk away the king to avoid a pin on the e-file.
12...c5
Question: Why is it useful for Black to have control of the d4-square?
Answer: After the immediate 12...Îxe6 13 Ëd3 White has the strong idea of 14 Ìd4 followed at an appropriate moment by Ìf5, putting the knight on the outpost square in front
of the isolated f6-pawn. Black would have no wish to be forced into the exchange Íxf5 as
after Ëxf5 her dynamism has dwindled – whereas the static pawn weaknesses remain.
After 12....Îxe6 13 Ëd3 Black could still play 13...c5, but Nemcova has another reason in
mind to delay the capture on e6.
13 Íf4
260
Gambit Lines
W________W
[rDb1rDkD]
[0W0WDWgp]
[WDWDP0WD]
[DW0pDWDW]
[WDWDWGWD]
[DWDWDNDW]
[P)PDQ)P)]
[$WDWDRIW]
W--------W
Exercise: Black has two obvious ways to take on e6, but can you
find an imaginative way to arrange the capture by a third black piece?
(Hint: it will take a three-move manoeuvre!)
13 Íf4 takes advantage of the gaps in the black centre to put the bishop on an active
square where it can’t be attacked by a black pawn. The pressure on the c7-pawn is also significant. An interesting alternative was 13 Ëb5!? when Black should defend c5 with
13...Íf8.
Answer: 13...Îb8!?
An admirable lesson in how to activate your worst placed piece. The black rook intends
to join the ensemble of other black pieces in the centre via b6 and e6.
14 b3
Black has gained a useful move for her rook’s journey as White can’t allow the b2-pawn
to fall.
14...Îb6
Question: Now what is the best way for White to try
to exploit Black’s weakened queenside pawns?
Answer: 15 Ëd2!
Black’s rook manoeuvre has the drawback that the a7-pawn has been left undefended.
Therefore Ëa5! will attack a7 and c5 and, in the event of ...Îbxe6, the c7-pawn in unison
with the bishop on f4.
15...Íf8
Black defends the c5-pawn. 15...Îbxe6 16 Ëa5 Ëe7 17 Íxc7 Îa6 18 Îfe1 Îxa5 19 Îxe7
Îxe7 20 Íxa5 would leave White a pawn up in the endgame, though the two bishops
would give Black considerable power of resistance.
261
The Ruy Lopez: Move by Move
16 Îad1
W________W
[WDb1rgkD]
[0W0WDWDp]
[W4WDP0WD]
[DW0pDWDW]
[WDWDWGWD]
[DPDWDNDW]
[PDP!W)P)]
[DWDRDRIW]
W--------W
Question: How should Black meet the threat to d5?
The pressure on the black centre leads to a rather panicky reaction by Black:
16...Íxe6?
Answer: It only takes one ‘obvious’ move to ruin a position. The bishop capture is totally
inconsistent with putting the rook on b6. Also weak are 16...d4, when 17 c3 undermines
the centre pawn, and 16...c6 which shuts out the rook on b6. But the position looks unclear
after 16...Íb7, for example 17 Ìh4 Îbxe6 18 Ìf5 Ëd7 etc.
17 Îfe1
Nemcova’s choice of 16...Íxe6? means that she has a rook on b6 and a bishop on e6
rather than, after 16...Íb7 and 17...Îbxe6, a rook on e6 and a bishop on b7. Can you see
that this represents a loss of coordination by the black pieces? It becomes even clearer after
Black’s next move:
17...c6
Black feels obliged to stabilize the d5-pawn, but what a miserable outcome to the grand
hopes of centralizing the rook with ...Îbxe6!
18 Íh6!
Offering an unwelcome exchange of bishops which would leave the dark squares weak
around the black king. Besides, the c5-pawn would become more fragile once deprived of
its defender.
18...Íd6 19 c4
262
Gambit Lines
W________W
[WDW1rDkD]
[0WDWDWDp]
[W4pgb0WG]
[DW0pDWDW]
[WDPDWDWD]
[DPDWDNDW]
[PDW!W)P)]
[DWDR$WIW]
W--------W
19...Íf7
Question: I don’t understand these moves. Why can’t Black play
19...d4 with a protected passed pawn in the centre?
Answer: After 19...d4 any counterplay that Black might have achieved through pressure on
c4 is gone. Her two bishops are lame, and it would be rather unpleasant having to endure
White’s probing with say 20 Ëd3 followed by 21 Ìd2 and 22 Ìe4.
Perhaps the best move was 19...Îb7, to bring the rook back into the game. Black might
have feared the sacrifice 20 Îxe6!? Îxe6 21 cxd5 cxd5 22 Ëxd5 though 22...Ëc8 seems to
hold for Black. In any case, provoking a crisis of this sort was preferable to being slowly
ground down in the game.
20 Ìh4 Îxe1+ 21 Îxe1 Ëd7 22 Ëc3!
W________W
[WDWDWDkD]
[0WDqDbDp]
[W4pgW0WG]
[DW0pDWDW]
[WDPDWDWH]
[DP!WDWDW]
[PDWDW)P)]
[DWDW$WIW]
W--------W
Exercise: Work out what happens after 22...Íe5.
263
The Ruy Lopez: Move by Move
White’s task after 22 Ëc3 is to get the queen involved in the attack on the enemy king.
The g3-, g4- and g5-squares are all barred to her, but Lahno finds an admirable way to
gradually infiltrate the defence.
22...Ëd8
The black queen is obliged to defend the f6-pawn.
Answer: If 22...Íe5? there follows 23 Îxe5 fxe5 24 Ëg3+ Íg6 25 Ìxg6 hxg6 26 Ëxg6+ Êh8
27 Íg5! and there is no defence to 28 Íf6+ winning the queen or mating. Notice how the
rook on b6 is a useless bystander whilst all this is going on.
23 Ëf3 Êh8 24 Ëg4 Íf8 25 Íxf8 Ëxf8 26 Ëf4 Íg8 27 Îe8!
A pretty infiltration. It’s mate in one if Black takes the rook.
27...Ëf7 28 Ëd6 Îb7
Black’s rook manoeuvre to b6 proved a catastrophe because Black lost heart before
completing it. It isn’t enough to have a good idea – you need to carry it out to a finish if at
all possible.
29 Ìf5!
W________W
[WDWDRDbi]
[0rDWDqDp]
[WDp!W0WD]
[DW0pDNDW]
[WDPDWDWD]
[DPDWDWDW]
[PDWDW)P)]
[DWDWDWIW]
W--------W
The knight reaches its ‘Lopez’ f5-square in some style. Black has no way to oust it as her
own minor piece is completely dominated. If 29...Ëxe8 30 Ëxf6+ and mate next move.
29...Ëg6
White mustn’t become so obsessed in the attack on the black king that she forgets
about her own king. Nemcova is hoping to catch her opponent in a cruel trap: 30 Ìe7,
planning the brilliant finish 30...Ëxe8 31 Ëxf6 mate, is a howler because of 30...Ëb1 and it
is White who is mated.
30 Ëe6!
Lahno calmly defends her knight and strengthens the pin on g8.
30...Îf7
Black defends f6 to avoid being put into a fatal pin after say 30...d4 31 Îxg8+ Ëxg8 32
Ëxf6+ Îg7, but now the black pieces fall prey to the white knight.
264
Gambit Lines
W________W
[WDWDRDbi]
[0WDWDrDp]
[WDpDQ0qD]
[DW0pDNDW]
[WDPDWDWD]
[DPDWDWDW]
[PDWDW)P)]
[DWDWDWIW]
W--------W
31 Îxg8+!
A neat concluding combination. Whichever way Black recaptures there is a decisive
fork.
31...Ëxg8
The lesser evil, as 31...Êxg8 32 Ìe7+ wins the queen.
32 Ìh6
The knight strikes the decisive blow from its outpost square.
32...Ëg6
Hoping to fight on after 33 Ìxf7+ Êg7 when the mating threat on b1 wins time to recapture on f7.
33 Ëc8+! 1-0
W________W
[WDQDWDWi]
[0WDWDrDp]
[WDpDW0qH]
[DW0pDWDW]
[WDPDWDWD]
[DPDWDWDW]
[PDWDW)P)]
[DWDWDWIW]
W--------W
After 33...Êg7 the knight once more returns to its outpost square ands wins the queen
with 34 Ìf5+. I guess you can live quite happily with the move order 6 Ëe2 and 7 Ìxf6+
but I can’t resist showing you the curious consequences of inverting the move order with 6
Ìxf6+ and 7 Ëe2.
265
Scaricare