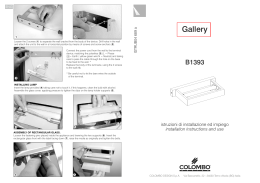
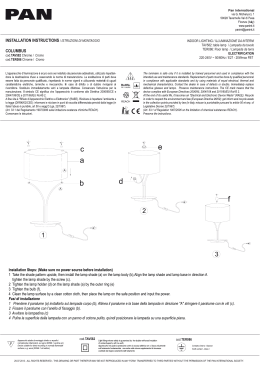
ITA
ENG
2
ISTRUB03 674 b
1
Gallery
Loosen the 2 screws (1) to separate the wall bracket from the body of the device. Drill
holes in the wall and attach the unit to the wall in a horizontal position by means of screws
and screw anchors (2).
B1392
Connect the power cord from the wall to the
terminal device, matching the polarities (3)
(L = Phase
= Earth / yellow-green wire
N = Neutral) and taking care to pass the cable
through the hole on the base to be fixed
to the wall. *
Replace the body of the luminaire, using
the 2 screws to the wall (1).
3
* Be careful not to let the bare wires the outside
of the terminal.
LAMP REPLACEMENT
Removing at least one of the two protective glass (4).Insert the lamp provided (5) being
careful not to touch it, if this happens, clean the bulb with alcohol.Replace the two panes
of protection as before
istruzioni di installazione ed impiego
installation instructions and use
R
4
5
D
COLOMBO DESIGN S.p.A.
E
S
I
G
N
Via Baccanello, 22 - 24030 Terno d'Isola (BG) Italia
ITA
ITA
NOTA
La sicurezza dell’apparecchio è garantita solo rispettando queste istruzioni sia in fase
di installazione che di impiego; è pertanto necessario conservarle.
PULIZIA DELLA LAMPADA
Per la pulizia della lampada usare esclusivamente un panno morbido eventualmente
inumidito con acqua e sapone o detersivo neutro per lo sporco più tenace.
Attenzione non usare alcool o altri solventi.
CE Attesta la conformità del prodotto alle disposizioni delle direttive comunitarie.
ATTENZIONE
All’atto dell’installazione ed ogni volta che si interviene sulla lampada, assicurarsi che sia
stata tolta la tensione di alimentazione.
COLOMBO DESIGN S.p.A non si assume alcuna resposabilità per prodotti modificati
senza preventiva autorizzazione.
1
Allentare le 2 viti (1) per separare l’attacco a muro dal corpo dell’apparecchio.
Effettuare i fori nella parete e fissare l’attacco a muro in posizione orizzontale mediante
viti e tasselli ad espansione (2).
ENG
NOTE
The safety of the device is guaranteed only by respecting these instructions, both during
installation and use; It is therefore necessary to keep this document.
CLEANING OF THE LAMP
For the cleaning of lamp use only a soft cloth dampened if necessary with soap and water
or neutral detergent.
Caution do not use alcohol or other solvents.
3
CE Certify the product is in conformity with the Community directives.
ATTENTION
During the installation and /or with intervenes on the lamp, be sure to remove the power
supply voltage.
COLOMBO DESIGN S.p.A assumes no responsibility for any modification to the product
without prior permission.
2
Collegare il cavo d’alimentazione proveniente
dalla parete alla morsettiera dell’apparecchio,
rispettando le polarità (3) (L=Fase
=Terra/cavo giallo-verde N=Neutro) e avendo
cura di fare passare il cavo attraverso il foro
presente sulla basetta da fissare alla parete.*
Rimontare il corpo dell’apparecchio di
illuminazione, mediante le 2 viti all’attacco a
muro (1).
* Prestare attenzione a non lasciare i fili scoperti
all’esterno dell’involucro della morsettiera.
SOSTITUZIONE DELLA LAMPADA
Rimuovere almeno uno dei due vetri di protezione (4).
Inserire la lampada in dotazione (5) facendo attenzione a non toccarla con le mani,
qualora ciò avvenga la si dovrà pulire con alcool.
Rimontare i due vetri di protezione come in origine.
CARATTERISTICHE TECNICHE / TECHNICAL SPECIFICATIONS
Tipologia: apparecchio di illuminazione da parete e/o soffitto
Typology: lamp fixture wall and/or ceiling
Potenza / Power : max 80W
Tensione nominale / Voltage : 230V ~
Tipo di lampada : alogena 78mm con attacco R7s
Lamp type : halogen 78mm with R7s
Grado di protezione : IP20 apparecchio adatto solo all’uso in interni
Level of protection : IP20 device suitable for indoor use only
Classe di isolamento / Class of insulation : CL I
4
5
Scarica