Für das Hauptaußeneiheit wird die 1. Adresse zugeteilt. Die zusätzliche Außeneiheiten müssen mit einer
anderen Adresse programmiert werden, und zwar:
- Die 2. Adresse für ein zusätzliches, parallel angeschlossenen Außeneiheit
- Die 2. und die 3. Adresse für zwei zusätzliche, parallel angeschlossene Außeneiheiten
- Die 2., 3. und 4. Adresse für drei zusätzliche, paralllel angeschlossene Außeneiheiten.
Das Programmierungsverfahren ist wie folgt:
Schritt 1
Stromversorgungseinheit
PROG
Den Knopf PROG lang drücken.
Die rote LED ist ein.
Schritt 2 Außeneinheit
Es wird den Knopf
Einrichtbetrieb.
Schritt 3
Es wird den Knopf
kurz, während einer Zeitspanne von max. 5 Sekunden
gedrückt,und zwar solange damit diese Druckanzahl der gewünschten Adresse
entspricht, d.h.:
2-mal kurz drücken – es wird die 2. Adresse programmiert 2 x [BEEP].
BEEP
3-mal kurz drücken – es wird die 3. Adresse programmiert 3 x [ ].
BEEP
4-mal kurz drücken – es wird die 4. Adresse programmiert 4 x [ ].
Nachdem man den Bestätigungton hören kann, kommt der Außeneinheit selber
aus dem Einrichtbetrieb heraus.
Schritt 4
Außeneinheit
Stromversorgungseinheit
PROG
lang gedrückt
EN Programming the address of the additional audio panel
The main panel in the system is programmed with Address 1. The additional panels connected in parallel
must be programmed with a different address, as following:
- Address 2 for one additional panel in parallel
- Address 2 and Address 3 for two additional panels in parallel
- Address 2, Address 3 and Address 4 for three additional panels in parallel.
The programming procedure is:
Supply control
unit
Step 2
Panel
Long press the
Panel
Short press the key, in maximum 5 sec., for a number of times equal to the
desired address, as following:
BEEP
2 short press – address 2 is programmed 2 x [ ].
BEEP
3 short press – address 3 is programmed 3 x [ ].
4 short press – address 4 is programmed 4 x [BEEP].
After the confirmation sound the panel exits the programming mode by itself.
Step 3
Step 4
Supply control
unit
PROG
BEEEEEP
]. The panel is in programming mode.
Press PROG.
The red LED is off, programming procedure terminated.
Any error during programming is signaled with [BEEEEEP]. In this case, the procedure must be
recommenced from Step 2 .
FR Programmation de l'adresse du panneau audio additionnel
Le panneau principal dans le système est programmé avec l'adresse 1. Les panneaux additionnel montées
en parallèle doivent être programmés avec une adresse différente, comme suit:
- Adresse 2 pour un panneau additionnel en parallèle
- Adresse 2 et 3 adresses pour deux panneaux additionnels en parallèle
- Adresse 2, Adresse 3 et 4 Adresse de trois panneaux additionnels en parallèle.
La procédure de programmation est:
Longtemps presse de PROG.
Le LED rouge est est allumé.
Pas 1
Unité
centrale
Pas 2
Panneau
Pressez longtemps la touche
Panneau
Presse courte la touche , en 5 sec. maximum, pour un nombre de fois égal à
l'adresse désirée, comme suit:
2 presses courte – adresse 2 est programmé 2 x [BEEP].
BEEP
3 presses courte – adresse 3 est programmé 3 x [ ].
BEEP
4 presses courte – adresse 4 est programmé 4 x [ ].
Après le son de confirmation, le panneau quitte le mode de programmation
par lui-même.
Pas 3
Pas 4
Unité
centrale
PROG
PROG
Passo 3
Pannello
Passo 4
Unità
centrale
Programmando l'indirizzo del pannello audio aggiuntivo
Il pannello principale nel sistema è programmato con indirizzo 1. I pannelli aggiuntivi collegati in parallelo
devono essere programmati con un indirizzo diverso, come segue:
- Indirizzo 2 per un pannello aggiuntivo in parallelo
- Indirizzo 2 Indirizzo 3 e per due pannelli aggiuntivi in parallelo
- Indirizzo 2 Indirizzo 3 e 4 Indirizzo per tre pannelli aggiuntivi in parallelo.
La procedura di programmazione è:
]. Il pannello è in fase di programmazione.
Stampa di PROG.
Il LED rosso è spento, procedura di programmazione è terminata.
NL Programmeren van het adres van de aanvulende audio panel
Het hoofdpaneel in het systeem wordt geprogrammeerd met Adres 1. De aanvullende panelen parallel
worden geprogrammeerd met een ander adres, als volgt:
- Adres 2 gedurende een extra paneel parallel
- Adres 2 en 3 Adres voor twee extra panelen parallel
- Adres 2, 3 en adres Adres 4 voor drie extra panelen parallel.
De programmering procedure is:
Stap 2
Paneel
Druk lang op de
Stap 3
Paneel
Druk kort op de toets in maximum 5 sec., for a number of times equal to the
desired address, as following:
2 kort indrukken - adres 2 is geprogrammeerd 2 x [BEEP].
3 kort indrukken - adres 3 is geprogrammeerd 3 x [BEEP].
BEEP
4 kort indrukken - adres 4 is geprogrammeerd 4 x [ ].
Na de bevestiging geluid de terminal verlaat de programmeermodus vanzelf.
Stap 4
Centrale
eenheid
PROG
ADDITIONAL AUDIO OUTDOOR PANEL
PANNEAU EXTÉRIEUR AUDIO ADDITIONNEL
PANNELLO ESTERNO AUDIO AGGIUNTIVO
AANVULENDE AUDIO UITWENDIG PANEEL
DODATKOWY PANEL ZEWNĘTRZNY AUDIO
DE
Der Einbau der zusätzliche Audio Außeneinheit
EN
The installation of the additional audio outdoor panel
FR
L'installation de panneau extérieur audio additionnel
IT
L'installazione del pannello esterno audio aggiuntivo
NL
Installatie van de aanvulende audio uitwendig paneel
PL
Instalacja dodatkowego panel zewnętrzny audio
0
Centrale
eenheid
PROG
ZUSÄTZLICHE AUDIO
AUßENEINHEIT
Lange slag van PROG.
De rode LED is aan.
Stap 1
toets
1
Krok 3
Długo nacisnąć
3
≈20 cm
[
] . Centrala jest w trybie programowania.
BEEEEEP
Krótkie naciśnięcie klawisza do maksymalnie 5 sekund. przez szereg razy
równej żądany adres, jak następuje:
2 krótkie naciśnięcie - adres 2 jest zaprogramowany 2 x [BEEP].
3 krótkie naciśnięcie - adres 3 jest zaprogramowany 3 x [BEEP].
4 krótkie naciśnięcie - adres 4 jest zaprogramowany 4 x [BEEP].
Po dźwięku potwierdzenia terminal wyjdzie z trybu programowania przez siebie.
Panel
Jednostka
główna
klawisz
PROG
Naciśnij przycisk PROG.
Czerwona dioda LED jest wyłączona, programowanie zakończone.
Każdy błąd podczas programowania jest sygnalizowane [BEEEEEP] . W tym przypadku, procedura musi
wznowione od Krok 2 .
DE
Autorisierter Repräsentant der ELECTRA S.R.L.
EN
Authorized Representative of ELECTRA S.R.L.
FR
Représentant Autorisé d'ELECTRA S.R.L.
IT
Rappresentante autorizzato ELECTRA S.R.L.
NL
Gemachtigde van ELECTRA S. R. L.
PL
Autoryzowany Przedstawiciel ELECTRA S.r.l.
ELECTRA Building Communications GmbH
Parkring 10, Liebenberggasse 7 1010 Wien Österreich/ Austria
Telefon +43 1 516 33 – 3817 Telefax + 43 1 516 33 – 3000
[email protected]
Designed & Manufactured by ELECTRA
Made in EU
INS.ADD.APA.1FR.BLY
07.2014
1
2
Slag van PROG.
De rode LED is uit, programmering procedure beëindigd.
Główny panel w systemie jest zaprogramowany z adresem 1. Te dodatkowe panele są zaprogramowane
na inny adres, równolegle, co następuje:
- Adres 2 dla jednego dodatkowego panelu w paralle
- Adres 2 Adres 3 i dwóch dodatkowych paneli równolegle
- Adres 2 Adres 3 Adres 4 i dodatkowych paneli w trzech równoległych.
Procedura programowania jest:
Jednostka
Długi skok PROG.
PROG
Krok 1
główna
Czerwona dioda LED jest włączony.
Panel
3
2
-5
c
-5 m
cm
PL Programowanie adresu dodatkowego panel audio
Krok 2
1x
[BEEEEEP] . Het paneel is in de programmeermodus.
Elke fout tijdens het programmeren wordt gesignaleerd met [BEEEEEP] . In dit geval moet de procedure pe hervat
vanaf Stap 2
->[BEEEEEP]. Le panneau est en mode de programmation.
Pressez sur PROG.
La LED rouge est éteinte, la procédure de programmation est terminée.
PROG
-> [
BEEEEEP
Qualsiasi errore durante la programmazione viene segnalato con [BEEEEEP]. In questo caso, la procedura deve
essere ricominciato dal Passo 2 .
Krok 4
Toute erreur lors de la programmation est signalée par [BEEEEEP]. Dans ce cas, la procédure doit être
recommencée du Pas 2 .
IT
Pressione lunga il tasto
Pressione breve il tasto , in massima 5 sec., per un numero di volte uguale
all'indirizzo desiderato, come segue:
BEEP
2 pressioni brevi - indirizzo 2 è programmato 2 x [ ].
BEEP
3 pressioni brevi - indirizzo 3 è programmato 3 x [ ].
BEEP
4 pressioni brevi - indirizzo 4 è programmato 4 x [ ].
Dopo il suono di conferma, il panello esce dalla modalità programmazione per sé.
Long stroke of PROG.
The red LED is on.
Step 1
Stampa lunga di PROG.
Il LED rosso è illuminato.
Pannello
Passo 2
Den Knopf PROG drücken.
Die rote LED ist aus, die Programmierung wurde abgeschlossen.
key ->[
PROG
[BEEEEEP]. Der Außeneinheit befindet sich im
Alle Fehler während der Programmierung werden mit einem [BEEEEEP] signalisiert. In diesem Fall muss man
das Verfahren vom 2. Schritt neuanfangen.
PROG
Unità
centrale
Passo 1
170 cm
DE Das Programmieren der Adresse des zusätzlichen Audio Außeneinheit
Torx
Schraube
Die Torx Schraube muß fest angezogen sein. Andernfalls, wenn das System eingeschalten ist, ertönt durch die Außeneinheit ein
dauerhaftes Alarmsignal.
The Torx screw must be completely screwed. Otherwise, when the system is powered, the panel emits a permanent acoustic signal.
La vis Torx doit être complètement vissée. Autrement, quand le système est sous tension, le panneau émet un signal
acoustique permanent. .
La vite Torx deve essere completamente avvitato. Altrimenti, quando il sistema è alimentato, il pannello emette un segnale
acustico permanente.
De Torx-schroef moet helemaal ingeschroefd. Anders, wanneer het systeem wordt ingeschakeld, het paneel geeft
continu geluidssignaal.
Śruba Torx musi być całkowicie pijany. W przeciwnym wypadku, gdy system jest zasilany, Panel emituje stały sygnał dźwiękowy.
DE
Individualisierung mit den Bewohnernamen
EN
Name display of inhabitant
FR
Personnaliser avec le nom du locataire
IT
Personalizzazione con il nome del locatario
NL
Personalisering met naam van de bewoner
PL
Wprowadzenie nazwiska domownika
DE
Blockdiagramm für den parallelen Anschluss von der Außeneinheiten
DE
Das Anschlussschemata
EN
Block diagram for connecting outdoor panels in parallel
EN
Connection diagram
FR
Schéma bloc connexion panneaux en parallèle
FR
Le schéma de connexions
IT
Schema a blocchi connessione pannelli in parallelo
IT
Schema di connessioni
Sicherungskasten - Electrical panel - Panneau électrique - Quadro elettrico - Electriciteitskast
- Rozdzielnica elektryczna
NL
Overzicht verbindingsblok panelen in parallel
NL
Overzicht van verbindingen
Akku - Accumulator - Accumulateur - Accumulatore - Accu - Akumulator
PL
Schemat blokowy połączenia paneli równolegle
PL
Schemat połączeń
Türöffnungsknopf - Door Opening button - Touche ouverture de la porte - Pulsante apertura della porta
- Knop openen deur - Przycisk otwierania drzwi
(a)
4
POMARAŃCZOWY
NIEBIESKI
BRĄZOWY
ZIELONY
ACC
Elektroschaltschrank
ACC
Elektroschaltschrank
12V/7 Ah
12V/7 Ah
2x Sig. 10A
2x Sig. 10A
(a)
F
-ACC
F
-ACC
N
+ACC
N
+ACC
(b)
3 x 0,75 mm²
Kabel
3/
4/
ORANGE
ORANGE
CD
BLAU
BLAU
CD IN CD OUT
GND
GRÜN
GRÜN
GND
+14 V
1
UTP CAT 5e
BRAUN (AWG 24) BRAUN
P
(a)
APE.3S0.xxy
Außeneinheit 2
APE.3F0.xxy
(b)
1
+14V +14V
+Uv
Vin 1
Vout
GNV
OUT
BUT
GNV 2
3/
(d)
Vin 2
LC
Ucam
LA/C
GND
2 x 0,5 mm²
Kabel
GRÜN
UTP CAT 5e
BRAUN
(AWG 24)
LA
AUX 1
(b)
4/
3/
1
(b) Stromversorgungseinheit - Supply control unit - Unité centrale - Unità centrale - Centrale eenheid - Jednostka główna
Audioverbindungsbox - Audio connection box - Boîte de jonction audio - Dose derivazione audio
- Audio verbindingsdoos - Rozgałęźnik sygnału audio
BLAU
CD IN CD OUT
GND
GRÜN
GRÜN
GND
GND
P
+Uv
Vin 1
Vout
GNV
OUT
BUT
P
BRAUN (AWG 24) BRAUN
APE.3S0.xxy
Außeneinheit 1
APE.3F0.xxy
PROG
Schritt 2 Außeneinheit
Schritt 3
GNV 2
Schloss Gleichstrom
oder
Schloss Wechselstrom
Step 2
Step 3
PROG
Unité centrale
IT
Pas 2
Panneau
Pas 3
Passo 1
Unità centrale
Berühren Sie mit den zu programmierenden Tags das Symbol.
Nach jedem Programmiervorgang des Tags ertönt ein -> [BEEEEEP].
Passo 2
Pannello
Long stroke of PROG.
The red LED is on.
Passo 3
GRÜN
GRÜN
UTP CAT 5e
BRAUN
(AWG 24)
BRAUN
ORANGE
(Optional)
Türöffnungsknopf
Schloss Gleichstrom
BLAU
GRÜN
BRAUN
oder
Schloss Wechselstrom
APT
ORANGE
BLAU
GRÜN
BRAUN
zu der
Verbindungsbox
oder der
Inneneinheit
APT
ACB.4DN.xxy
Audioverbindungsbox
AUX Befehl
PROG
Stampa lunga di PROG.
Il LED rosso è illuminato.
Toccate con i tag, pezzo per pezzo, il simbolo
Dopo ogni tag memorizzato -> [BEEEEEP].
Stampa di PROG.
Unità centrale
PROG
Il LED rosso è spento, procedura di programmazione è terminata.
Qualsiasi errore durante la programmazione viene segnalato con [BEEEEEP]. In questo caso, la procedura
deve essere ricominciato dal Passo 2 .
Stap 1 Centrale eenheid
symbol.
Stap 2
PROG
Lange slag van PROG.
De rode LED is aan.
Raak met de tags, stuk voor stuk, de
BEEEEEP
Na elke opgeslagen tag -> [
].
Paneel
symbool.
Slag van PROG.
De rode LED is uit, programmering procedure beëindigd.
Elke fout tijdens het programmeren wordt gesignaleerd met [BEEEEEP]. In dit geval moet de procedure pe
hervat vanaf Stap 2.
Stap 3 Centrale eenheid
PROG
PL Programowanie dostęp tagi RFID
Longtemps presse de PROG.
Le LED rouge est est allumé.
Touchez avec les tags, pièce par pièce, le symbole
BEEEEEP
Après chaque tag mémorisé -> [
].
PROG
BLAU
BLAU
NL Programmering van toegang RFID-tags
Krok 1 Jednostka główna
.
Pressez sur PROG.
La LED rouge est éteinte, la procédure de programmation est terminée.
Toute erreur lors de la programmation est signalée par [BEEEEEP]. Dans ce cas, la procédure doit être
recommencée du Pas 2 .
Unité centrale
ORANGE
OUT
+14V +14V
IN
OUT
CD
CD
OUT
IN
GND GND
OUT
IN
+14V +14V
3
1
CD
CD
1
3
GND GND
3
1
+14V +14V
4
2
CD
CD
4
2
GND GND
2
4
Programmazione dei tag RFID di accesso
Den Knopf PROG lang drücken.
Die rote LED ist ein.
PROG
PROG
IN
Stromversorgungseinheit 1
FR Programmation des tags d'accès RFID
Pas 1
LA
AUX 1
Press PROG.
The red LED is off, programming procedure terminated.
Any error during programming is signaled with [BEEEEEP]. In this case, the procedure must be
recommenced from Step 2 .
Supply control
unit
LA/C
AUX Befehl
Touch with the tags, piece by piece, the
BEEEEEP
After each memorized tag -> [
].
Panel
LC
Ucam
AUX 2
Den Knopf PROG drücken.
StromversorgungPROG
seinheit
Die rote LED ist aus, die Programmierung wurde abgeschlossen.
Alle Fehler während der Programmierung werden mit einem [BEEEEEP] signalisiert. In diesem Fall muss man
das Verfahren vom 2 Schritt neuanfangen.
Supply control
unit
Vin 2
GND
EN Programming RFID access tags
Step 1
+14V +14V
GNV 1
(Optional)
Türöffnungsknopf
DE Programmierung von RFID Tags
(d) Zu der Inneneinheit - To the terminal - Pour la terminal - Verso la terminale - Naar terminal - Do moduł
Für andere Konfigurationen bitte wenden Sie sich an den Hersteller.
For other configurations contact the manufacturer.
Pour d'autres configurations contacter le fabricant.
Per le altre configurazioni rivolgersi al produttore.
Voor andere configuraties contact op met de fabrikant.
Dla innych konfiguracji skontaktuj się z producentem.
CD
BLAU
Stromversorgungseinheit 2
StromversorgungSchritt 1
seinheit
(a) Außeneinheit - Panel - Panneau - Pannello - Paneel - Panel
ORANGE
UTP CAT 5e
2 x 0,5 mm²
Kabel
ORANGE
ORANGE
+14 V
BLAU
AUX 2
(a)
3 x 0,75 mm²
Kabel
ORANGE
GND
P
GNV 1
3/
4/
Kurt König
ORANJE
BLAUW
BRUIN
GROEN
Akku
230 V a.c./50Hz
Akku
230 V a.c./50Hz
1
Kurt König
ARANCIONE
BLU
MARRONE
VERDE
A U X befehl - A U X command - Commande A U X - Comando A U X - A U X-commando - komenda A U X
3/
/
Kurt König
ORANGE
BLEU
MARRON
VERT
Elektromagnetische -Schloss - Electromagnetic lock - Serrure - Serratura - Slot - Zamek
(b)
Kurt König
ORANGE
BLUE
BROWN
GREEN
ORANGE
BLAU
BRAUN
GRÜN
Krok 2
PROG
Długi skok PROG.
Czerwona dioda LED jest włączony.
Dotknij z tagami, kawałek po kawałku, z
BEEEEEP
Po każdym zapamiętane tag -> [
].
Panel
symbolem.
Naciśnij przycisk PROG.
Czerwona dioda LED jest wyłączona, programowanie zakończone.
Każdy błąd podczas programowania jest sygnalizowane [BEEEEEP] . W tym przypadku, procedura musi
wznowione od Krok 2.
Krok 3 Jednostka główna
PROG
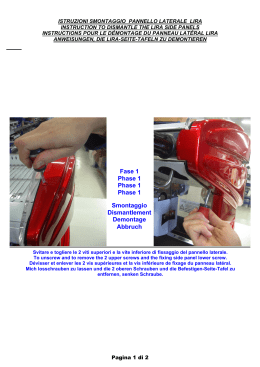
Scarica