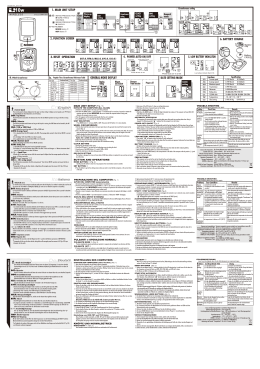
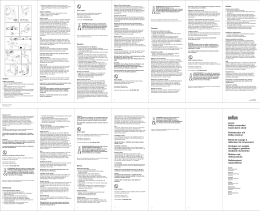
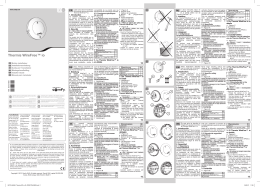
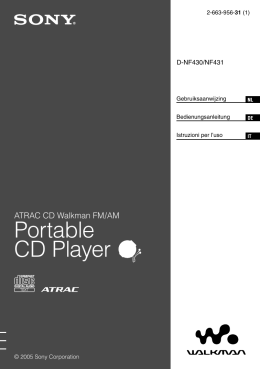
BC15S
BICYCLE COMPUTER 15 FUNCTIONS + SOLAR POWER
FIETSCOMPUTER 15 FUNCTIES + ZONNECEL
ORDINATEUR DE BICYCLETTE 15 FONCTIONS + ALIMENTATION SOLAIRE
ORDENADOR DE BICICLETA 15 FUNCIONES & ALIMENTACIÓN SOLAR
FAHRRADCOMPUTER 15 FUNKTIONEN + SOLARENERGIE
COMPUTER MULTIFUNZIONE PER BICI CON PANNELLO SOLARE
USER MANUAL
GEBRUIKERSHANDLEIDING
NOTICE D’EMPLOI
MANUAL DEL USUARIO
BEDIENUNGSANLEITUNG
MANUALE UTENTE
BC15S – BICYCLE COMPUTER 15 FUNCTIONS + SOLAR POWER
1. Introduction
To all residents of the European Union
Important environmental information about this product
This symbol on the device or the package indicates that disposal of the device after its lifecycle could harm
the environment.
Do not dispose of the unit (or batteries) as unsorted municipal waste; it should be taken to a specialised
company for recycling.
This device should be returned to your distributor or to a local recycling service.
Respect the local environmental rules.
If in doubt, contact your local waste disposal authorities.
Thank you for buying the BC15S! Please read the manual thoroughly before bringing this device into service. If the
device was damaged in transit, don't install or use it and contact your dealer. Contents: bicycle computer, bracket with
cable and sensor, magnet with screw, rubber pad, cable clips, battery.
2. Functions
1.
2.
3.
4.
5.
6.
7.
8.
km/h: current speed (0~199.9 km/h)
D: trip distance (0~3999.9 km)
ODO: total distance (0~39999.9 km)
AVS: average speed (0~199.9 km/h)
TM: trip time (0~39:59:59)
Max.: max. speed (0~199.9 km/h)
12/24 hour conversion
clock
9. kilometre/mile conversion
10. auto start/stop
11. manual start/stop
12. LCD auto clear
13. wheel circumference setting (1~399cm)
14. scan
15. auxiliary solar power
3. Installation
Mounting the cycle computer main unit
(see fig. A)
Attach the bracket to the handlebar by
means of the included screw. Use the
rubber pad if the bracket does not fit
onto the handlebar. Tighten the screw
and make sure the bracket does not
move.
Mounting the sensor and the magnet (see fig. B)
Remove the protective foil from the back of the sensor (2), fix it on the inner side of the front fork and strap the
sensor by fastening the cable clip (1) slowly to allow sensor adjustment.
Attach the magnet (5) to a spoke (4) on the front wheel with the included screw (3).
Adjust the magnet and sensor position. Ensure that the magnet is pointed directly at the bulge near the top of the
sensor. Align the magnet and the sensor so that the distance between them is less than 5mm when they cross each
other.
Tighten the cable clip and the screw to fix the system.
BC15S
-3-
VELLEMAN
4. Use
• Kilometre/mile conversion: Press the SET button for 3 seconds and enter the adjustment
state. The display will show fig. on the right. Press the MODE button to select metric or
imperial system.
• Wheel circumference: Press the SET button and enter the wheel circumference setting state.
The display will show fig. on the right. Press the MODE button to add 1 digit at the time. Hold
the MODE button pressed to add digits sequentially. Refer to the table below.
Wheel diameter in inches
Wheel circumference
16”
128
18”
144
20”
160
22”
176
24”
192
26”
208
0.0 Km/h
D
000.00
28”
224
• Auto and manual start/stop: Press the SET button. The LCD will display the fig. on the right.
Press the MODE button and choose automatic or manual start/stop.
• Clock setting: Press the SET button. The LCD will display fig. on the right. Press the MODE
button to choose the 12-hour or 24-hour mode. Press SET again and enter the time with the
MODE button.
• Press SET to confirm.
205
281/2
228
Km Manual
205
Km
12/24
NOTE: If you hold any button for 15 seconds, the computer will return to the factory settings. Press the SET and
MODE button simultaneously to clear D, TM, AVS and Max.
5. Technical Specifications
Power Supply
1 x 1.5V type SR44 (V357) battery (incl.)
The information in this manual is subject to change without prior notice.
BC15S – FIETSCOMPUTER 15 FUNCTIES + ZONNECEL
1. Inleiding
Aan alle ingezetenen van de Europese Unie
Belangrijke milieu-informatie betreffende dit product
Dit symbool op het toestel of de verpakking geeft aan dat, als het na zijn levenscyclus wordt weggeworpen,
dit toestel schade kan toebrengen aan het milieu.
Gooi dit toestel (en eventuele batterijen) niet bij het gewone huishoudelijke afval; het moet bij een
gespecialiseerd bedrijf terechtkomen voor recyclage.
U moet dit toestel naar uw verdeler of naar een lokaal recyclagepunt brengen.
Respecteer de plaatselijke milieuwetgeving.
Heeft u vragen, contacteer dan de plaatselijke autoriteiten inzake verwijdering.
Dank u voor uw aankoop! Lees deze handleiding grondig voor u het toestel in gebruik neemt. Werd het toestel
beschadigd tijdens het transport, installeer het dan niet en raadpleeg uw dealer. Inhoud: fietscomputer, beugel met
kabel en sensor, magneet met schroef, rubber strook, kabelclips, batterij.
2. Functies
1.
2.
3.
4.
5.
6.
7.
8.
km/h: huidige snelheid (0~199.9 km/h)
D: ritafstand (0~3999.9 km)
ODO: totale afstand (0~39999.9 km)
AVS: gemiddelde snelheid (0~199.9 km/h)
TM: rittijd (0~39:59:59)
Max.: max. snelheid (0~199.9 km/h)
12/24u tijdsweergave
klok
BC15S
9. afstandseenheden in kilometer/mijl
10. automatische start/stop
11. manuele start/stop
12. automatische uitschakeling van het LCD-scherm
13. instelling van de wielomtrek (1~399cm)
14. scanning
15. bijkomende voeding via zonnecel
-4-
VELLEMAN
3. Installatie
De fietscomputer installeren (zie fig. A)
Maak de beugel aan het stuur vast door middel van de meegeleverde schroef. Gebruik het rubber strookje indien de
beugel niet op het stuur past. Span de schroef aan zodat de beugel niet meer beweegt.
De sensor en de magneet installeren (zie fig. B)
Verwijder het beschermende lipje achteraan de sensor (2), plaats hem aan de binnenkant van de voorvork en maak
de sensor vast door de kabelklem (1) zachtjes aan te spannen zodat u hem later kunt regelen.
Maak de magneet (5) vast aan een spaak (4) van het voorwiel door middel van de meegeleverde schroef (3).
Regel de magneet en de sensor bij. Zorg dat de magneet op het uiteinde van de sensor gericht is. Regel de magneet
en sensor zo dat de afstand minder dan 5mm bedraagt op het moment dat ze elkaar kruisen.
Span nu de kabelklem en de schroef aan.
4. Gebruik
• Afstandseenheden in kilometer/mijl: Druk op SET gedurende 3 seconden om de
afstandseenheden in te stellen. U krijgt het schermpje rechts afgebeeld. Druk op MODE om
het metrieke of het imperiale meetstelsel te kiezen.
• Wielomtrek: Druk op SET om de wielomtrek in te geven. U krijgt het schermpje rechts
afgebeeld. Druk op MODE om telkens 1 digit toe te voegen. Houd MODE ingedrukt om de
digits sneller toe te voegen. Raadpleeg de tabel hieronder.
Diameter wiel in duim
Wielomtrek
16”
128
18”
144
20”
160
22”
176
24”
192
26”
208
28”
224
• Automatische en manuele start/stop: Druk op SET. U krijgt het schermpje rechts afgebeeld.
Druk op MODE en kies de automatische of manuele start/stop.
• De klok instellen: Druk op SET. U krijgt het schermpje rechts afgebeeld. Druk op MODE en
kies de 12-uur of de 24-uur weergave. Druk opnieuw op SET en geef het uur in met MODE.
• Druk op SET om te bevestigen.
1.0 Km/h
D
000.00
205
281/2
228
Km Manual
205
Km
12/24
OPMERKING: Houd een knop gedurende 15 seconden ingedrukt om naar de
fabrieksinstellingen terug te keren. Druk gelijktijdig op SET en MODE om D, TM, AVS en Max. te
wissen.
5. Technische specificaties
Voeding
1 x 1.5V type SR44 (V357) batterij (meegelev.)
De informatie in deze handleiding kan te allen tijde worden gewijzigd zonder voorafgaande kennisgeving.
BC15S – ORDINATEUR DE BICYCLETTE 15 FONCTIONS + ALIMENTATION SOLAIRE
1. Introduction
Aux résidents de l'Union Européenne
Des informations environnementales importantes concernant ce produit
Ce symbole sur l'appareil ou l'emballage indique que, si l'appareil est jeté après sa vie, il peut nuire à
l'environnement.
Ne jetez pas cet appareil (et des piles éventuelles) parmi les déchets ménagers; il doit arriver chez une firme
spécialisée pour recyclage.
Vous êtes tenu à porter cet appareil à votre revendeur ou un point de recyclage local.
Respectez la législation environnementale locale.
Si vous avez des questions, contactez les autorités locales pour élimination.
BC15S
-5-
VELLEMAN
Nous vous remercions de votre achat! Lisez attentivement la présente notice avant la mise en service de l'appareil.
Si l’appareil a été endommagé pendant le transport, ne l'installez pas et consultez votre revendeur. Contenu:
ordinateur de bicyclette, support avec câble et capteur, aimant avec vis, plaquette en caoutchouc, serre-câble, pile.
2. Fonctions
1.
2.
3.
4.
5.
6.
7.
8.
km/h: vitesse instantanée (0~199.9 km/h)
D: distance partielle (0~3999.9 km)
ODO: distance totale (0~39999.9 km)
AVS: moyenne courante (0~199.9 km/h)
TM: durée du parcours (0~39:59:59)
Max.: vitesse max. (0~199.9 km/h)
affichage 12/24h
horloge
9. conversion kilomètre/mille
10. marche/arrêt automatique
11. marche/arrêt manuel
12. extinction automatique de l’afficheur LCD
13. circonférence de roue (1~399cm)
14. balayeur
15. alimentation solaire auxiliaire
3. Installation
Installation de l’ordinateur de bicyclette (voir ill. A)
Fixez le support au guidon à l’aide de la vis fournie. Intercalez la plaquette en caoutchouc au cas où le support ne
s’adapte pas. Serrez la vis jusqu’à ce que le support ne bouge plus.
Installation du capteur et de l’aimant (voir ill. B)
Retirez la languette protectrice située à l’arrière du capteur (2), collez le capteur du côté intérieur de la fourche en
fixez-le en serrant légèrement le serre-câble (1) pour pouvoir le régler plus tard.
Fixez l’aimant (5) à un rayon (4) de la roue avant à l’aide de la vis fournie (3).
Ajustez l’aimant et le capteur. Pointez l’aimant vers l’extrémité du capteur. Alignez l’aimant et le capteur de façon à
ce que la distance entre ceux-ci soit inférieure à 5mm au moment où ils se croisent.
A présent, serrez le serre-câble et la vis.
4. Emploi
• Conversion kilomètre/mille: Enfoncez SET pendant 3 secondes pour instaurer les unités de
distance. L’écran illustré à droite s’affiche. Enfoncez MODE pour choisir entre le système
métrique et le système impérial.
• Circonférence de roue: Enfoncez SET pour instaurer la circonférence de roue. L’écran illustré
à droite s’affiche. Enfoncez MODE pour ajouter 1 chiffre à la fois. Maintenez enfoncé MODE
pour ajouter les chiffres de manière séquentielle. Consultez la table ci-dessous.
Diamètre roue en pouces
Circonférence de roue
16”
128
18”
144
20”
160
22”
176
24”
192
26”
208
28”
224
• Marche/arrêt automatique et manuel: Enfoncez SET. L’écran illustré à droite s’affiche.
Enfoncez MODE et choisissez entre marche/arrêt automatique et manuel.
• L’horloge: Enfoncez SET. L’écran illustré à droite s’affiche. Enfoncez MODE et choisissez le
format 12 heures ou 24 heures. Renfoncez SET et entrez l’heure à l’aide du bouton MODE.
• Enfoncez SET pour confirmer.
2.0 Km/h
D
000.00
205
281/2
228
Km Manual
205
Km
12/24
REMARQUE: Maintenez enfoncé un bouton pendant 15 secondes pour revenir aux réglages d‘usine. Enfoncez
simultanément les boutons SET et MODE pour effacer D, TM, AVS et Max.
5. Spécifications techniques
Alimentation
1 pile 1.5V type SR44 (V357) (incl.)
Toutes les informations présentées dans cette notice peuvent être modifiées sans notification préalable.
BC15S
-6-
VELLEMAN
BC15S – ORDENADOR DE BICICLETA 15 FUNCIONES & ALIMENTACIÓN SOLAR
1. Introducción
A los ciudadanos de la Unión Europea
Importantes informaciones sobre el medio ambiente concerniente a este producto
Este símbolo en este aparato o el embalaje indica que, si tira las muestras inservibles, podrían dañar el
medio ambiente.
No tire este aparato (ni las pilas, si las hubiera) en la basura doméstica; debe ir a una empresa especializada
en reciclaje. Devuelva este aparato a su distribuidor o a la unidad de reciclaje local.
Respete las leyes locales en relación con el medio ambiente.
Si tiene dudas, contacte con las autoridades locales para residuos.
¡Gracias por haber comprado el BC15S! Lea atentamente las instrucciones del manual antes de usarlo. Si el aparato
ha sufrido algún daño en el transporte no lo instale y póngase en contacto con su distribuidor. Incluye: ordenador de
bicicleta, soporte con cable y sensor, imán con tornillo, almohadilla de goma, clip de cable, pila.
2. Funciones
1.
2.
3.
4.
5.
6.
7.
8.
km/h: velocidad actual (0~199.9 km/h)
D: distancia recorrida (0~3999.9 km)
ODO: distancia total (0~39999.9 km)
AVS: velocidad media (0~199.9 km/h)
TM: duración del recorrido (0~39:59:59)
Max.: velocidad máx. (0~199.9 km/h)
visualización 12/24h
reloj
9. conversión kilómetro/milla
10. activación/desactivación automática
11. activación/desactivación manual
12. desactivación automática de la pantalla LCD
13. circunferencia de la rueda (1~399cm)
14. exploración
15. alimentación solar adicional
3. Instalación
Instalar el ordenador de bicicleta (véase fig. A)
Fije el soporte al manillar con el tornillo incluido. Utilice la almohadilla de goma en caso de que el soporte no
conviene. Apriete el tornillo hasta que el soporte deje de mover.
Instalar el sensor y el imán (véase fig. B)
Quite la lengüeta protectora de la parte trasera del sensor (2), ponga el sensor en el lado interior de la horquilla
delantera y fíjelo al apretar ligeramente el clip de cable (1) para que pueda ajustarlo más tarde.
Fije el imán (5) a cualquier radio (4) de la rueda delantera con el tornillo incluido (3).
Ajuste el imán y el sensor. Dirija el imán hacia el extremo del sensor. Asegúrese de que la distancia entre el imán y
el sensor sea inferior a 5mm al cruzarse.
Ahora, apriete el clip de cable y el tornillo.
4. Uso
3.0 Km/h
D
000.00
• Conversión kilómetro/milla: Pulse SET durante 3 segundos para seleccionar la unidad de
distancia. Se visualiza la pantalla a la derecha. Pulse MODE para seleccionar entre el
sistema métrico y el sistema imperial.
• Circunferencia de la rueda: Pulse SET para seleccionar la circunferencia de la rueda. Se
visualiza la pantalla al la derecha. Pulse MODE para añadir 1 cifra a la vez. Mantenga
pulsado MODE para añadir las cifras de manera sucesiva. Consulte la siguiente lista.
Diámetro de la rueda en
pulgadas
BC15S
16”
18”
20”
22”
-7-
24”
26”
205
28”
281/2
VELLEMAN
Circunferencia de la rueda
128
144
160
176
192
208
224
Activación/desactivación automática y manual: Pulse SET. Se visualiza la pantalla a la derecha.
Pulse MODE y seleccione entre activación/desactivación automática et manual.
• Reloj: Pulse SET. Se visualiza la pantalla a la derecha. Pulse MODE y seleccione el formato
12 horas o 24 horas. Vuelva a pulsar SET e introduzca la hora con el botón MODE.
• Pulse SET para confirmar.
228
Km Manual
205
Km
12/24
NOTA: Mantenga pulsado un botón durante 15 segundos para volver a los ajustes de fábrica.
Pulse simultáneamente los botones SET y MODE para borrar D, TM, AVS y Max.
5. Especificaciones
Alimentación
1 pila SR44 de 1.5V (V357) (incl.)
Se pueden modificar las especificaciones y el contenido de este manual sin previo aviso.
BC15S – FAHRRADCOMPUTER 15 FUNKTIONEN + SOLARENERGIE
1. Einführung
An alle Einwohner der Europäischen Union
Wichtige Umweltinformationen über dieses Produkt
Dieses Symbol auf dem Produkt oder der Verpackung zeigt an, dass die Entsorgung dieses Produktes nach
seinem Lebenszyklus der Umwelt Schaden zufügen kann.
Entsorgen Sie die Einheit (oder verwendeten Batterien) nicht als unsortiertes Hausmüll; die Einheit oder
verwendeten Batterien müssen von einer spezialisierten Firma zwecks Recycling entsorgt werden.
Diese Einheit muss an den Händler oder ein örtliches Recycling-Unternehmen retourniert werden.
Respektieren Sie die örtlichen Umweltvorschriften.
Falls Zweifel bestehen, wenden Sie sich für Entsorgungsrichtlinien an Ihre örtliche Behörde.
Danke für Ihren Ankauf! Lesen Sie vor Inbetriebnahme diese Bedienungsanleitung sorgfältig durch. Überprüfen Sie,
ob Transportschäden vorliegen. Sollte dies der Fall sein, verwenden Sie das Gerät nicht und wenden Sie sich an
Ihren Händler. Lieferumfang: Fahrradcomputer, Bügel mit Kabel und Sensor, Magnet mit Schraube, Gummistreifen,
Kabelclips und Batterie.
2. Funktionen
1.
2.
3.
4.
5.
6.
7.
8.
km/h: aktuelle Geschwindigkeit (0~199.9 km/h)
D: Tagesstrecke (0~3999.9 km)
ODO: Gesamtstrecke (0 ~ 39999.9 km)
AVS: Durchschnittsgeschwindigkeit (0~199.9 km/h)
TM: Fahrzeit (0 ~ 39:59:59)
Max.: max. Geschwindigkeit (0~199.9 km/h)
12/24-Stundenanzeige
Uhr
9. Kilometer/Meilenumrechnung
10. automatische Start/Stop-Funktion
11.manuelle Start/Stop-Funktion
12. LCD-Auto Clear (automatische Ausschaltung)
13. Radgröße einstellbar (1 ~ 399cm)
14. Scan
15. zusätzliche Solarenergie-Stromversorgung
3. Installation
Fahrradcomputer montieren (siehe Abb. A)
Befestigen Sie den Bügel am Lenkrad mit der mitgelieferten Schraube. Verwenden Sie den Gummistreifen wenn der
Bügel nicht passt. Drehen Sie die Schraube an, damit der Bügel nicht mehr bewegen kann.
Sensor und Magneten montieren (siehe Abb. B)
BC15S
-8-
VELLEMAN
Entfernen Sie die Schutzlasche hinter dem Sensor (2), montieren Sie ihn an der Innenseite der Vorderradgabel und
machen Sie den Sensor fest, indem Sie die Kabelklemme (1) anziehen, sodass Sie ihn später regeln können.
Machen Sie den Magneten (5) an einer Speiche (4) des Vorderrads fest mit der mitgelieferten Schraube (3).
Stimmen Sie den Magneten und den Sensor ab. Sorgen Sie dafür, dass der Magnet auf das Ende des Sensors
gerichtet ist. Stimmen Sie den Magneten und den Sensor so ab, dass der Abstand weniger als 5mm beträgt wenn
sie einander kreuzen.
Ziehen Sie jetzt die Kabelklemme und die Schraube an.
4. Anwendung
• Entfernung in Kilometern/Meilen: Drücken Sie 3 Sekunden auf SET um die
Entfernungseinheiten einzustellen. Der Schirm rechts wird gezeigt. Drücken Sie MODE um
das metrische oder imperiale System zu wählen.
• Radgröße: Drücken Sie SET um die Radgröße einzugeben. Der Schirm rechts wird
erscheinen. Drücken Sie MODE um jeweils eine Stelle hinzuzufügen. Halten Sie MODE
gedrückt um schneller Stellen hinzuzufügen. Siehe Tabelle unten.
Raddurchmesser in Zoll
Radgröße
16”
128
18”
144
20”
160
22”
176
24”
192
26”
208
28”
224
• Automatische und manuelle Start/Stop-Funktion: Drücken Sie SET. Der Schirm rechts wird
gezeigt. Drücken Sie MODE und wählen Sie zwischen der automatischen oder manuellen
Start/Stop-Funktion.
• Die Uhr einstellen: Drücken Sie SET. Der Schirm rechts wird gezeigt. Drücken Sie MODE
und wählen Sie die 12- oder die 24 Stunden-Anzeige. Drücken Sie erneut SET und geben Sie
die Zeit mit MODE ein.
• Drücken Sie SET zum Bestätigen.
4.0 Km/h
D
000.00
205
281/2
228
Km Manual
205
Km
12/24
BEMERKUNG: Halten Sie eine beliebige Taste 15 Sekunden gedrückt um zu den Werkseinstellungen
zurückzukehren. Drücken Sie zur gleichen Zeit SET und MODE um D, TM, AVS und Max. zu
löschen.
5. Technische Daten
Stromversorgung
1 x 1.5V Typ SR44 (V357) Batterie (mitgeliefert)
Alle Änderungen vorbehalten.
BC15S – COMPUTER MULTIFUNZIONE PER BICI CON PANNELLO SOLARE
1. Introduzione
A tutti i residenti dell’Unione Europea
Importanti informazioni ambientali relative a questo prodotto
Questo simbolo riportato sul prodotto o sull’imballaggio, indica che è vietato smaltire il prodotto
nell’ambiente al termine del suo ciclo vitale in quanto può essere nocivo per l’ambiente stesso. Non
smaltire il prodotto (o le pile, se utilizzate) come rifiuto urbano indifferenziato; dovrebbe essere smaltito da
un’impresa specializzata nel riciclaggio.
Per informazioni più dettagliate circa il riciclaggio di questo prodotto, contattare l’ufficio comunale, il
servizio locale di smaltimento rifiuti oppure il negozio presso il quale è stato effettuato l’acquisto.
La ringraziamo per aver acquistato il BC15S! Si prega di leggere attentamente le informazioni contenute nel presente
manuale prima di utilizzare il dispositivo. Assicurarsi che l’apparecchio non sia stato danneggiato durante il trasporto; in
tale evenienza, contattare il proprio fornitore. Contenuto della confezione: computer per bicicletta, supporto di fissaggio
completo di cavo e sensore, magnete con fissaggio a vite, distanziale in gomma, fascette di fissaggio, batteria.
BC15S
-9-
VELLEMAN
2. Funzioni
1.
2.
3.
4.
5.
6.
7.
8.
km/h: velocità corrente (0~199,9 km/h)
D: distanza parziale (0~3999,9 km)
ODO: distanza totale (0~39999,9 km)
AVS: velocità media (0~199,9 km/h)
TM: tempo di crociera (0~39:59:59)
Max.: velocità massima (0~199,9 km/h)
12/24 formato ora
orologio
9. indicazione in Km/miglia
10. attivazione/disattivazione automatica
11. attivazione/disattivazione manuale
12. LCD autopulente
13.impostazione circonferenza ruota (1~399cm)
14. funzione Scan
15.alimentazione ausiliaria tramite pannello solare
3. Installazione
Montaggio dell’unità principale (fig. A)
Fissare al manubrio la staffa servendosi
della vite inclusa nella confezione.
Utilizzare il distanziale in gomma se la
fascetta non dovesse aderire bene sul
manubrio. Stringere a fondo la vite
assicurandosi che il supporto sia ben
saldo.
Montaggio del sensore e del magnete (fig. B)
Rimuovere la pellicola protettiva dall’adesivo presente sulla base del sensore (2). Applicare quest’ultimo sul lato
interno della forcella anteriore fissandolo provvisoriamente con le fascette incluse (1) per consentire la regolazione.
Fissare il magnete (5) a un raggio (4) della ruota anteriore, utilizzando il relativo morsetto a vite (3).
Regolare la posizione del sensore e del magnete in modo che la parte frontale di quest’ultimo risulti rivolta verso il
sensore e perfettamente allineata con la tacca presente su di esso. Assicurarsi che la distanza tra i due elementi,
quando posti uno di fronte all’altro, sia inferiore a 5 mm. Fissare in modo definitivo il sensore ed il cavo alla bicicletta
utilizzando le fascette fornite in dotazione.
4. Utilizzo
• Impostazione km/miglia: tenere premuto per 3 secondi il tasto SET per entrare in modalità
impostazioni. Il display visualizzerà la schermata riportata nella figura a fianco. Premere il
tasto MODE per selezionare km/h o m/h.
• Circonferenza ruota: premere nuovamente il tasto SET per selezionare il menu impostazione
circonferenza ruota. Il display visualizzerà la schermata riportata nella figura a fianco.
Premere il tasto MODE per incrementare il valore di un’unità. Tenere premuto il tasto MODE
per avanzare velocemente. Fare riferimento alla tabella seguente per conoscere il diametro
della ruota corrispondente al valore impostato.
Diametro ruota in pollici
Circonferenza ruota
16”
128
18”
144
20”
160
22”
176
24”
192
26”
208
28”
224
• Attivazione/disattivazione automatica o manuale: premere nuovamente il tasto SET. Il display
visualizzerà la schermata riportata nella figura a fianco. Premere il tasto MODE per scegliere
la modalità automatica o manuale.
• Impostazione dell’orologio: premere ancora una volta il tasto SET. Il display visualizzerà la
schermata riportata nella figura a fianco. Premere il tasto MODE per selezionare il formato
12 o 24 ore. Premere SET nuovamente per selezionare ore, minuti, secondi e il tasto MODE
per effettuare le relative impostazioni.
• Premere il tasto SET per confermare.
BC15S
- 10 -
5.0 Km/h
D
000.00
205
281/2
228
Km Manual
205
Km
12/24
VELLEMAN
NOTE: tenere premuto per almeno 15 secondi un qualsiasi pulsante per ripristinare le impostazioni di fabbrica.
Premere simultaneamente i tasti SET e MODE per azzerare i dati D, TM, AVS e Max.
5. Specifiche tecniche
Alimentazione
1 batteria 1,5V tipo SR44 (V357) (inclusa)
Le informazioni contenute in questo manuale possono essere soggette a modifiche senza alcun preavviso.
BC15S
- 11 -
VELLEMAN
Scarica