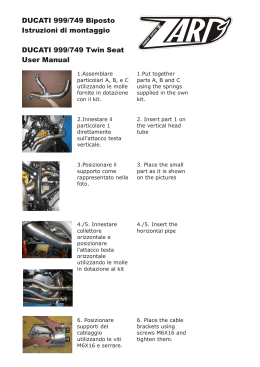
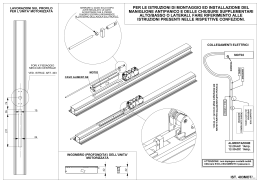
DUCATI 999/749 Monoposto
Istruzioni di montaggio
DUCATI 999/749 Oneseat
User Manual
1.Assemblare
particolari A, B, e C
utilizzando le molle
fornite in dotazione
con il kit.
1.Put together
parts A, B and C
using the springs
supplied in the own
kit.
2.Innestare il
particolare 1
direttamente
sull’attacco testa
verticale.
2. Insert part 1 on
the vertical head
tube
3.Posizionare il
supporto come
rappresentato nella
foto senza serrare i
dadi (lasciare
2/3mm di luce)
3. Place the small
part as it is shown
on the pictures and
do not tighten the
bolts (leave 2/3mm
of inner space)
4. Innestare
collettore
orizzontale senza
agganciare la molla
4. Insert the
horizontal pipe and
do not hook the
spring
5.Posizionare
ghiera sulla testa
cilindro orizzontale
senza serrare i dati
(lasciare 2/3mm di
luce)
5. Place the ghiera
on the horizontal
head cylinder and
do not tighten the
bolts (leave 2/3mm
of inner space)
6. Agganciare molla
e portare in battuta
il tubo cilindro
orizzontale (se
necessario usare un
martello di plastica)
6. Hook the spring
and fully insert the
horizontal cylinder
tube (if necessary
use a plastic
hammer)
7. Posizionare i supporti
del cablaggio utilizzando
le viti M6X16 e serrare
7. Place the cable using
screws M6X16 and
tighten them all
8.9.10. Per assemblare
in modo corretto il
gruppo
fanale/portatarga
posizionare prima la
copertura del faro, poi il
supporto fanale e in
ultimo il supporto targa.
Quindi serrare il tutto.
8.9.10.In order to
better assemble the
light and the license
plate, place first the
light cover then the light
holder finally the license
plate holder. Then
tighten the screws.
11. Smontare i
distanziali originali e
rimontarli dal lato
opposto come in figura
11. Remove the original
spacer and reassemble
them into the opposite
side (as shown)
12. Posizionare il
paracalore in e quindi
inserire il silenziatore.
12. Place the heat shield
and then place the
muffler.
13. Agganciare la molla.
13. Hook the spring.
14. Sostituire
slient-block
originale con
quello in
dotazione (come
da foto)
14. Change the
original silentblock and use the
silent-block in the
kit (as on the
pictures)
15. Imboccare la vite
del silenziatore, senza
serrare
15. Place the top
silencer screw and do
not tighten it
16. Posizionare i
distanziali tra supporto
scarico e paracalore
utilizzando le viti in
dotazione M6X35 senza
serrare
16. Place the two spacer
between the pipe and
the heat shield using
screws M6X35 in the kit
and do not tighten them
17.18. Innestare il
connettore delle luci e
fermare il tutto con la
fascetta di plastica in
dotazione
17a. A montaggio
avvenuto verificare che
il silenziatore non sia
troppo rigido, per
evitare tensioni che
potrebbero causare
rotture strutturali del
silenziatore e dei
particolari di supporto
17. 18. Insert the light
plug then fix all with the
small plastic band in the
kit
17a. Once the silencer is
installed, check if it’s
not too rigid to avoid
tensions that could
cause broken on the
structure of the silencer
19. Dopo aver verificato il corretto
posizionamento del silenziatore, serrare i
dadi della testa (foto 2/4/5), serrare il
supporto centrale (foto 3), serrare i supporti
finali (foto 14) e in ultimo serrare la vite
centrale del silenziatore (foto 15)
20. Posizionare e
serrare le pedane e il
paracalore originale
19. Check the right
position of the muffler,
cut the bolts (pics
2/4/5), tight the central
body holder (pic3), tight
the final brackets and the
central screw in the
muffler (pic15)
20. Place and tighten
the foot rests and the
original heat shield.
21.22. Rimuovere le
frecce ruotando in senso
orario.
21.22. Remove the two
turning signals turning
clockwise
23.Posizionare il
paracolare in carbonio.
23.Place the carbon
heat shield
24. Utilizzare e
posizionare la vite
M5X16 senza serrare.
24.Place the screw
M5X16 without tighten.
25.Posizionare la sella.
25.Place the seatt.
26.Serrare
completamente il
supporto inferiore del
paracalore.
26.tightne the bottom
heat shield holder.
27.Fissare le viti del
codone e della sella.
27.Cut the rear saddle
and seatpost screws.
28.Rimontare le frecce e
le carene.
28. Plug the turning
signals and refit the
fairings.
Scarica