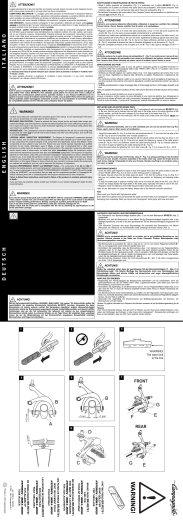
Met alot er m® US
Mounting instructions / Montageanweisung / Mode de montage / Istruzioni di montaggio / Montagehandleiding
EN
Fig. 1 Top/Oben/Supérieure/Alto/Boven
Fig. 2
DE
Regulation
Baurecht
• The system must be built to national regulations and to the instructions of
the manufacturer, as indicated in the documentation. This documentation
will be sent free on application.
• The use of stainless steel systems in an enclosed space where there may
be a high concentration of aggressive vapours and acid in the air (such
as in swimming pools, launderettes, etc.) may cause a problem. For a
suitable solution in such situations, please contact your supplier.
• Das Schornsteinsystem ist den örtlichen Vorschriften und den in
der Dokumentation und Installationsvorschriften enthaltenen
Herstelleranweisungen entsprechend aufzubauen. Auf Anfrage wird Ihnen
diese Dokumentation kostenlos zugesendet.
• Die Verwendung von Anlagen aus Edelstahl in einer geschlossenen
Umgebung, wo aggressive Dämpfe und Säuren in hohen Konzentrationen
in der Luft vorkommen (z. B. in Schwimmbädern, Wäschereien usw.), kann
zu Problemen führen. Zum Finden einer geeigneten Lösung für derartige
Situationen kontaktieren Sie Ihren Lieferanten.
Specific instructions
Gerätespezifische Vorschriften
• Apart from the general instructions above, there are specific instructions
in connection with the type of stove. This will contain the minimum and
maximum allowed length of the flue system in relation to the safe working
of the stove.
• Certain types of stoves must be connected to the concentric US system by
means of an adaptor.
• Other types are connected directly to the concentric US system.
• Specific instructions related to the stove can be obtained from the stove
manufacturer.
• Zusätzlich zu den oben genannten allgemeinen Vorschriften gelten für
jedes Gerät spezifische Vorschriften. Diese betreffen hauptsächlich die
zulässige Mindest- und Höchstkanallänge, bei der eine sichere Funktion
des Geräts noch gewährleistet ist.
• Manche Geräte müssen mithilfe eines Anschlussstücks an das konzentrische
US-System angeschlossen werden.
• Andere Geräte können direkt an das konzentrische US-System
angeschlossen werden.
• Die gerätespezifischen Vorschriften können beim Hersteller des Geräts
angefordert werden.
Installation
Montage
Check all parts for possible damage. The installation of the chimney starts at
the appliance and then progresses upwards to the terminal.
Vor der Montage sind die Bauteile auf Vollständigkeit und Beschädigungen
zu überprüfen. Die Installation der Anlage erfolgt von der Schornsteinsohle
nach oben, wobei der Außenmantel der Elemente immer “entwässerend”
zusammengesteckt wird.
The top of each element can be recognized by the profiled edge (fig. 1). At
the bottom of each section (US 100) an arrow is printed which indicates the
direction of the flow.
Connect two elements by pushing them vertically into each other. For visual
reasons it is advisable to place the welding seams at the rear if possible.
Connect the elements and fix the locking band (USKB) (fig. 2) in such a way
that it snaps into place. When utilizing the protection band (USAB) (fig. 3)
instead, use parkers to secure the protection band.
Then install the next element as instructed above.
An der Oberseite jedes Elementes befindet sich ein Profil, über den
der Außenmantel des nächsten Elementes montiert wird (Fig. 1). Die
Rauchrichtung wird mit einem Pfeil gekennzeichnet auf der Unterseite des
Längenelements (US 100).
Das zu montierende Element wird senkrecht aufgesteckt, wobei die
Schweißnähte aus optischen Grunden zur Rückseite auf der gleichen
Längsachse sitzen sollten.
Anschließend wird das Klemmband (Kode USKB) (Fig. 2) so über den
Elementstoß gelegt, das die beiden umlaufenden Sicken des Außenmantels
eingreifen. Oder bei Verwendung von die Elementstoßabdeckung (USAB)
(Fig. 3) die Elemente mit Parker-Schrauben fixieren.
Anschließend das nächste Element auf die gleiche Weise installieren.
Fig. 3
CE
CE
After installation a chimney plate must be applied. This is the responsibility of
the installer. The chimney plates will be sent on application free of charge.
Nach erfolgter Installation der Abgasanlage muß diese entsprechend DIN
18160-1 gekennzeichnet werden.
Ontop B.V. | Oude Veerseweg 23 | 4332 SH Middelburg | The Netherlands | www.eontop.info | Energy - Environment - Efficiency
IT
FR
NL
Instructions générales
Norme di riferimento
Algemene voorschriften
• Ce système d’évacuation des fumées doit être mis en oeuvre
conformément aux réglementations nationales, ainsi qu’aux
instructions du fabricant, comme indiqué sur la documentation.
La documentation vous sera envoyée gratuitement sur simple
demande.
• L’emploi de systèmes en acier inoxydable dans un environnement
confiné où l’air est susceptible de contenir une haute
concentration de vapeurs agressives et d’acide (comme les
piscines, les laveries automatiques, etc.) peut poser des
problèmes. Pour répondre à ces contraintes et trouver des
solutions adaptées, contactez votre fourniseur.
• Il sistema di scarico dei gas combusti deve essere disposto in
modo tale da soddisfare le normative localmente vigenti e le
disposizione del produttore indicate all’interno della documentazione
e delle istruzioni di installazione. Su richiesta, la nostra azienda
provvederà all’invio gratuito di questa documentazione.
• L’impiego di sistemi in acciaio inossidabile all’interno di ambienti
chiusi la cui aria potrebbe contenere elevate concentrazioni di
acidi e vapori aggressivi (quali ad esempio, piscine, lavanderie,
ecc.) può comportare l’insorgenza di problemi. Per ottenere
informazioni o consigli sulle soluzioni adeguate da adottare in tali
circostanze, contattare il proprio fornitore.
• Het rookgasafvoersysteem moet opgebouwd worden volgens de
nationale regelgeving en de voorschriften van de fabrikant, zoals
aangegeven in de documentatie. Deze documentatie wordt op
aanvraag kosteloos toegezonden.
• Het gebruik van RVS systemen in een gesloten omgeving waar
een hoge concentratie agressieve dampen en zuur in de lucht
aanwezig kunnen zijn (zoals zwembaden, wasserettes, etc) kan
problemen geven. Voor een geschikte oplossing in dergelijke
situaties neemt u contact op met uw leverancier.
Instructions particulières
Disposizioni specifiche per il modello
Toestelgebonden voorschriften
• En complément des instructions générales, les instructions
particulières de raccordement sont fournies avec l’insert. Elles
indiquent les longueurs mini et maxi du système d’évacuation des
fumées, afin d’assurer le bon fonctionnement de l’insert.
• Certains modèles d’insert doivent être raccordés au système
concentrique METALOTERM® - US au moyen d’un adaptateur.
• D’autres modèles sont raccordés directement avec le système
concentrique METALOTERM® - US.
• Les instructions particulières concernant l’insert sont disponibles
auprès du fabricant.
• Oltre alle disposizioni generali di cui sopra, debbono essere rispettate anche alcune disposizioni specifiche per il modello di prodotto.
In questo caso, si tratta preminentemente delle lunghezze
minime e massime ammesse per i condotti al fine di assicurare
un funzionamento in sicurezza del prodotto.
• Alcuni apparecchi devono essere collegati mediante un apposito
raccordo al sistema coassiale US.
• Gli altri apparecchi possono essere direttamente collegati al
sistema coassiale US.
• Le Disposizioni specifiche per il modello possono essere richieste
al produttore.
• Naast de bovenstaande algemene voorschriften, zijn er
toestel- gebonden voorschriften. Het betreft hier voornamelijk
de toegestane minimum en maximum kanaallengte waarbij het
toestel nog veilig functioneert.
• Sommige toestellen moeten door middel van een aansluitstuk op
het concentrische US systeem aangesloten worden.
• Andere toestellen kunnen direct op het concentrische US systeem
aangesloten worden.
• De toestelgebonden voorschriften kunt u opvragen bij de
toestelfabrikant.
Montage
Montaggio
Montage
Avant de commencer, il faut contrôler chaque élément afin de
détecter d’éventuels défauts.
L’installation du conduit commence par le bas et fini par le haut.
Prima di iniziare il montaggio controllate gli elementi. Installate gli elementi
a partire dalla base del camino verso l’alto, facendo attenzione alla corretta
direzione del flusso dei fumi indicata con una freccia sui singoli elementi.
Controleer alle onderdelen op eventuele beschadigingen voordat u
met de montage begint. De montage geschiedt vanaf het toestel
richting de uitmonding.
Le côté supérieur peut être identifié par le profil (fig. 1). Sur la partie
basse de la longueur d’ un mètre (US 100), une flèche indique le sens
des fumées.
Procedete quindi all’assemblaggio degli elementi congiungendoli verticalmente e avendo cura che le guarnizione, inserita nella parte alta della parete
interna, rimanga correttamente posizionata nella sua sede senza subire danni
e che la saldatura della parete esterna sia orientata in posizione nascosta.
De bovenkant van de schoorsteenonderdelen is herkenbaar aan het
profiel (fig. 1). En aan de onderkant van de metersecties (US 100) is
een pijl geprint die de rookgasrichting aangeeft.
Montez deux éléments pour un emboîtement vertical. Pour des
raisons esthétiques nous recommandons de placer les soudures
alignées, vers l’arrière du conduit(si possible).
Après l’emboîtement des éléments, la bande de sécurité, si besoinest,
doit être fixée. Mettez la bande en position exacte, où les profils se
fixent dans ceux des éléments (fig. 2). Après positionnement exact
des éléments, serrez la bande de sécurité avec un tournevis.
Ensuite le prochain élément peut être monté de la même façon.
Le profilature alta e bassa sono rappresentate nella fig. 1. Al fondo di
ogni sezione è stampata una freccia che indica la direzione del flusso.
Una volta collegati perfettamente i componenti, applicare la staffa di
sicurezza (USKB) o la fascetta di sicurezza (USAB). Vedere la fig. 2 e la
fig. 3. La coppia di scanalature della fascia di sicurezza a compressione
dovrà inserirsi perfettamente nella scanalatura dell’elemento inferiore
e nella scanalatura dell’elemento superiore per garantire un corretto
assemblaggio (Fig. 2). Qualora si utilizzino le fascette di sicurezza USAB,
è necessario ancorare i componenti mediante viti autofilettanti.
Koppel twee elementen door deze rechtstandig in elkaar te schuiven.
Om optische redenen verdient het aanbeveling om de naden aan de
achterzijde en in elkaars verlengde te plaatsen.
Nadat de elementen op elkaar staan de klemband (USKB) of afdekband (USAB) aanbrengen. Zie fig. 2 en fig. 3. Plaats de klemband zodanig dat de randen van de klemband in de randen van de elementen
vallen (fig. 2). Positioneer de elementen juist ten opzichte van elkaar
en draai de klemband aan. Bij het gebruik van de USAB de elementen
m.b.v. parkers vastzetten.
Vervolgens het volgende element op dezelfde wijze koppelen.
Installate gli elementi successivi seguendo le stesse procedure.
CE
CE
CE
Après installation, une plaque signalétique doit être appliquée. Elle
engage la responsablilté de l’installateur. Les plaques signalétiques
seront envoyées gratuitement sur demande.
Dopo aver installato la canna fumaria è necessario applicare una
targhetta segnaletica come da norme DIN 18160-1.
Iedere installatie moet worden voorzien van een CE-etiket. De
installateur is hiervoor verantwoordelijk. Deze etiketten worden op
aanvraag kosteloos toegezonden.
EN 1856 - 1
EN 1856 - 1
EN 1856 - 2
EN 1856 - 2
T450 N1 D V2 L20040 O50
T600 N1 D V2 L20040 O50
T450 N1 D V2 L20040 O50
T600 N1 D V2 L20040 O50
www.eontop.info
Ontop B.V.
Postbus 135, 4330 AC Middelburg
Oude Veerseweg 23, 4332 SH Middelburg
Nederland
T:+31 (0)118 68 99 00
F:+31 (0)118 68 99 99
E:[email protected]
Ontop Abgastechnik GmbH
Albert-Einstein-Straße 8
51674 Wiehl
Deutschland
T:+49 (0)2261 708 –0
F:+49 (0)2261 708 90
E:[email protected]
Metaloterm France S.A.R.L.
65, Avenue du Général de Gaulle
77420 Champs-sur-Marne
France
T:+33 (0)1 64 62 12 30
F:+33 (0)1 64 62 11 08
E:[email protected]
Ontop Polska Sp. z o.o.
ul. Hallera 75
98 - 100 Wiewiórczyn
Polska
T:+48 (0)43 676 33 66
F:+48 (0)42 209 10 57
E:[email protected]
USmontage_H10_13
2015_07
Scarica