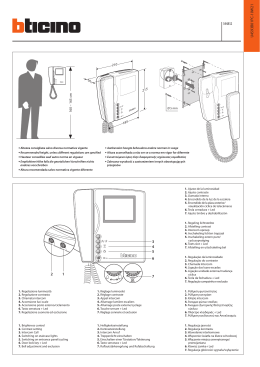
IT
MANUALE
TECNICO
EN
TECHNICAL
SHEET
FR
FEUILLE
TECHNIQUE
FT PLANUX 03
Manuale utilizzo e programmazioni Planux Intercomunicante
Planux Intercom Operation & Programming Manual
Manuel d’utilisation et programmations Planux Intercommunicant
Assistenza tecnica Italia
Commerciale Italia
0346/750090
0346/750091
Technical service abroad (+39) 0346750092
Export department
(+39) 0346750093
Comelit Group S.p.A. - Via Don Arrigoni 5 - 24020 Rovetta S. Lorenzo BG Italy - tel. (+39) 0346 750 011 - fax (+39) 0346 71436
www.comelit.eu
www.simplehome.eu [email protected] [email protected]
[email protected]
GROUP S.p.A.
ITALIANO
INDICE
1 DESCRIZIONE
1.1 Descrizione monitor
1.2 Tasti di navigazione
1.3 Tasti e funzioni videocitofoniche
Pag. 3
Pag. 3
Pag. 3
2 UTILIZZO DEL MONITOR
2.1 Utilizzo manualistica
2.2 Impostazione lingua
2.3 Rispondere ad una chiamata
2.4 Utilizzo funzione Attuatore generico
2.5 Utilizzo funzione Autoaccensione
2.6 Utilizzo funzione Chiamata a Centralino
2.7 Utilizzo funzione Privacy
2.8 Effettuare una chiamata intercomunicante / chiamata di gruppo
2.9 Regolazione immagine
2.10 Regolazione volumi
2.11 Impostazione melodie
2.12 Utilizzo di un attuatore tramite menu (Art. 1256)
2.13 Visualizzazione immagine da telecamere scorporate (Art. 1259C)
2.14 Utilizzo funzione Blocco Tasti
2.15 Attivazione e disattivazione della funzione Mani Libere
Pag. 4
Pag. 4
Pag. 4
Pag. 5
Pag. 5
Pag. 5
Pag. 5
Pag. 6
Pag. 6
Pag. 7
Pag. 7
Pag. 8
Pag. 8
Pag. 9
Pag. 9
3 SETTAGGI E PROGRAMMAZIONE MONITOR
3.1 Programmazione tasto
3.2 Programmazione tasto
3.3 Programmazione tasto Autoaccensione
3.4 Disabilitazione tasto Autoaccensione
3.5 Rinomina voci (Menu Attuatori e Telecamere)
3.6 Programmazione tasto Privacy / Dottore
3.7 Visualizzare versione software
3.8 Entrare nel menu programmatore
3.9 Impostazione codici attuatori
3.10 Impostazione codici telecamere
3.11 Impostazione codice intercomunicante
3.12 Impostazione Rubrica Intercom
3.13 Impostazione chiamate di gruppo
3.14 Modifica lingua menu
3.15 Ripristino sistema
FT PLANUX 03
2
Pag. 9
Pag. 10
Pag. 10
Pag. 11
Pag. 11
Pag. 12
Pag. 12
Pag. 13
Pag. 13
Pag. 14
Pag. 14
Pag. 14
Pag. 15
Pag. 16
Pag. 16
FT PLANUX 03
1 DESCRIZIONE
1 Microfono
2 Display LCD a colori; visualizza il menu del monitor e le
immagini provenienti dal posto esterno o da altre
telecamere (se presenti).
3 Altoparlante
4 Tasto fonica
5 Tasto serratura
6 Tastiera navigazione
7 Tasto chiamata a centralino (pragrammabile*)
8 Tasto attuatore generico (pragrammabile*)
9 Tasto autoaccensione (pragrammabile*)
10 Tasto funzione Privacy / Dottore
1.2 Tasti di navigazione
TASTO MENU
Permette di accedere e uscire dal menu e di
arretrare di un livello nel menu.
Se lasciato inattivo il monitor esce dalla modalità
menu automaticamente dopo 15 secondi.
ITALIANO
1.1 Descrizione monitor
NOTA Se dopo la pressione del tasto questo lampeggia per 4
secondi significa funzione non disponibile oppure impianto
occupato.
TASTO CONFERMA
Permette di confermare le scelte effettuate e di
accedere al livello successivo nel menu.
TASTI NAVIGAZIONE
Permettono di scorrere tra le varie voci e di
modificare il valore della voce selezionata.
1.3 Tasti e funzioni videocitofoniche
TASTO FONICA
Permette di attivare o disattivare la conversazione con il posto esterno.
Il led lampeggia ad indicare una chiamata ricevuta. Il LED si accende ad indicare una conversazione in corso.
TASTO SERRATURA
Permette l’apertura della serratura associata.
Il led lampeggia ad indicare una chiamata ricevuta.
TASTO PROGRAMMABILE 1*
Di fabbrica impostato a chiamata a centralino.
TASTO PROGRAMMABILE 2*
Di fabbrica impostato a attuatore generico.
TASTO AUTOACCENSIONE*
Di fabbrica impostato a autoaccensione
TASTO PRIVACY / DOTTORE
• La funzione Privacy permette l'esclusione della chiamata dal posto esterno e dal centralino.
• La funzione Dottore permette l’azionamento automatico dell’apriporta su chiamata da posto esterno.
• La funzione Privacy + Dottore oltre a disattivare la suoneria del citofono come nella funzione Privacy, permette
l’azionamento automatico dell’apriporta su chiamata da posto esterno.
Il led rosso indica che la funzione scelta è attivata.
* È possible programmare il tasto con le seguenti funzioni: chiamata a centralino, attuatore generico, attuatore con
codice (attivazione Art. 1256), comando telecamera scorporata (attivazione Art. 1259C), chiamata intercomunicante,
chiamata generale.
3
FT PLANUX 03
GROUP S.p.A.
ITALIANO
2 UTILIZZO DEL MONITOR
2.1 Utilizzo manualistica
2.3 Rispondere ad una chiamata
All’interno del manuale verranno mostrati i vari passaggi per
utilizzare e programmare il monitor Planux. Le varie
schermate saranno strutturate nel seguente modo:
I due LED lampeggiano a seguito di una chiamata.
TASTI DA PREMERE
MENU IN USO
VOCE ATTUALMENTE
ATTIVA
VOCE SELEZIONATA
LINGUE
ITALIANO
Per attivare la fonica premere il pulsante
luce del LED sia fissa prima di parlare.
ENGLISH
attendere che la
FRANÇAIS
NEDERLANDS
DEUTSCH
PORTUGUÊS
ESPAÑOL
SCHERMATA VISUALIZZATA
2.2 Impostazione lingua
Al primo accesso al menu, viene richiesto di impostare la
lingua di utilizzo.
Per attivare la serratura elettronica premere il pulsante
.
LINGUE
ITALIANO
ENGLISH
FRANÇAIS
NEDERLANDS
DEUTSCH
Il monitor emetterà un tono a confermare l’avvenuta
attivazione della serratura.
PORTUGUÊS
ESPAÑOL
Durante una chiamata è possibile utilizzare le funzioni:
Attuatore Generico (2.4), Attuatore tramite menu (2.12),
Visualizzazione immagine da telecamere scorporate (2.13).
ITALIANO
NO
OK
FT PLANUX 03
4
FT PLANUX 03
2.6 Utilizzo funzione Chiamata a Centralino
Premere il tasto
per attivare la funzione Attuatore
Generico (attivazione Art. 1256 o Art. 1259C).
Premere il tasto
Centralino.
Il monitor emetterà un tono a confermare l’avvenuta
attivazione
Viene inviata una chiamata al centralino associato
2.5 Utilizzo funzione Autoaccensione
2.7 Utilizzo funzione Privacy
*
Premere il tasto
per attivare la funzione Autoaccensione.
*
*
Sul video compare l’immagine del posto esterno associato.
Premendo ripetutamente il tasto
posti esterni (MAX 2 se presenti).
*
per attivare la funzione Chiamata a
Premere il tasto
per attivare la funzione privacy.
ITALIANO
2.4 Utilizzo funzione Attuatore Generico
*
Si accenderà il LED rosso ad indicare che la funzione è stata
attivata.
si potrà basculare tra i
Funzioni disponibili nella configurazione di fabbrica, per modificare vedi sezione SETTAGGI E PROGRAMMAZIONI
MONITOR Pag. 9.
5
FT PLANUX 03
GROUP S.p.A.
ITALIANO
2.8 Effettuare una chiamata intercomunicante / chiamata
di gruppo
2.9 Regolazione immagine
PLANUX
PLANUX
INTERCOMUNICANTE
INTERCOMUNICANTE
ATTUATORI
ATTUATORI
TELECAMERE
TELECAMERE
MANI LIBERE
MANI LIBERE
IMPOSTAZIONI
IMPOSTAZIONI
BLOCCO TASTI
BLOCCO TASTI
IMPOSTAZIONI
INTERCOMUNICANTE
REGOLA IMMAGINE
CHIAMATA GEN.
REGOLA VOLUMI
INTERCOM 1
IMPOSTA MELODIE
INTERCOM 2
PROGRAMMAZIONE TASTI
INTERCOM 3
INFORMAZIONI
INTERCOM 4
INTERCOM 5
INTERCOM 6
In caso non ci sia il posto interno associato all’indirizzo di
chiamata scelto compare la scritta DISPOSITIVO NON
PRESENTE.
REGOLA IMMAGINE
CONTRASTO
LUMINOSITÀ
COLORE
DISPOSITIVO NON
PRESENTE
REGOLA IMMAGINE
Per rinominare chiamata intercomunicante riferirsi al punto
3.5.
CONTRASTO
LUMINOSITÀ
COLORE
FT PLANUX 03
6
FT PLANUX 03
2.10 Regolazione volumi
ITALIANO
PLANUX
2.11 Impostazione melodie
PLANUX
INTERCOMUNICANTE
INTERCOMUNICANTE
ATTUATORI
ATTUATORI
TELECAMERE
TELECAMERE
MANI LIBERE
MANI LIBERE
IMPOSTAZIONI
IMPOSTAZIONI
BLOCCO TASTI
BLOCCO TASTI
IMPOSTAZIONI
IMPOSTAZIONI
REGOLA IMMAGINE
REGOLA IMMAGINE
REGOLA VOLUMI
REGOLA VOLUMI
IMPOSTA MELODIE
IMPOSTA MELODIE
PROGRAMMAZIONE TASTI
PROGRAMMAZIONE TASTI
INFORMAZIONI
INFORMAZIONI
REGOLA VOLUMI
IMPOSTA MELODIE
SUONERIA
ESTERNA
AUDIO
CENTRALINO
FUORIPORTA
REGOLA VOLUMI
ESTERNA
MELODIA
1
SUONERIA
MELODIA
2
AUDIO
MELODIA
3
MELODIA
4
MELODIA
5
MELODIA
6
MELODIA
7
7
FT PLANUX 03
GROUP S.p.A.
ITALIANO
2.12 Utilizzo di un attuatore tramite menu (Art. 1256)
2.13 Visualizzazione immagine da telecamere scorporate
(Art. 1259C)
PLANUX
PLANUX
INTERCOMUNICANTE
INTERCOMUNICANTE
ATTUATORI
ATTUATORI
TELECAMERE
TELECAMERE
MANI LIBERE
IMPOSTAZIONI
BLOCCO TASTI
MANI LIBERE
IMPOSTAZIONI
BLOCCO TASTI
A schermo compare l’immagine da posto esterno.
ATTUATORI
ATTUATORE GENERICO
TELECAMERE
ATTUATORE 1
TELECAMERA 1
ATTUATORE 2
TELECAMERA 2
ATTUATORE 3
RINOMINA VOCI
RINOMINA VOCI
Il monitor emetterà un tono a confermare l’avvenuta
attivazione. In caso non ci sia nessuna telecamera scorporata
compare la scritta DISPOSITIVO NON PRESENTE.
TELECAMERE
TELECAMERA 1
TELECAMERA 2
RINOMINA VOCI
DISPOSITIVO NON
PRESENTE
Per rinominare gli attuatori riferirsi al punto 3.5.
Premendo ripetutamente il tasto
è possibile basculare tra
le varie telecamere del gruppo selezionato e il posto esterno
Premere ripetutamente il tasto
per uscire dal menu e
visualizzare a pieno schermo l’immagine della telecamera
In caso non ci sia nessuna telecamera scorporata compare la
scritta DISPOSITIVO NON PRESENTE
Per rinominare le telecamere riferirsi al punto 3.5
FT PLANUX 03
8
FT PLANUX 03
2.14 Utilizzo funzione Blocco Tasti
3 SETTAGGI E PROGRAMMAZIONI MONITOR
ITALIANO
3.1 Programmazione tasto
PLANUX
INTERCOMUNICANTE
PLANUX
ATTUATORI
INTERCOMUNICANTE
TELECAMERE
MANI LIBERE
IMPOSTAZIONI
BLOCCO TASTI
ATTUATORI
TELECAMERE
MANI LIBERE
IMPOSTAZIONI
BLOCCO TASTI
BLOCCO TASTI
ANNULLA
IMPOSTAZIONI
CONFERMA
REGOLA IMMAGINE
REGOLA VOLUMI
IMPOSTA MELODIE
PROGRAMMAZIONE TASTI
La funzione Blocco Tasti si disattiverà automaticamente dopo
60 secondi oppure a seguito di una chiamata ricevuta
INFORMAZIONI
2.15 Attivazione e disattivazione della funzione Mani Libere
PROGRAMMAZIONE TASTI
PLANUX
TASTO 1
INTERCOMUNICANTE
TASTO 2
ATTUATORI
TASTO
TELECAMERE
TASTO
MANI LIBERE
IMPOSTAZIONI
BLOCCO TASTI
TASTO 1
MANI LIBERE
ATTUATORE GENERICO
ON
ATTUATORE 1
OFF
ATTUATORE 2
ATTUATORE 3
TELECAMERA 1
TELECAMERA 2
La funzione Mani Libere permette di attivare la fonica
automaticamente dopo una chiamata senza dover premere il
pulsante
INTERCOM. 1
9
FT PLANUX 03
GROUP S.p.A.
ITALIANO
3.2 Programmazione tasto
3.3 Programmazione tasto autoaccensione
PLANUX
PLANUX
INTERCOMUNICANTE
INTERCOMUNICANTE
ATTUATORI
ATTUATORI
TELECAMERE
TELECAMERE
MANI LIBERE
MANI LIBERE
IMPOSTAZIONI
IMPOSTAZIONI
BLOCCO TASTI
BLOCCO TASTI
IMPOSTAZIONI
IMPOSTAZIONI
REGOLA IMMAGINE
REGOLA IMMAGINE
REGOLA VOLUMI
REGOLA VOLUMI
IMPOSTA MELODIE
IMPOSTA MELODIE
PROGRAMMAZIONE TASTI
PROGRAMMAZIONE TASTI
INFORMAZIONI
INFORMAZIONI
PROGRAMMAZIONE TASTI
PROGRAMMAZIONE TASTI
TASTO 1
TASTO 1
TASTO 2
TASTO 2
TASTO
TASTO
TASTO
TASTO
TASTO 2
TASTO
ATTUATORE GENERICO
ATTUATORE GENERICO
ATTUATORE 1
ATTUATORE 1
ATTUATORE 2
ATTUATORE 2
ATTUATORE 3
ATTUATORE 3
TELECAMERA 1
TELECAMERA 1
TELECAMERA 2
TELECAMERA 2
INTERCOM. 1
INTERCOM. 1
FT PLANUX 03
10
FT PLANUX 03
3.4 Disabilitazione tasto autoaccensione
3.5 Rinomina Voci (Menu Attuatori, Telecamere e
Intercomunicante)
ITALIANO
PLANUX
INTERCOMUNICANTE
PLANUX
ATTUATORI
INTERCOMUNICANTE
TELECAMERE
ATTUATORI
MANI LIBERE
TELECAMERE
IMPOSTAZIONI
MANI LIBERE
BLOCCO TASTI
IMPOSTAZIONI
BLOCCO TASTI
IMPOSTAZIONI
REGOLA IMMAGINE
ATTUATORI
REGOLA VOLUMI
ATTUATORE GENERICO
IMPOSTA MELODIE
ATTUATORE 1
PROGRAMMAZIONE TASTI
ATTUATORE 2
INFORMAZIONI
ATTUATORE 3
RINOMINA VOCI
PROGRAMMAZIONE TASTI
RINOMINA VOCI
TASTO 1
TASTO 2
ATTUATORE 1
ATTUATORE 2
TASTO
TASTO
TASTO
CHIAMATA GEN.
AUTOACCENSIONE
CENTRALINO
OFF
Premere i tasti navigazione
per scorrere le lettere
dell’alfabeto; Premere il tasto
per confermare la lettera e
passare automaticamente a quella immediatamente a destra.
Una volta terminato l’inserimento premere
per
confermare.
RINOMINA VOCI
ATTUATORE 1
CANCELLO
11
FT PLANUX 03
GROUP S.p.A.
ITALIANO
3.6 Programmazione tasto Privacy / Dottore
3.7 Visualizzare versione software
PLANUX
PLANUX
INTERCOMUNICANTE
INTERCOMUNICANTE
ATTUATORI
ATTUATORI
TELECAMERE
TELECAMERE
MANI LIBERE
MANI LIBERE
IMPOSTAZIONI
IMPOSTAZIONI
BLOCCO TASTI
BLOCCO TASTI
IMPOSTAZIONI
IMPOSTAZIONI
REGOLA IMMAGINE
REGOLA IMMAGINE
REGOLA VOLUMI
REGOLA VOLUMI
IMPOSTA MELODIE
PROGRAMMAZIONE TASTI
IMPOSTA MELODIE
PROGRAMMAZIONE TASTI
INFORMAZIONI
INFORMAZIONI
INFORMAZIONI
PROGRAMMAZIONE TASTI
TASTO 1
TASTO 2
TASTO
TASTO
TASTO
DOTTORE
PRIVACY
PRIVACY + DOTTORE
FT PLANUX 03
12
VERS. SW:
1.0-I
VERS. EE:
1.0
IND SIMPLEBUS:
1P
IND. INTERCOM:
255
USCITA 4897:
4
FT PLANUX 03
3.8 Entrare nel menu programmatore
3.9 Impostazione codici attuatori
Per maggiori informazioni su Art. 1256 vedi FT/SB2/02 o
MT/SBC/01.
Entrare nel menu Programmatore
ITALIANO
All’interno del menu programmatore è possibile impostare i
codici relativi agli attuatori (Art. 1256) e alle telecamere, (Art.
1259C) cambiare la lingua di tutti i menu, visualizzare la
versione del software installato e ripristinare il monitor come
da fabbrica.
Per entrare nel menu seguire il seguente procedimento:
PROGRAMMATORE
ATTUATORI
PLANUX
TELECAMERE
INTERCOMUNICANTE
INTERCOMUNICANTE
ATTUATORI
LINGUE
TELECAMERE
RIPRISTINO
MANI LIBERE
IMPOSTAZIONI
BLOCCO TASTI
IMPOSTAZIONI
ATTUATORI
ATTUATORE 1
1
ATTUATORE 2
2
ATTUATORE 3
3
PROG
___
REGOLA IMMAGINE
PROG
___
REGOLA VOLUMI
PROG
___
IMPOSTA MELODIE
PROG
___
PROGRAMMAZIONE TASTI
INFORMAZIONI
Una volta all’interno del menu Programmazione Tasti premere
il tasto navigazione
per 3 volte e di seguito il tasto
navigazione
per 3 volte
PROGRAMMAZIONE TASTI
TASTO 1
TASTO 2
ATTUATORI
ATTUATORE 1
1
ATTUATORE 2
2
ATTUATORE 3
3
PROG
4
PROG
___
PROG
___
PROG
___
TASTO
TASTO
ATTUATORI
PROGRAMMATORE
ATTUATORI
ATTUATORE 1
1
ATTUATORE 2
2
ATTUATORE 3
3
TELECAMERE
ATTUATORE 4
INTERCOMUNICANTE
PROG
___
PROG
___
PROG
___
LINGUE
4
RIPRISTINO
13
FT PLANUX 03
ITALIANO
GROUP S.p.A.
3.10 Impostazione codici telecamere
Per maggiori informazioni su Art. 1259C vedi FT/SBC/05 o
MT/SBC/01
Entrare nel menu Programmatore
3.11 Impostazione codice intercomunicante
Entrare nel menu Programmatore
PROGRAMMATORE
PROGRAMMATORE
ATTUATORI
ATTUATORI
TELECAMERE
TELECAMERE
INTERCOMUNICANTE
INTERCOMUNICANTE
LINGUE
LINGUE
RIPRISTINO
RIPRISTINO
INTERCOMUNICANTE
TELECAMERE
INDIRIZZO INTERCOM.
TELECAMERA 1
220
RUBRICA INTERCOM.
TELECAMERA 2
221
CHIAMATE DI GRUPPO
PROG
___
PROG
___
PROG
___
PROG
___
PROG
___
INDIRIZZO INTERCOM.
TELECAMERA 1
220
INDIRIZZO INTERCOM.
TELECAMERA 2
221
INDIRIZZO INTERCOM.
PROG
222
PROG
___
PROG
___
PROG
___
3.12 Impostazione Rubrica Intercom.
PROG
___
Per eliminare un indirizzo di chiamata intercom dalla rubrica
seguire il seguente procedimento:
INDIRIZZO INTERCOM.
1
TELECAMERE
Entrare nel menu Programmatore
TELECAMERE
TELECAMERA 1
220
TELECAMERA 2
221
TELECAMERA 3
222
PROG
___
PROG
___
PROG
___
PROG
___
PROGRAMMATORE
ATTUATORI
TELECAMERE
INTERCOMUNICANTE
LINGUE
RIPRISTINO
FT PLANUX 03
14
2
FT PLANUX 03
3.13 Impostazione chiamate di gruppo
INTERCOMUNICANTE
ITALIANO
Entrare nel menu Programmatore
INDIRIZZO INTERCOM.
PROGRAMMATORE
RUBRICA INTERCOM.
CHIAMATE DI GRUPPO
ATTUATORI
TELECAMERE
INTERCOMUNICANTE
LINGUE
RUBRICA INTERCOM.
RIPRISTINO
INTERCOM. 1
1
INTERCOM. 2
2
INTERCOM. 3
3
INTERCOM. 4
4
INTERCOM. 5
5
INDIRIZZO INTERCOM.
INTERCOM. 6
6
RUBRICA INTERCOM.
INTERCOM. 7
7
CHIAMATE DI GRUPPO
INTERCOMUNICANTE
RUBRICA INTERCOM.
INTERCOM. 1
1
INTERCOM. 2
2
INTERCOM. 3
3
INTERCOM. 4
4
INTERCOM. 5
0
CHIAMATA GEN.
INTERCOM. 6
6
GRUPPO 2
INTERCOM. 7
7
GRUPPO 3
CHIAMATE DI GRUPPO
12345678
GRUPPO 4
RUBRICA INTERCOM.
INTERCOM. 1
1
INTERCOM. 2
2
INTERCOM. 3
3
INTERCOM. 4
4
PROG
_
INTERCOM. 6
6
INTERCOM. 7
7
CHIAMATE DI GRUPPO
12345678
CHIAMATA GEN.
GRUPPO 2
GRUPPO 3
GRUPPO 4
15
FT PLANUX 03
ITALIANO
GROUP S.p.A.
3.14 Modifica lingua menu
3.15 Ripristino sistema
Entrare nel menu Programmatore
Questo procedimento riporterà il sistema allo stato originale di
fabbrica, cancellando tutti i codici attuatori e telecamere
impostati
PROGRAMMATORE
Entrare nel menu Programmatore
ATTUATORI
PROGRAMMATORE
TELECAMERE
INTERCOMUNICANTE
LINGUE
ATTUATORI
TELECAMERE
RIPRISTINO
INTERCOMUNICANTE
LINGUE
RIPRISTINO
LINGUE
ITALIANO
ENGLISH
RIPRISTINO
FRANÇAIS
NEDERLANDS
ANNULLA
DEUTSCH
CONFERMA
PORTUGUÊS
ESPAÑOL
ENGLISH
NO
OK
RIPRISTINO
RIPRISTINO
EFFETTUATO
FT PLANUX 03
16
FT PLANUX 03
TABLE OF CONTENTS
Page 17
Page 17
Page 17
2 USING THE MONITOR
2.1 Using the manual
2.2 Setting the language
2.3 Answering a call
2.4 Using the Generic Actuator function
2.5 Using the Self-Ignition function
2.6 Using the Switchboard Call function
2.7 Using the Privacy function
2.8 Making an intercom call / group call
2.9 Adjusting the image
2.10 Adjusting the volume
2.11 Setting the melody
2.12 Using an actuator from the menu (Art. 1256)
2.13 Viewing images from remote cameras (Art. 1259C)
2.14 Using the Keypad Lock function
2.15 Activating and de-activating the Hands Free function
Page 18
Page 18
Page 18
Page 19
Page 19
Page 19
Page 20
Page 21
Page 21
Page 22
Page 22
Page 23
Page 23
Page 24
Page 24
3 MONITOR SETTINGS AND PROGRAMMING
3.1 Programming key
3.2 Programming key
3.3 Programming the Self-Ignition key
3.4 Disabling the Self-Ignition key
3.5 Renaming headings (Actuators and Cameras Menu)
3.6 Programming the Privacy / Doctor key
3.7 Displaying the software version
3.8 Entering the programmer menu
3.9 Setting actuator codes
3.10 Setting camera codes
3.11 Setting the intercom code
3.12 Setting the Intercom Directory
3.13 Setting group calls
3.14 Changing the menu language
3.15 Resetting the system
Page 24
Page 25
Page 25
Page 26
Page 26
Page 27
Page 27
Page 28
Page 28
Page 29
Page 29
Page 29
Page 30
Page 31
Page 31
17
ENGLISH
1 DESCRIPTION
1.1 Description of the monitor
1.2 Navigation keys
1.3 Video entry phone keys and functions
FT PLANUX 03
GROUP S.p.A.
1 DESCRIPTION
1.1 Description of the monitor
ENGLISH
1 Microphone
2 LCD color display; displays the monitor menu and the
images from the external unit or other cameras (if present).
3 Loudspeaker
4 Audio key
5 Door-release key
6 Navigation keys
7 Switchboard Call key (programmable*)
8 Generic Actuator key (programmable*)
9 Self-Ignition key (programmable*)
10 Privacy/Doctor function key
NOTE If, after a key is pressed, it flashes for 4 seconds, this
means the function is not available or the system is
engaged.
1.2 Navigation keys
MENU KEY
Use this key to access and exit the menu, and to go
back one level in the menu.
If left idle, the monitor exits menu mode
automatically after 15 seconds.
CONFIRM KEY
Confirms the selection made and provides access
to the next menu level.
NAVIGATION KEYS
Use these keys to scroll through the headings
and modify the value of the selected heading.
1.3 Video entry phone keys and functions
AUDIO KEY
Activates or de-activates conversation with the external unit.
The LED flashes to indicate that a call has been received. The LED illuminates to indicate that a conversation is in progress.
DOOR-RELEASE KEY
Use this key to release the corresponding door lock.
The LED flashes to indicate that a call has been received.
PROGRAMMABLE KEY 1*
Factory-set to Switchboard Call.
PROGRAMMABLE KEY 2*
Factory-set to Generic Actuator.
SELF-IGNITION KEY*
Factory-set to Self-Ignition
PRIVACY / DOCTOR KEY
• The Privacy function disables calls from the external unit and switchboard.
• The Doctor function enables automatic activation of the door-release function in response to a call from the external unit.
• The Privacy + Doctor function, as well as disabling the intercom ringtone melody in the same way as the Privacy
function, also enables automatic activation of the door-release function in response to a call from the external unit.
The red LED indicates that the selected function is active.
* The key may be programmed for the following functions: Switchboard Call, Generic Actuator, Actuator with code
(activation of Art. 1256), Remote Camera Control (activation of Art. 1259C), Intercom Call, General Call.
FT PLANUX 03
18
FT PLANUX 03
2 USING THE MONITOR
2.1 Using the manual
2.3 Answering a call
The manual describes the various sequences used when
operating and programming the Planux monitor. The various
screens are structured as follows:
The two LEDs flash in response to a call.
MENU IN USE
KEYS TO BE PRESSED
ENGLISH
OPTION CURRENTLY
ACTIVE
OPTION SELECTED
LINGUE
ITALIANO
To activate the audio line, press
and wait for the LED to
illuminate steadily before speaking.
ENGLISH
FRANÇAIS
NEDERLANDS
DEUTSCH
PORTUGUÊS
ESPAÑOL
SCREEN DISPLAYED
2.2 Setting the language
When you first access the menu, you will be asked to set the
language.
To activate the door-release function, press
.
LINGUE
ITALIANO
ENGLISH
FRANÇAIS
NEDERLANDS
DEUTSCH
PORTUGUÊS
The monitor will beep to confirm that the door-release
function has been activated.
ESPAÑOL
ITALIANO
During a call, it is possible to use the following functions:
Generic Actuator (2.4), Actuator from menu (2.12), View
images from remote cameras (2.13).
NO
OK
19
FT PLANUX 03
GROUP S.p.A.
2.4 Using the Generic Actuator function
2.6 Using the Switchboard Call function
Press
Press
to activate the Generic Actuator function
*
*
ENGLISH
(activation of Art. 1256 or Art. 1259C).
to activate the Switchboard Call function.
The monitor will beep to confirm activation
A call is transmitted to the corresponding switchboard
2.5 Using the Self-Ignition function
2.7 Using the Privacy function
Press
to activate the Self-Ignition function.
*
The image from the corresponding external unit appears on the monitor.
Press
to activate the Privacy function.
*
The red LED will light up to indicate that the function has been
activated.
By pressing
repeatedly, you can switch between the
external units (MAX. 2 if present).
*
Functions available in the factory configuration; to modify, see MONITOR SETTINGS AND PROGRAMMING, Page 24.
FT PLANUX 03
20
FT PLANUX 03
2.8 Making an intercom call / group call
2.9 Adjusting the image
PLANUX
PLANUX
INTERCOM
ACTUATORS
ACTUATORS
VIDEO CAMERAS
VIDEO CAMERAS
HANDS FREE
HANDS FREE
SETTINGS
SETTINGS
KEYPAD LOCK
ENGLISH
INTERCOM
KEYPAD LOCK
SETTINGS
INTERCOM
ADJUST IMAGE
GEN CALL
ADJUST VOLUME
INTERCOM 1
SET MELODY
INTERCOM 2
PROGRAM KEYS
INTERCOM 3
INFORMATION
INTERCOM 4
INTERCOM 5
INTERCOM 6
If there is no internal unit associated with the selected call
address, the text DEVICE NOT FOUND will appear.
ADJUST IMAGE
CONTRAST
BRIGHTNESS
COLOR
DEVICE NOT
FOUND
ADJUST IMAGE
To rename the intercom call, see point 3.5.
CONTRAST
BRIGHTNESS
COLOR
21
FT PLANUX 03
GROUP S.p.A.
2.10 Adjusting the volume
ENGLISH
PLANUX
2.11 Setting the melody
PLANUX
INTERCOM
INTERCOM
ACTUATORS
ACTUATORS
VIDEO CAMERAS
VIDEO CAMERAS
HANDS FREE
HANDS FREE
SETTINGS
SETTINGS
KEYPAD LOCK
KEYPAD LOCK
SETTINGS
SETTINGS
ADJUST IMAGE
ADJUST IMAGE
ADJUST VOLUME
ADJUST VOLUME
SET MELODY
SET MELODY
PROGRAM KEYS
PROGRAM KEYS
INFORMATION
INFORMATION
ADJUST VOLUME
SET MELODY
RINGTONE
EXTERNAL
AUDIO
SWITCHBOARD
OUTSIDE DOOR
ADJUST VOLUME
EXTERNAL
MELODY
1
RINGTONE
MELODY
2
AUDIO
MELODY
3
MELODY
4
MELODY
5
MELODY
6
MELODY
7
FT PLANUX 03
22
FT PLANUX 03
2.12 Using an actuator from the menu (Art. 1256)
2.13 Viewing images from remote cameras (Art. 1259C)
PLANUX
PLANUX
INTERCOM
INTERCOM
ACTUATORS
VIDEO CAMERAS
ACTUATORS
VIDEO CAMERAS
HANDS FREE
HANDS FREE
ENGLISH
SETTINGS
SETTINGS
KEYPAD LOCK
KEYPAD LOCK
The image from the external unit appears on the screen.
ACTUATORS
GENERIC ACTUATOR
VIDEO CAMERAS
ACTUATOR 1
VIDEO CAMERA 1
ACTUATOR 2
VIDEO CAMERA 2
ACTUATOR 3
RENAME HEADINGS
RENAME HEADINGS
The monitor will beep to confirm activation. If no remote
camera is connected, the text DEVICE NOT FOUND will
appear on the display.
VIDEO CAMERAS
VIDEO CAMERA 1
VIDEO CAMERA 2
RENAME HEADINGS
DEVICE NOT
FOUND
To rename the actuators, see point 3.5.
By pressing
repeatedly, you can switch between the
various cameras in the selected group and the external unit
Press
repeatedly to exit the menu and view the image
from the camera on the full screen
If no remote camera is connected, the text DEVICE NOT
FOUND will appear on the display
To rename the cameras, see point 3.5
23
FT PLANUX 03
GROUP S.p.A.
2.14 Using the Keypad Lock function
3 MONITOR SETTINGS AND PROGRAMMING
3.1 Programming key
PLANUX
INTERCOM
PLANUX
ACTUATORS
INTERCOM
VIDEO CAMERAS
HANDS FREE
VIDEO CAMERAS
SETTINGS
ENGLISH
ACTUATORS
KEYPAD LOCK
HANDS FREE
SETTINGS
KEYPAD LOCK
KEYPAD LOCK
CANCEL
SETTINGS
CONFIRM
ADJUST IMAGE
ADJUST VOLUME
SET MELODY
PROGRAM KEYS
The Keypad Lock function will de-activate automatically after
60 seconds, or on receipt of a call
INFORMATION
2.15 Activating and de-activating the Hands Free function
PROGRAM KEYS
PLANUX
KEY 1
INTERCOM
KEY 2
ACTUATORS
KEY
VIDEO CAMERAS
KEY
HANDS FREE
SETTINGS
KEYPAD LOCK
KEY 1
HANDS FREE
GENERIC ACTUATOR
ON
ACTUATOR 1
OFF
ACTUATOR 2
ACTUATOR 3
VIDEO CAMERA 1
VIDEO CAMERA 2
The Hands Free function activates the audio line automatically
in response to a call, without having to press
FT PLANUX 03
24
INTERCOM 1
FT PLANUX 03
3.2 Programming key
PLANUX
3.3 Programming the Self-Ignition key
PLANUX
INTERCOM
ACTUATORS
ACTUATORS
VIDEO CAMERAS
VIDEO CAMERAS
HANDS FREE
HANDS FREE
SETTINGS
SETTINGS
KEYPAD LOCK
KEYPAD LOCK
SETTINGS
SETTINGS
ADJUST IMAGE
ADJUST IMAGE
ADJUST VOLUME
ADJUST VOLUME
SET MELODY
SET MELODY
PROGRAM KEYS
PROGRAM KEYS
INFORMATION
INFORMATION
PROGRAM KEYS
KEY 1
KEY 2
KEY
KEY
KEY 2
GENERIC ACTUATOR
ACTUATOR 1
ACTUATOR 2
ACTUATOR 3
VIDEO CAMERA 1
VIDEO CAMERA 2
INTERCOM 1
ENGLISH
INTERCOM
PROGRAM KEYS
KEY 1
KEY 2
KEY
KEY
KEY
GENERIC ACTUATOR
ACTUATOR 1
ACTUATOR 2
ACTUATOR 3
VIDEO CAMERA 1
VIDEO CAMERA 2
INTERCOM 1
25
FT PLANUX 03
GROUP S.p.A.
3.4 Disabling the Self-Ignition key
3.5 Renaming headings (Actuator, Camera and Intercom
menus)
PLANUX
PLANUX
INTERCOM
INTERCOM
ACTUATORS
VIDEO CAMERAS
ENGLISH
HANDS FREE
ACTUATORS
VIDEO CAMERAS
HANDS FREE
SETTINGS
KEYPAD LOCK
SETTINGS
KEYPAD LOCK
SETTINGS
ADJUST IMAGE
ACTUATORS
ADJUST VOLUME
GENERIC ACTUATOR
SET MELODY
ACTUATOR 1
PROGRAM KEYS
ACTUATOR 2
INFORMATION
ACTUATOR 3
RENAME HEADINGS
PROGRAM KEYS
RENAME HEADINGS
KEY 1
ACTUATOR 1
KEY 2
ACTUATOR 2
KEY
KEY
Use the navigation keys
to scroll through the letters of
the alphabet; Press
to confirm the letter and move
automatically to the one immediately to its right. Once you
have completed this procedure, press
to confirm.
TASTO
GEN CALL
SELF IGNITION
RENAME HEADINGS
SWITCHBOARD
ACTUATOR 1
OFF
GATE
FT PLANUX 03
26
FT PLANUX 03
3.6 Programming the Privacy / Doctor key
PLANUX
INTERCOM
ACTUATORS
VIDEO CAMERAS
HANDS FREE
KEYPAD LOCK
PLANUX
INTERCOM
ACTUATORS
VIDEO CAMERAS
HANDS FREE
SETTINGS
ENGLISH
SETTINGS
3.7 Displaying the software version
KEYPAD LOCK
SETTINGS
SETTINGS
ADJUST IMAGE
ADJUST IMAGE
ADJUST VOLUME
SET MELODY
PROGRAM KEYS
ADJUST VOLUME
SET MELODY
PROGRAM KEYS
INFORMATION
INFORMATION
INFORMATIONS
PROGRAM KEYS
SW. VERS:
1.0-I
EE VER:
1.0
SIMPLEBUS CODE: 1 P
KEY 1
INTERCOM ADD:
255
KEY 2
OUTPUT 4897:
4
KEY
KEY
TASTO
DOCTOR
PRIVACY
PRIVACY + DOCTOR
27
FT PLANUX 03
GROUP S.p.A.
3.8 Entering the programmer menu
Inside the programmer menu you can set the codes for the
actuators (Art. 1256) and cameras (Art. 1259C), change the
language of all the menus, display the software version
installed and restore the monitor to its factory settings.
To enter the menu, proceed as follows:
3.9 Setting actuator codes
For further information about Art. 1256 , see FT/SB2/02 or
MT/SBC/01.
Enter the Programmer menu
PROGRAMMER
ACTUATORS
ENGLISH
PLANUX
VIDEO CAMERAS
INTERCOM
INTERCOM
ACTUATORS
LANGUAGES
VIDEO CAMERAS
RESET
HANDS FREE
SETTINGS
ACTUATORS
KEYPAD LOCK
ACTUATOR 1
1
ACTUATOR 2
2
ACTUATOR 3
SETTINGS
3
PROG
___
ADJUST IMAGE
PROG
___
ADJUST VOLUME
PROG
___
SET MELODY
PROG
___
PROGRAM KEYS
INFORMATION
Once inside the Program Keys menu, press
consecutively, and then press
3 times
PROGRAM KEYS
KEY 1
KEY 2
3 times
ACTUATORS
ACTUATOR 1
1
ACTUATOR 2
2
ACTUATOR 3
3
PROG
4
PROG
___
PROG
___
PROG
___
KEY
KEY
ACTUATORS
PROGRAMMER
ACTUATORS
ACTUATOR 1
1
ACTUATOR 2
2
ACTUATOR 3
3
VIDEO CAMERAS
ACTUATOR 4
INTERCOM
PROG
___
PROG
___
PROG
___
LANGUAGES
RESET
FT PLANUX 03
28
4
FT PLANUX 03
3.10 Setting camera codes
For further information about Art. 1259C , see FT/SBC/05 or
MT/SBC/01
Enter the Programmer menu
3.11 Setting the intercom code
Enter the Programmer menu
PROGRAMMER
PROGRAMMER
ACTUATORS
VIDEO CAMERAS
VIDEO CAMERAS
INTERCOM
INTERCOM
LANGUAGES
LANGUAGES
RESET
ENGLISH
ACTUATORS
RESET
INTERCOM
VIDEO CAMERAS
INTERCOM ADD.
VIDEO CAMERA 1
220
INTERCOM DIRECTORY
VIDEO CAMERA 2
221
GROUP CALL
PROG
___
PROG
___
PROG
___
PROG
___
PROG
___
INTERCOM ADD.
VIDEO CAMERA 1
220
INTERCOM ADD:
VIDEO CAMERA 2
221
INTERCOM ADD.
PROG
222
PROG
___
PROG
___
PROG
___
3.12 Setting the Intercom Directory
PROG
___
To delete an intercom call address from the directory, proceed
as follows:
INTERCOM ADD:
1
VIDEO CAMERAS
2
Enter the Programmer menu
VIDEO CAMERAS
VIDEO CAMERA 1
220
VIDEO CAMERA 2
221
VIDEO CAMERA 3
222
PROG
___
PROG
___
PROG
___
PROG
___
PROGRAMMER
ACTUATORS
VIDEO CAMERAS
INTERCOM
LANGUAGES
RESET
29
FT PLANUX 03
GROUP S.p.A.
3.13 Setting group calls
INTERCOM
Enter the Programmer menu
INTERCOM ADD.
PROGRAMMER
INTERCOM DIRECTORY
GROUP CALL
ACTUATORS
VIDEO CAMERAS
ENGLISH
INTERCOM
LANGUAGES
INTERCOM DIRECTORY
RESET
INTERCOM 1
1
INTERCOM 2
2
INTERCOM 3
3
INTERCOM. 4
4
INTERCOM 5
5
INTERCOM ADD.
INTERCOM 6
6
INTERCOM DIRECTORY
INTERCOM 7
7
GROUP CALL
INTERCOM
INTERCOM DIRECTORY
INTERCOM 1
1
INTERCOM 2
2
INTERCOM 3
3
INTERCOM. 4
4
INTERCOM 5
0
GEN CALL
INTERCOM 6
6
GROUP 2
INTERCOM 7
7
GROUP 3
GROUP CALL
12345678
GROUP 4
INTERCOM DIRECTORY
INTERCOM 1
1
INTERCOM 2
2
INTERCOM 3
3
INTERCOM. 4
4
PROG.
_
INTERCOM 6
6
INTERCOM 7
7
GROUP CALL
12345678
GEN CALL
GROUP 2
GROUP 3
GROUP 4
FT PLANUX 03
30
FT PLANUX 03
3.14 Changing the menu language
3.15 Resetting the system
Enter the Programmer menu
This procedure will restore the system to its original factory
settings, and delete all the actuator and camera codes set
PROGRAMMER
Enter the Programmer menu
ACTUATORS
VIDEO CAMERAS
INTERCOM
RESET
ACTUATORS
ENGLISH
LANGUAGES
PROGRAMMER
VIDEO CAMERAS
INTERCOM
LANGUAGES
RESET
LANGUAGES
ITALIANO
ENGLISH
FRANÇAIS
RESET
NEDERLANDS
CANCEL
DEUTSCH
CONFIRM
PORTUGUÊS
ESPAÑOL
ITALIANO
NO
OK
RESET
SUCCESSFUL
31
FT PLANUX 03
GROUP S.p.A.
FRANÇAIS
TABLE DES MATIÈRES
1 DESCRIPTION
1.1 Description moniteur
1.2 Touches de navigation
1.3 Touches et fonctions visiophoniques
Page 33
Page 33
Page 33
2 UTILISATION DU MONITEUR
2.1 Utilisation du manuel
2.2 Programmation de la langue
2.3 Répondre à un appel
2.4 Utilisation fonction Actionneur générique
2.5 Utilisation fonction Auto-allumage
2.6 Utilisation fonction Appel à Standard
2.7 Utilisation fonction Privacy
2.8 Effectuer un appel intercommunicant / appel de groupe
2.9 Réglage image
2.10 Réglage volumes
2.11 Programmation mélodies
2.12 Utilisation d’un actionneur par menu (Art. 1256)
2.13 Visualisation image depuis caméras déportées (Art. 1259C)
2.14 Utilisation fonction Blocage Touches
2.15 Activation et désactivation de la fonction Mains Libres
Page 34
Page 34
Page 34
Page 35
Page 35
Page 35
Page 35
Page 36
Page 36
Page 36
Page 37
Page 38
Page 38
Page 39
Page 39
3 RÉGLAGES ET PROGRAMMATION MONITEUR
3.1 Programmation touche
3.2 Programmation touche
3.3 Programmation touche Auto-allumage
3.4 Invalidation touche Auto-allumage
3.5 Renommer texte (Menu Actionneurs et Caméras)
3.6 Programmation touche Privacy / Docteur
3.7 Visualiser version du logiciel
3.8 Entrer dans le menu de programmation
3.9 Programmation codes actionneurs
3.10 Programmation codes caméras
3.11 Programmation code intercommunicant
3.12 Programmation Répertoire Intercom
3.13 Programmation appels de groupe
3.14 Modification langue menu
3.15 Rétablissement système
Page 39
Page 40
Page 40
Page 41
Page 41
Page 42
Page 42
Page 43
Page 43
Page 44
Page 44
Page 44
Page 45
Page 46
Page 46
FT PLANUX 03
32
FT PLANUX 03
1 DESCRIPTION
1.1 Description moniteur
1 Micro
2 Afficheur LCD couleurs ; visualise le menu du moniteur
et les images provenant de la plaque de rue ou d’autres
caméras (si présentes).
3 Haut-parleur
4 Touche phonie
5 Touche gâche
6 Clavier navigation
7 Touche appel à standard (programmable*)
8 Touche actionneur générique (programmable*)
9 Touche auto-allumage (programmable*)
10 Touche fonction Privacy / Docteur
1.2 Touches de navigation
TOUCHE CONFIRMATION
Elle permet de confirmer les choix effectués et
d’accéder au niveau suivant dans le menu.
FRANÇAIS
TOUCHE MENU
Elle permet d’accéder et de quitter le menu ou de
reculer d’un niveau dans le menu.
Si laissée non active, le moniteur sort
automatiquement du mode menu après 15
secondes.
REMARQUE Si, après avoir appuyé sur la touche, cette
dernière clignote pendant 4 secondes, cela signifie fonction
non disponible ou bien installation occupée.
TOUCHES NAVIGATION
Elles permettent de dérouler les différents textes
et de modifier la valeur du texte sélectionné.
1.3 Touches et fonctions visiophoniques
TOUCHE PHONIE
Elle permet d’activer ou de désactiver la conversation avec la plaque de rue.
La led clignote pour indiquer un appel reçu. La led s’allume pour indiquer une conversation en cours.
TOUCHE GÂCHE
Elle permet l’ouverture de la gâche y étant associée.
La led clignote pour indiquer un appel reçu.
TOUCHE PROGRAMMABLE 1*
En usine, elle est programmée comme appel au standard.
TOUCHE PROGRAMMABLE 2*
En usine, elle est programmée comme actionneur générique.
TOUCHE AUTO-ALLUMAGE*
En usine, elle est programmée comme auto-allumage
TOUCHE PRIVACY / DOCTEUR
• La fonction Privacy permet d’exclure l’appel depuis la plaque de rue et depuis le standard.
• La fonction Docteur permet l’activation automatique de l’ouvre porte sur appel depuis plaque de rue.
• La fonction Privacy + Docteur non seulement permet de désactiver la sonnerie de l’interphone comme dans la fonction
Privacy, mais en plus elle permet l’actionnement automatique de l’ouvre porte sur appel depuis la plaque de rue.
La led rouge indique que la fonction choisie est activée.
* Il est possible de programmer la touche avec les fonctions suivantes : appel à standard, actionneur générique, actionneur
avec code (activation Art. 1256), commande caméra déportée (activation Art. 1259C), appel intercommunicant, appel général.
33
FT PLANUX 03
GROUP S.p.A.
2 UTILISATION DU MONITEUR
2.1 Utilisation du manuel
2.3 Répondre à un appel
Les différents passages pour utiliser et programmer le
moniteur Planux sont illustrés dans le manuel. Les différentes
pages seront structurées de la manière suivante :
Les deux leds clignotent à la suite d’un appel.
MENU UTILISÉ
TOUCHES À APPUYER
TEXTE
ACTUELLEMENT
ACTIF
TEXTE SÉLECTIONNÉ
LINGUE
ITALIANO
Pour activer la phonie, appuyer sur le bouton
, attendre
que la lumière de la led soit fixe avant de parler.
ENGLISH
FRANÇAIS
FRANÇAIS
NEDERLANDS
DEUTSCH
PORTUGUÊS
ESPAÑOL
PAGE VISUALISÉE
2.2 Programmation de la langue
Au premier accès au menu, choisir la langue que l’on désire
utiliser.
Pour activer la gâche électronique, appuyer sur le bouton
.
LINGUE
ITALIANO
ENGLISH
FRANÇAIS
NEDERLANDS
DEUTSCH
Le moniteur émettra une tonalité pour confirmer l’activation de
la gâche.
PORTUGUÊS
ESPAÑOL
Durant un appel, il est possible d’utiliser les fonctions :
Actionneur Générique (2.4), Actionneur par menu (2.12),
Visualisation image par caméras déportées (2.13).
ITALIANO
NO
OK
FT PLANUX 03
34
FT PLANUX 03
2.4 Utilisation fonction Actionneur générique
2.6 Utilisation fonction Appel à Standard
Appuyer sur la touche
Appuyer sur la touche
pour activer la fonction Actionneur
Générique (activation Art. 1256 ou Art. 1259C).
*
Standard.
pour activer la fonction Appel au
*
Le moniteur émettra une tonalité de confirmation de
l’activation
Un appel est envoyé au standard associé
2.5 Utilisation fonction Auto-allumage
2.7 Utilisation fonction Privacy
pour activer la fonction Auto-allumage.
L’image de la plaque de rue associée apparaît sur l’écran.
*
Appuyer sur la touche
pour activer la fonction Privacy.
*
FRANÇAIS
Appuyer sur la touche
La led rouge s’allume pour indiquer que la fonction a été
activée.
En appuyant plusieurs fois sur la touche
, on pourra
basculer entre les plaques de rue (MAXI 2 si présentes).
*
Fonctions disponibles dans la configuration d’usine, pour modifier voir section RÉGLAGES ET PROGRAMMATIONS
MONITEUR page 39.
35
FT PLANUX 03
GROUP S.p.A.
2.8 Effectuer un appel intercommunicant / appel de
groupe
2.9 Réglage image
PLANUX
PLANUX
INTERCOMMUNICANT
INTERCOMMUNICANT
ACTIONNEURS
ACTIONNEURS
CAMÉRAS
CAMÉRAS
MAINS LIBRES
MAINS LIBRES
RÉGLAGES
RÉGLAGES
BLOCAGE CLAVIER
BLOCAGE CLAVIER
RÉGLAGES
INTERCOMMUNICANT
FRANÇAIS
APPEL GÉN.
RÉGLER IMAGE
RÉGLER VOLUMES
INTERCOM. 1
PROGRAMMER MÉLODIES
INTERCOM. 2
PROGRAMMATION TOUCHES
INTERCOM. 3
INFORMATIONS
INTERCOM. 4
INTERCOM. 5
INTERCOM. 6
S’il n’y a pas de poste intérieur associé à l’adresse d’appel
choisie, le message DISPOSITIF PAS PRÉSENT apparaît.
RÉGLER IMAGE
CONTRASTE
LUMINOSITÉ
COULEUR
DISPOSITIF PAS
PRÉSENT
RÉGLER IMAGE
Pour renommer l’appel intercommunicant, se référer au point
3.5.
CONTRASTE
LUMINOSITÉ
COULEUR
FT PLANUX 03
36
FT PLANUX 03
2.10 Réglage volumes
PLANUX
2.11 Programmation mélodies
PLANUX
INTERCOMMUNICANT
INTERCOMMUNICANT
ACTIONNEURS
ACTIONNEURS
CAMÉRAS
CAMÉRAS
MAINS LIBRES
MAINS LIBRES
RÉGLAGES
RÉGLAGES
BLOCAGE CLAVIER
BLOCAGE CLAVIER
RÉGLAGES
RÉGLER IMAGE
RÉGLER IMAGE
RÉGLER VOLUMES
RÉGLER VOLUMES
PROGRAMMER MÉLODIES
PROGRAMMER MÉLODIES
PROGRAMMATION TOUCHES
PROGRAMMATION TOUCHES
INFORMATIONS
INFORMATIONS
RÉGLER VOLUMES
RÉGLER VOLUMES
SONNERIE
EXTÉRIEUR
AUDIO
STANDARD
FRANÇAIS
RÉGLAGES
PALIER
RÉGLER VOLUMES
EXTÉRIEUR
MÉLODIE
1
SONNERIE
MÉLODIE
2
AUDIO
MÉLODIE
3
MÉLODIE
4
MÉLODIE
5
MÉLODIE
6
MÉLODIE
7
37
FT PLANUX 03
GROUP S.p.A.
2.12 Utilisation d’un actionneur par menu (Art. 1256)
2.13 Visualisation image depuis caméras déportées
(Art. 1259C)
PLANUX
PLANUX
INTERCOMMUNICANT
INTERCOMMUNICANT
ACTIONNEURS
ACTIONNEURS
CAMÉRAS
CAMÉRAS
MAINS LIBRES
MAINS LIBRES
RÉGLAGES
BLOCAGE CLAVIER
RÉGLAGES
BLOCAGE CLAVIER
L’image depuis la plaque de rue apparaît sur l’écran.
ACTIONNEURS
FRANÇAIS
ACTIONNEUR GÉNÉRIQUE
CAMÉRAS
ACTIONNEUR 1
CAMÉRA 1
ACTIONNEUR 2
CAMÉRA 2
ACTIONNEUR 3
RENOMMER TEXTE
RENOMMER TEXTE
Le moniteur émettra une tonalité de confirmation de
l’activation. Si aucune caméra déportée n’est présente, le
message DISPOSITIF PAS PRÉSENT apparaîtra.
CAMÉRAS
CAMÉRA 1
CAMÉRA 2
RENOMMER TEXTE
DISPOSITIF PAS
PRSENT
Pour renommer les actionneurs, se référer au point 3.5.
En appuyant à plusieurs reprises sur la touche , il est
possible de basculer entre les différentes caméras du groupe
sélectionné et la plaque de rue
Appuyer plusieurs fois sur la touche
pour quitter le menu
et visualiser à plein écran l’image de la caméra
Si aucune caméra déportée n’est présente, le message
DISPOSITIF PAS PRÉSENT apparaîtra
Pour renommer les caméras, se référer au point 3.5
FT PLANUX 03
38
FT PLANUX 03
2.14 Utilisation fonction Blocage Touches
3 RÉGLAGES ET PROGRAMMATIONS MONITEUR
3.1 Programmation touche
PLANUX
INTERCOMMUNICANT
PLANUX
ACTIONNEURS
INTERCOMMUNICANT
CAMÉRAS
MAINS LIBRES
RÉGLAGES
BLOCAGE CLAVIER
ACTIONNEURS
CAMÉRAS
MAINS LIBRES
RÉGLAGES
BLOCAGE CLAVIER
BLOCAGE CLAVIER
ANNULER
RÉGLAGES
CONFIRMER
RÉGLER IMAGE
FRANÇAIS
RÉGLER VOLUMES
PROGRAMMER MÉLODIES
PROGRAMMATION TOUCHES
La fonction Blocage Touches se désactivera automatiquement
après 60 secondes ou à la suite d’un appel reçu
INFORMATIONS
2.15 Activation et désactivation de la fonction Mains Libres
PROGRAMMATION TOUCHES
PLANUX
TOUCHE 1
INTERCOMMUNICANT
TOUCHE 2
ACTIONNEURS
TOUCHE
CAMÉRAS
TOUCHE
MAINS LIBRES
RÉGLAGES
BLOCAGE CLAVIER
TOUCHE 1
MAINS LIBRES
ACTIONNEUR GÉNÉRIQUE
ON
ACTIONNEUR 1
OFF
ACTIONNEUR 2
ACTIONNEUR 3
CAMÉRA 1
CAMÉRA 2
La fonction Mains Libres permet d’activer la phonie
automatiquement après un appel, sans avoir besoin
d’appuyer sur le bouton
INTERCOM. 1
39
FT PLANUX 03
GROUP S.p.A.
3.2 Programmation touche
FRANÇAIS
PLANUX
3.3 Programmation touche Auto-allumage
PLANUX
INTERCOMMUNICANT
INTERCOMMUNICANT
ACTIONNEURS
ACTIONNEURS
CAMÉRAS
CAMÉRAS
MAINS LIBRES
MAINS LIBRES
RÉGLAGES
RÉGLAGES
BLOCAGE CLAVIER
BLOCAGE CLAVIER
RÉGLAGES
RÉGLAGES
RÉGLER IMAGE
RÉGLER IMAGE
RÉGLER VOLUMES
RÉGLER VOLUMES
PROGRAMMER MÉLODIES
PROGRAMMER MÉLODIES
PROGRAMMATION TOUCHES
PROGRAMMATION TOUCHES
INFORMATIONS
INFORMATIONS
PROGRAMMATION TOUCHES
TOUCHE 1
PROGRAMMATION TOUCHES
TOUCHE 1
TOUCHE 2
TOUCHE 2
TOUCHE
TOUCHE
TOUCHE
TOUCHE
TOUCHE 1
TOUCHE 1
ACTIONNEUR GÉNÉRIQUE
ACTIONNEUR GÉNÉRIQUE
ACTIONNEUR 1
ACTIONNEUR 1
ACTIONNEUR 2
ACTIONNEUR 2
ACTIONNEUR 3
ACTIONNEUR 3
CAMÉRA 1
CAMÉRA 1
CAMÉRA 2
CAMÉRA 2
INTERCOM. 1
INTERCOM. 1
FT PLANUX 03
40
FT PLANUX 03
3.4 Invalidation touche Auto-allumage
3.5 Renommer texte (Menu Actionneurs, Caméras et
Intercommunicant)
PLANUX
PLANUX
INTERCOMMUNICANT
ACTIONNEURS
CAMÉRAS
MAINS LIBRES
RÉGLAGES
BLOCAGE CLAVIER
INTERCOMMUNICANT
ACTIONNEURS
CAMÉRAS
MAINS LIBRES
RÉGLAGES
BLOCAGE CLAVIER
RÉGLAGES
ACTIONNEURS
RÉGLER VOLUMES
ACTIONNEUR GÉNÉRIQUE
PROGRAMMER MÉLODIES
ACTIONNEUR 1
PROGRAMMATION TOUCHES
ACTIONNEUR 2
INFORMATIONS
ACTIONNEUR 3
FRANÇAIS
RÉGLER IMAGE
RENOMMER TEXTE
PROGRAMMATION TOUCHES
RENOMMER TEXTE
TOUCHE 1
ACTIONNEUR 1
TOUCHE 2
ACTIONNEUR 2
TOUCHE
TOUCHE
TOUCHE
APPEL GÉN.
AUTO-ALLUMAGE
STANDARD
OFF
Appuyer sur les touches de navigation
pour dérouler
les lettres de l’alphabet ; appuyer sur la touche
pour
confirmer la lettre et passer automatiquement à celle
immédiatement à droite. Après avoir terminé l’insertion,
appuyer sur
pour confirmer.
RENOMMER TEXTE
ACTIONNEUR 1
PORTAIL
41
FT PLANUX 03
GROUP S.p.A.
3.6 Programmation touche Privacy / Docteur
3.7 Visualiser version du logiciel
PLANUX
PLANUX
INTERCOMMUNICANT
ACTIONNEURS
INTERCOMMUNICANT
ACTIONNEURS
CAMÉRAS
CAMÉRAS
MAINS LIBRES
MAINS LIBRES
RÉGLAGES
RÉGLAGES
BLOCAGE CLAVIER
BLOCAGE CLAVIER
RÉGLAGES
RÉGLAGES
RÉGLER IMAGE
RÉGLER IMAGE
RÉGLER VOLUMES
FRANÇAIS
RÉGLER VOLUMES
PROGRAMMER MÉLODIES
PROGRAMMER MÉLODIES
PROGRAMMATION TOUCHES
PROGRAMMATION TOUCHES
INFORMATIONS
INFORMATIONS
INFORMATIONS
VERS. SW:
1.0-I
VERS. EE:
1.0
AD SIMPLEBUS:
1P
TOUCHE 1
AD. INTERCOM:
255
TOUCHE 2
SORTIE 4897:
4
PROGRAMMATION TOUCHES
TOUCHE
TOUCHE
TOUCHE
DOCTEUR
PRIVACY
PRIVACY + DOCTEUR
FT PLANUX 03
42
FT PLANUX 03
3.8 Entrer dans le menu de programmation
À l’intérieur du menu de programmation, il est possible
d’introduire les codes relatifs aux actionneurs (Art. 1256) et
aux caméras, (Art. 1259C), de changer la langue de tous les
menus, de visualiser la version du logiciel installé et de
rétablir le moniteur comme programmé en usine.
Pour entrer dans le menu, suivre la procédure ci-après :
3.9 Programmation codes actionneurs
Pour plus d’informations sur l’Art. 1256 voir FT/SB2/02 ou
MT/SBC/01.
Entrer dans le menu de programmation
PROGRAMMATEUR
ACTIONNEURS
PLANUX
CAMÉRAS
INTERCOMMUNICANT
INTERCOMMUNICANT
ACTIONNEURS
LANGUES
CAMÉRAS
RÉTABLISSEMENT
MAINS LIBRES
RÉGLAGES
ACTIONNEURS
BLOCAGE CLAVIER
1
ACTIONNEUR 2
2
ACTIONNEUR 3
3
PROG
___
RÉGLER IMAGE
PROG
___
RÉGLER VOLUMES
PROG
___
PROG
___
PROGRAMMER MÉLODIES
FRANÇAIS
RÉGLAGES
ACTIONNEUR 1
PROGRAMMATION TOUCHES
INFORMATIONS
Une fois à l’intérieur du menu Programmation Touches,
appuyer sur la touche navigation
3 fois et ensuite sur la
touche navigation
3 fois
PROGRAMMATION TOUCHES
TOUCHE 1
TOUCHE 2
ACTIONNEURS
ACTIONNEUR 1
1
ACTIONNEUR 2
2
ACTIONNEUR 3
3
PROG
4
PROG
___
PROG
___
PROG
___
TOUCHE
TOUCHE
ACTIONNEURS
PROGRAMMATEUR
ACTIONNEURS
ACTIONNEUR 1
1
ACTIONNEUR 2
2
ACTIONNEUR 3
3
CAMÉRAS
ACTIONNEUR 4
INTERCOMMUNICANT
PROG
___
PROG
___
PROG
___
LANGUES
4
RÉTABLISSEMENT
43
FT PLANUX 03
GROUP S.p.A.
3.10 Programmation codes caméras
Pour plus d’informations sur l’Art. 1259C voir FT/SBC/05 ou
MT/SBC/01
Entrer dans le menu de programmation
3.11 Programmation code intercommunicant
Entrer dans le menu de programmation
PROGRAMMATEUR
PROGRAMMATEUR
ACTIONNEURS
ACTIONNEURS
CAMÉRAS
CAMÉRAS
INTERCOMMUNICANT
INTERCOMMUNICANT
LANGUES
LANGUES
RÉTABLISSEMENT
RÉTABLISSEMENT
INTERCOMMUNICANT
FRANÇAIS
CAMÉRAS
ADRESSE INTERCOM.
CAMÉRA 1
220
REPERTOIRE INTERCOM.
CAMÉRA 2
221
APPEL DE GROUPE
PROG
___
PROG
___
PROG
___
PROG
___
PROG
___
ADRESSE INTERCOM.
CAMÉRA 1
220
ADRESSE INTERCOM.
CAMÉRA 2
221
ADRESSE INTERCOM.
PROG
222
PROG
___
PROG
___
PROG
___
3.12 Programmation Répertoire Intercom.
PROG
___
Pour éliminer une adresse d’appel intercom du répertoire,
suivre la procédure suivante :
ADRESSE INTERCOM.
1
CAMÉRAS
Entrer dans le menu de programmation
CAMÉRAS
CAMÉRA 1
220
CAMÉRA 2
221
CAMÉRA 3
222
PROG
___
PROG
___
PROG
___
PROG
___
PROGRAMMATEUR
ACTIONNEURS
CAMÉRAS
INTERCOMMUNICANT
LANGUES
RÉTABLISSEMENT
FT PLANUX 03
44
2
FT PLANUX 03
3.13 Programmation appels de groupe
INTERCOMMUNICANT
Entrer dans le menu de programmation
ADRESSE INTERCOM.
PROGRAMMATEUR
REPERTOIRE INTERCOM.
APPEL DE GROUPE
ACTIONNEURS
CAMÉRAS
INTERCOMMUNICANT
LANGUES
REPERTOIRE INTERCOM.
RÉTABLISSEMENT
INTERCOM. 1
1
INTERCOM. 2
2
INTERCOM. 3
3
INTERCOM. 4
4
INTERCOM. 5
5
ADRESSE INTERCOM.
INTERCOM. 6
6
REPERTOIRE INTERCOM.
INTERCOM. 7
7
APPEL DE GROUPE
INTERCOMMUNICANT
FRANÇAIS
REPERTOIRE INTERCOM.
INTERCOM. 1
1
INTERCOM. 2
2
INTERCOM. 3
3
INTERCOM. 4
4
INTERCOM. 5
0
APPEL GÉN.
INTERCOM. 6
6
GROUPE 2
INTERCOM. 7
7
GROUPE 3
APPEL DE GROUPE
12345678
GROUPE 4
REPERTOIRE INTERCOM.
INTERCOM. 1
1
INTERCOM. 2
2
INTERCOM. 3
3
INTERCOM. 4
4
PROG
_
INTERCOM. 6
6
INTERCOM. 7
7
APPEL DE GROUPE
12345678
APPEL GÉN.
GROUPE 2
GROUPE 3
GROUPE 4
45
FT PLANUX 03
GROUP S.p.A.
3.14 Modification langue menu
3.15 Rétablissement système
Entrer dans le menu de programmation
Cette procédure remettra le système à l’état d’origine
(programmation d’usine), en effaçant tous les codes
actionneurs et caméras introduits
PROGRAMMATEUR
Entrer dans le menu de programmation
ACTIONNEURS
PROGRAMMATEUR
CAMÉRAS
INTERCOMMUNICANT
LANGUES
ACTIONNEURS
CAMÉRAS
RÉTABLISSEMENT
INTERCOMMUNICANT
LANGUES
RÉTABLISSEMENT
LANGUES
FRANÇAIS
ITALIANO
ENGLISH
RÉTABLISSEMENT
FRANÇAIS
NEDERLANDS
ANNULER
DEUTSCH
CONFIRMER
PORTUGUÊS
ESPAÑOL
ENGLISH
NO
OK
RÉTABLISSEMENT
EFFECTUÉ
FT PLANUX 03
46
FT PLANUX 03
47
FT PLANUX 03
FT/PLANUX/03 – 1a edizione 02/2009 – cod. 2G40000142
GROUP S.p.A.
Assistenza tecnica Italia
Commerciale Italia
[B]
[ GR ] Comelit Hellas
[I]
9 Epiru str.
16452 Argiroupolis - Athens Greece
Tel. +30 210 99 68 605-6
Fax +30 210 99 45 560
www.comelit.gr - [email protected]
[ RC ]
Comelit (Shanghai) Electronics Co.,Ltd
5 Floor No. 4 Building No.30 Hongcao Road
Hi-Tech Park Caohejing, Shanghai, China
Tel. +86-21-64519192/9737/3527
Fax +86-21-64517710
www.comelit.com.cn
[email protected]
[ SG ]
0346/750090
0346/750091
Technical service abroad (+39) 0346750092
Export department
(+39) 0346750093
Comelit Group Belgium
Z.3 Doornveld 170
1731 Zellik ( Asse)
Tel. +32 (0) 24115099 - Fax +32 (0) 24115097
www.comelit.be - [email protected]
Comelit Piemonte
Str. Del Pascolo 6/E
10156 Torino
Tel. e Fax +39 011 2979330
www.comelit.eu
[email protected]
[email protected]
[email protected]
Comelit Group
Singapore Representative Office
54 Genting Lane, Ruby Land Complex
Blk 2, #06-01 - Singapore 349562
Tel. +65-6748 8563 - Fax +65-6748 8584
offi[email protected]
[ E ] Comelit Espana S.L.
[ D ] Comelit Group Germany GmbH
Brusseler Allee 23- 41812 Erkelenz
Tel. +49 (0) 243190151-23 • +49 (0) 243190151-24
Fax +49 (0) 24319015125
www.comelit.de - [email protected]
[ I ] Comelit Sud S.r.l.
[ IRL ] Comelit Ireland
Via Corso Claudio, 18
84083 Castel San Giorgio (Sa)
Tel. +39 081 516 2021
Fax +39 081 953 5951
www.comelit.eu - [email protected]
[ UAE ] Comelit Group U.A.E.
Suite 3 Herbert Hall
16 Herbert Street - Dublin 2
Tel. +353 (0) 1 619 0204
Fax. +353 (0) 1 619 0298
www.comelit.ie - [email protected]
[ UK ] Comelit Group UK Ltd
Middle East Office
P.O. Box 54433 - Dubai U.A.E.
Tel +971 4 299 7533 - Fax +971 4 299 7534
www.scame.ae - [email protected]
[ F ] Comelit Immotec
Josep Estivill 67/69 - 08027 Barcelona
Tel. +34 932 430 376 - Fax +34 934 084 683
www.comelit.es - [email protected]
Unit 4 Mallow Park
Watchmead Welwyn
Garden City Herts AL7 1GX
Tel: +44 (0)1707377203
Fax: +44 (0)1707377204
www.comelitgroup.co.uk
[email protected]
15, Rue Jean Zay - 69800 Saint Priest
Tél. +33 (0) 4 72 28 06 56
Fax +33 (0) 4 72 28 83 29
www.comelit.fr
[email protected]
[ NL ] Comelit Nederland BV
Aventurijn 220 - 3316 LB Dordrecht
Tel. +31 (0) 786511201
Fax +31 (0) 786170955
www.comelit.nl - [email protected]
[ USA ] Comelit Cyrex
250 W. Duarte Rd. Suite B
Monrovia, CA 91016
Tel. +1 626 930 0388
Fax +1 626 930 0488
www.comelitusa.com
[email protected]
Scarica