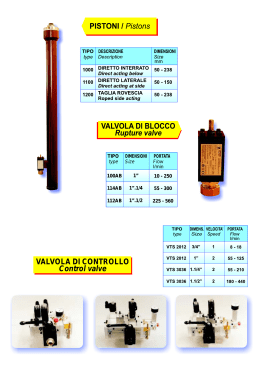
IMPIANTI AUTOMATICI
PER LA DILUIZIONE
IN CONTINUO DI EMULSIONE
TIPO / TYPE
COMPACT
3000
AUTOMATIC PLANTS FOR CONTINUOUS EMULSION DILUTION
COMMESSA N°
JOB No
CLIENTE
SERIE
SERIES
EMULSOL
CUSTOMER
ORDINE N°
CUSTOMER ORDER No.
IMPIANTO TIPO
PLANT TYPE
ALLEGATI
ENCLOSES
Doc. N°
Rev.
Lingua
UT 2961 Rev.
0 Lang.
Doc. No.
Preparato
Controllato
G. VENERONI
Prepared
Checked
Rev.
ITA - ENG
V. D'ADDIO
Descrizione
Description
Data
Date
Sost. il
Replace
Controllato
Checked
01.01.96
Data
Date
ITEM
ITEMS
MANUALE DI ESERCIZIO
OPERATING MANUAL
MATRICOLA/E
SERIAL(S) No
Edizione 1996
Issue 1996
PREMESSA
PRINCIPLES OF OPERATION
Le presenti informazioni, abbinate allo
schema elettrico del quadro standard ed alla
scheda tecnica dell’impianto che raffigura una
installazione tipo (installazione consigliata),
illustrano le fasi per la messa in marcia
dell’impianto tramite i comandi del quadro
elettrico.
These information with the standard electric
board connections and the technical sheet of
the plant, showing the suggested installation,
show the steps for the plant startup through
the electric board.
PRINCIPIO DI FUNZIONAMENTO
PRINCIPLES OF OPERATION
L’emulsione viene prelevata dal serbatoio
emulsione (escluso dalla fornitura) e dosata
tramite una pompa dosatrice OBL della serie
HV nel mixer statico.
The emulsion is delivered from the emulsion
tank (not included in the supply) and dosed by
means of an OBL HV series metering pump
into a static mixer.
L’acqua giunge nel mixer statico dal condotto
di alimentazione. Il riduttore di pressione
livella la pressione dell’acqua a 1 Bar mentre
la saracinesca a monte del flussimetro è
registrata in modo da mantenere una portata
ottimale dell’acqua (per portate ottimali vedi
pagina 3).
The water enters the static mixer from the
feeding pipe. The pressure is kept to 1 bar by
means of fhe pressure reducer and the gate
valve of the flow meter is set in order to keep
the most suitable flow rate (for suitable flow
rates see table on page 3).
Nel mixer statico avviene in continuo la
miscelazione acqua-emulsione. Per ottenere
una soluzione di migliore qualità si consiglia di
trasferirla, così come ottenuta in uscita dal
mixer, in un serbatoio di maturazione (escluso
dalla fornitura) e di stoccarla per almeno 15
minuti prima del suo utilizzo.
Installando sul serbatoio di stoccaggio le
sonde di livello, di cui l’impianto è dotato, è
possibile rendere completamente automatico
il controllo dell’intero processo di preparazione
e maturazione della soluzione.
1
2
3
4
Water and emulsion are mixed along the
static mixer. In order to have the best dilution
is suggested to store it, as soon as it goes out
of the static mixer, in a ripening tank (not
included in the supply) for at least 15
minutes before utilisation.
By installing on the ripening tank the level
sensors (included in the supply) the plant
becomes fully automatic.
SONDE DI LIVELLO
LEVEL SENSORS
L’impianto standard è dotato di 2 (due) sonde
di lavoro che gestiscono l’automatismo del
sistema:
The plant is equipped with 2 (two) work level
sensors for the fully automatic running of the
plant:
N° 1 è la sonda di MIN che avvia la pompa
dosaggio emulsione e contemporaneamente
apre l’elettrovalvola acqua del condotto di
alimentazione.
No. 1 is the MIN sensor activating the
emulsion metering pump and opening at the
same time the solenoid valve of the feeding
pipe.
N° 1 è la sonda di MAX che ferma la pompa
dosaggio emulsione e chiude l’elettrovalvola
acqua del condotto di alimentazione dopo
circa 10 secondi.
No.1 is the MAX sensor wich stops the
emulsion metering pump and closes the
solenoid valve of the feeding pipe after 10
seconds.
La terza bacchetta, quella più lunga, è per il
contatto comune.
The third one (the longest) is not a level
sensor is for the common contact.
Doc.
UT2961
Rev.
1
CONTROLLI ED OPERAZIONI
PRELIMINARI ALL’AVVIAMENTO
CHECKS AND OPERATIONS
BEFORE STARTUP
Realizzare i collegamenti per l’alimentazione
elettrica del quadro di comando. La tensione
standard di alimentazione necessaria è di
380/400Vca - 50Hz - trifase. Il quadro è
completo di trasformatore per i circuiti ausiliari
24Vca (versione standard).
Do the electrical connections of the panel. In
this case the supply voltage is 110Vac, 60Hz,
singlephase (standard 380/400Vac – 50Hz –
3phase). The control panel is equipped with
auxiliary 24Vac (standard version).
Realizzare i collegamenti per l’alimentazione
dell’acqua. Collegare il condotto di ingresso
acqua alla rete idrica con una tubazione non
inferiore
alla
dimensione
dell’attacco
(portagomma).
La minima pressione necessaria della rete
idrica NON deve essere inferiore a 2 Bar ad
impianto funzionante (elettrovalvola aperta).
Realizzare la tubazione aspirante per la
pompa dosaggio emulsione. Posizionare il
serbatoio emulsione (escluso dalla fornitura)
sotto la pompa dosatrice e collegare alla
bocca aspirante della pompa una tubazione
rigida
non
inferiore
alla
dimensione
dell’attacco.
Collegare elettricamente al quadro di
comando le sonde di livello di cui l’impianto è
dotato e posizionarle sul serbatoio di
stoccaggio soluzione.
Connect the water feeding system. Connect
the water inlet to the water network with pipe
with at least the dimension of the plant
connections.
The minimum pressure required in the water
network must be OVER 2 bar with plant
running (solenoid valve open).
Realise the suction piping for the emulsion
metering pump. Place the emulsion tank (not
included in the supply) underneath the
metering pump and connect the suction valve
with a rigid pipe with dimension not smaller
than the suction valve size.
Connect the levels sensors to the electric
panel and place them over the storing tank.
AVVIAMENTO
STARTUP
Aprire manualmente la valvola a sfera posta
all’inizio del condotto di alimentazione acqua
per consentire l’ingresso dell’acqua di rete.
Open manually the on-off valve located at the
beginning of the feeding system so as to let
the water in.
Dare tensione al quadro comando portando
l’interruttore generale “Q0” in posizione “1”.
Con quadro in tensione la lampada “H1” deve
essere accesa. Qualora non risultasse accesa
controllare se il pulsante di emergenza “PEM”
è premuto; in tal caso il quadro è privo di
tensione ed occorre ripristinare il pulsante
ruotandolo in senso orario fino al suo sblocco.
Posizionare il selettore marcia impianto “S1”
in relazione alla necessità di utilizzo:
Pos. “0”: L’impianto è fermo, la lampada “H2”
è spenta. Il quadro è comunque sotto
tensione e la lampada “H1” è accesa;
Pos. “1”: L’impianto è in funzione, la lampada
“H2” è accesa. Il quadro è sotto tensione e la
lampada “H1” è accesa.
Portando il selettore “S1” in posizione “1” ha
inizio il ciclo automatico. Parte la pompa
dosaggio emulsione il cui funzionamento è
segnalato dalla lampada “H4” accesa, e
contemporaneamente si apre l’elettrovalvola
del condotto di alimentazione che permette
all’acqua di raggiungere il mixer statico.
1
2
3
4
Apply voltage to the panel positioning the
master switch “QO” on position “1”.
When the voltage is applied the led “H1” is lit.
In case is not lit check if the emergency button
“PEM” is pushed down; in that case the
voltage is not applied on the control panel and
is necessary turn the button anticlockwise till it
lifts.
Set the running selector “S1” according the
need:
Pos. “0” the plant is at rest, led “H2” is
switched off. The voltage is applied and the
led “H1”is lit;
Pos. “1” the plant is running, the led “H2” is
lit. The voltage is applied and let “H1” is lit.
Setting the selector “S1” on “1” position the
automatic cycle starts. The running of the
metering pump is given by the led “H4” lit. The
metering pump starts together with the
solenoid valve letting the water going into the
static mixer.
Doc.
UT2961
Rev.
1
Il ciclo di produzione soluzione è controllato
automaticamente dalle sonde di livello e
continua ininterrottamente fino al riempimento
del serbatoio di stoccaggio soluzione. Sarà la
sonda di MAX ad interrompere il processo
fermando la pompa dosaggio emulsione e,
dopo
circa
10
secondi,
chiudendo
l’elettrovalvola acqua del condotto di
alimentazione.
Durante il prelievo della soluzione dal
serbatoio di stoccaggio il ciclo di produzione è
interrotto ed il livello della soluzione stoccata
nel serbatoio continuerà a scendere. Sarà la
sonda di MIN a riavviare il ciclo automatico
facendo partire la pompa dosaggio emulsione
e
contemporaneamente
aprendo
l’elettrovalvola acqua del condotto di
alimentazione.
L’impianto è stato collaudato ed è quindi
pronto per funzionare. Riteniamo comunque
sia utile effettuare, con impianto in funzione
(elettrovalvola aperta), il controllo della
effettiva portata dell’acqua in ingresso. Se
necessario si potrà eventualmente provvedere
ad un suo ‘ritocco’ agendo sulla saracinesca
del flussimetro per ripristinare la portata
ottimale. Tale portata è sempre indicata sul
flussimetro da una freccia. Di seguito vengono
richiamate le portate ottimali dell’acqua per i
diversi modelli di impianto.
GRANDEZZE PORTATA OTTIMALE
3000.16
l/h 1500
3000.25
l/h 2500
CONCENTRAZIONE ACQUA-EMULSIONE
PREMESSA: L’acqua è
l’emulsione è la variabile.
la
costante,
L’impianto è strutturato per produrre soluzioni
in un campo di concentrazioni ben definito
(rapporto medio di 1:100). E’ indispensabile
mantenere costante la portata ottimale
dell’acqua ed agire esclusivamente sulla
manopola di regolazione portata della pompa
dosaggio emulsione per ottenere le diverse
concentrazioni che si desiderano.
Il bollettino di collaudo prototipo della suddetta
pompa dosatrice (allegato al presente libretto)
permette di conoscere, in modo indicativo, in
quale posizione deve essere impostata la
regolazione della portata della pompa per
ottenere la concentrazione acqua-emulsione
desiderata.
Consigliamo comunque di verificare, ed
eventualmente di ricostruire, l’effettiva curva di
portata della pompa dosaggio emulsione
rilevando i dati reali di portata con la
emulsione impiegata.
The cycle is automatically controlled by the
level sensors and keeps on until the storing
tank is filled up.
The MAX level sensor will stop the cycle
shutting down the emulsion metering pump
and after 10 second closing the solenoid valve
of the feeding pipe.
1
2
3
4
During the delivery of the solution from the
storing tank the cycle is interrupted and the
solution level will keep on decreasing.
The MIN level sensor will start again the cycle
activating the emulsion metering pump and
the same time opening the solenoid valve of
the feeding pipe.
The plant has been tested and therefore is
ready to work. However we feel it would be
useful to check, with the plant running
(solenoid valve open) the actual flow rate of
the incoming water. If necessary the water
flow rate could be fined by acting on the gate
valve of the flow meter to set the most suitable
flow rate.
This flow rate is always shown on the flow
meter by an arrow.
Find here below the most suitable flow rates
for the different COMPACT models.
UNIT SIZE
3000.16
3000.25
OPTIMUM FLOW
l/h 1500
l/h 2500
WATER-EMULSION CONCENTRATION
STARTUP
Foreword: the water is constant, the
emulsion is variable
The plant is designed to give solutions within
a well-defined range (Average ratio 1:100). It
is necessary to keep constant the water flow
rate and act only on the emulsion metering
pump adjustment so as to get the needed
concentrations.
The prototype test report of the abovementioned metering pump (attached to these
directions) allows to know how to set
indicatively the adjustment knob of the
metering pump in order to have the wanted
water-emulsion concentration.
It is suggested to verify, and eventually redraw, the actual flow rate line of this metering
pump, taking the actual flow rate data of the
emulsion used.
Doc.
UT2961
Rev.
1
ALLARME PER BASSA PRESSIONE
Nel caso la pressione della rete idrica (con
elettrovalvola aperta) si abbassi al di sotto
della taratura del pressostato per un tempo
superiore ai 3 secondi, si verifica il blocco
impianto per bassa pressione acqua. La
pompa dosaggio emulsione si arresta, la
relativa lampada “H4” si spegne e
l’elettrovalvola si chiude interrompendo
l’ingresso dell’acqua dopo circa 10 secondi.
La condizione di allarme è evidenziata dal
suono
ininterrotto
della
sirena
e
dell’accensione della lampada “H5” di bassa
pressione acqua. La lampada “H2” di impianto
in funzione rimane comunque accesa.
ATTENZIONE: IL RESET DELL’IMPIANTO È
SOLO MANUALE.
LOW PRESSURE ALARM
In case water network low pressure with
solenoid valve open (below the value set on
the pressure switch for at least three seconds)
the plant shuts down for water low pressure.
The emulsion metering pump stops, the
relevant “H4” led switches off and the solenoid
valve of the feeding pipe closes after 10
seconds.
The alarm condition is shown by a non-stop
siren sound and by the lit “H5” let (water low
pressure led). The “H2” led (running plant)
remains lit.
ATTENTION: THE PLANT RESET IS ONLY
MANUAL.
Per resettare occorre premere il pulsante “P2”
per la tacitazione della sirena, rimuovere la
causa del blocco impianto, quindi premere il
pulsante “P1” per resettare il pressostato e
per spegnere la lampada “H5”.
Il ciclo automatico riparte riavviando la pompa
dosaggio emulsione; la relativa lampada “H4”
si riaccende e l’elettrovalvola si riapre
consentendo
nuovamente
l’ingresso
dell’acqua.
To reset is necessary to press the “P2” button
for the siren shut down, restore the needed
water pressure an then press “P1” button to
reset the pressure switch and switch off the
“H5” led.
SCATTO TERMICO POMPA EMULSIONE
Lo scatto termico della pompa è segnalato
dalla lampada “H3” accesa fissa. Per
ripristinare bisogna:
PUMP MAGNETO-THERMIC TRIPPING
The magneto-thermic tripping of the pump
motor is shown by the “H3” led lit. To restart
the cycle act as follows:
Rimuovere la causa del blocco e posizionare il
selettore “S1” sulla posizione “0”, in questo
modo si arresta l’impianto e la lampada “H2”
si spegne;
Eliminate the cause and set the “S1” selector
on “0” position; in this way the plant is stopped
and the led “H2” switches off;
Togliere tensione al quadro elettrico portando
l’interruttore generale “Q0” in posizione “0”, la
lampada “H1” si spegne;
Aprire il portello del quadro elettrico e
resettare la pompa premendo il pulsante
“reset” del relè termico “Q1” all’interno del
quadro;
Chiudere il portello del quadro e ridare
tensione portando l’interruttore generale “Q0”
in posizione “1”, la lampada “H1” si accende;
Posizionare il selettore “S1” sulla posizione
“1”. In questo modo la lampada “H2” si
accende e si riavvia automaticamente tutto
l’impianto
PULSANTE MANUALE DI EMERGENZA
Il pulsante manuale di emergenza “PEM”
ferma per EMERGENZA l’intero impianto
togliendo tensione ai circuiti ausiliari. Tutte le
lampade spia si spengono. Per ripristinare
tensione al quadro occorre ruotare il pulsante
in senso orario fino al suo sblocco ed
automaticamente l’impianto si riavvia.
1
2
3
4
The automatic cycle starts again. The
metering pump starts and the relevant “H4”
led is lit again and the solenoid valve re-opens
allowing the water incoming.
Clear the voltage to the electric panel turning
the master switch “Q0” on “0” position, the led
“H1” switches off;
Open the door of the electric panel and reset
by pressing the button “RESET” of the thermic
relay “Q1” inside the panel;
Close the door and apply voltage turning the
master switch “Q0”on “1” position. The led
“H1” switches on;
Set the “S1” selector on “1” position. In this
way the led “H2” switches on and the fully
automatic cycle re-start.
EMERGENCY MANUAL BUTTON
The emergency manual button “PEM” stops in
case of EMERGENCY the whole plant
clearing voltage to the auxiliary circuits. All the
leds switch off. To restore the voltage, turn the
button anticlockwise until it releases. In this
ways the plant restarts.
Doc.
UT2961
Rev.
1
Scarica