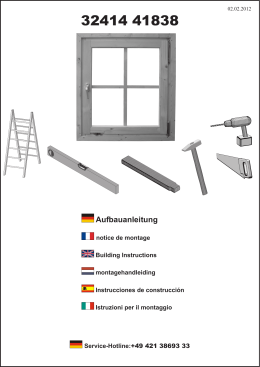
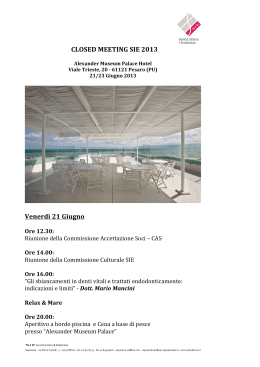
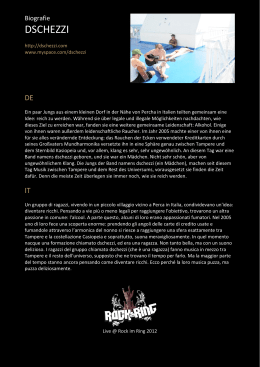
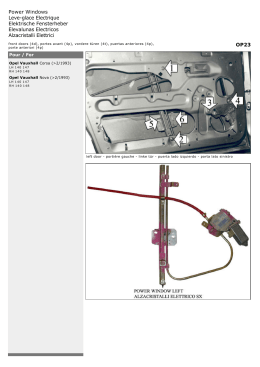
VERSION.3 JULY 2014 Contents of Manual Page No. 2-6 Introduction 7 Capsize recovery – Single handed dinghies 8 Capsize recovery – Double handed dinghies 9 Capsize recovery - Multihulls 10 – 12 Principal Dimensions – ABP dinghies 13 Principal Dimensions – Single handed performance dinghies 14 Principal Dimensions – Double handed performance dinghies 15 - 17 Towing points 18 - 19 Methods of bailing 20 Declaration of conformity 21 RCD essential requirements 23 - 26 Appendix – Basic rigging guides Page 1 English____________________________________________________________ Introduction Congratulations on the purchase of your new RS sailing dinghy and thank you for choosing an RS product. We are confident that you will have many hours of great sailing and racing in this truly excellent design. The RS fleet are exciting boats to sail and offer fantastic performance. This manual has been compiled to help you operate your craft with safety and pleasure. This manual will not instruct you in boating safety or seamanship. If this is your first boat, or if you are changing to a type of craft that you are not familiar with, for your own safety and comfort, please ensure that you have adequate experience before assuming command of the craft. If you are unsure, your RS Dealer or your National sailing federation – for example, the Royal Yachting Association – will be able to advise you of a local sailing school or a competent instructor. Please keep this manual in a secure place and hand it over to the new owner if you sell the boat. Please take note of the following warnings; Do not exceed the maximum number of persons (crew limit) stated on the CE plaque and in the Principal Dimensions. Always ensure you sail with the minimum number of crew needed to recover the boat after a capsize. Do not exceed the maximum recommended engine size stated in the Principal Dimensions. Ensure all hatches and bungs are fully closed before going afloat. Stability will be reduced when towing/being towed whilst afloat. The puncturing of air tanks is a serious stability hazard. Breaking waves are a serious stability hazard. If transporting your boat on your car roof ensure that you do not exceed the maximum roof rack load. If transporting your boat by road trailer ensure you do not exceed the permitted axle weight of the trailer. Always rig your boat as per the rigging manual which can be downloaded from www.RSsailing.com. Page 2 Français___________________________________________________________ Intro Félicitations pour l’achat de votre nouveau dériveur RS et merci d’avoir choisi nos produits. Nous sommes convaincus que vous aurez de belles heures de navigation avec cet excellent support. La gamme RS propose une large palette de modèles, tous parfaitement aboutis pour leur programme. Ce manuel a été prévu pour vous aider à appréhender votre bateau dans les meilleures conditions de sécurité et le plus sereinement possible. Ce manuel n’a pas pour objet de vous instruire sur la sécurité en mer ou la conduite en marin responsable. Si ce bateau est votre premier, ou si vous changez de type de navigation, pour votre sécurité et sérénité, assurez-vous d’avoir les compétences nécessaires. Si ce n’est pas le cas, votre revendeur ou la fédération de voile saura vous donner les contacts locaux nécessaires pour une mise à niveau (ex; école de voile, club nautique,…). Assurez-vous de garder ce manuel à l’abri pour le transmettre au nouveau propriétaire en cas de revente du bateau. Ne pas dépasser le nombre de personnes maximum indiquées sur la plaque CE et dans les caractéristiques Toujours faire attention de naviguer avec le nombre de personnes nécessaires pour être capable de redresser le bateau après chavirage Ne pas dépasser la puissance maximum de moteur recommandée dans les caractéristiques Bien vérifier l’étanchéité des trappes et bouchons avant de mettre à l’eau. Stabilité aléatoire lors des remorquages sur l’eau. La crevaison d’une réserve de flottabilité compromet grandement la sécurité Les vagues déferlantes sont dangereuses pour la stabilité Si vous transportez votre bateau sur le toit, vérifiez bien la capacité de chargement de celui-ci. Si vous remorquez votre bateau, vérifiez-bien la charge utile de la remorque. Montez toujours votre bateau selon le guide du propriétaire livré avec, ou à télécharger sur www.rssailing.com Page 3 Deutsch____________________________________________________________ Einleitung Herzlichen Glückwunsch zum Kauf Ihres neuen Bootes aus dem Hause RS Sailing. Wir freuen uns, das Sie sich für eines unserer Produkte entschieden haben. Und wir sind überzeugt davon, dass Sie unzählige Stunden voller Segelspaß genießen können werden. Dieses Handbuch wurde zusammengestellt, um Ihnen zu helfen, das Boot auf sichere und für Sie angenehme Art und Weise zu nutzen. Dieses Handbuch dient nicht der Schulung von guter Seemannschaft oder allgemeiner Sicherheitsfragen. Falls dieses Ihr erstes Segelboot sein sollte oder falls sie die Bootskategorie wechseln und sich mit diesem Bootstyp noch nicht auskennen, dann stellen Sie bitte zu Ihrer eigenen Sicherheit und für Ihre Zufriedenheit sicher, sich die notwendigen Kenntnisse und Fähigkeiten anzueignen, bevor Sie sich mit dem Boot auf das Wasser begeben. Ihr lokaler RSHändler oder der nationale Segelverband (beispielsweise der DSV) ist sicher in der Lage, Ihnen Adressen von Segelschulen oder Vereinen in Ihrer Nähe zu nennen. Bitte bewahren Sie dieses Handbuch sorgfältig auf und händigen Sie es im Falle eines Weiterverkaufes des Bootes an den Käufer aus. Überschreiten Sie niemals die auf der CE-Plakette angegebene maximale Personenanzahl bzw. die angegebene maximale Zuladung. Segeln Sie immer mit dem mindestens notwendigen Cregewicht, das zum Wiederaufrichten benötigt wird. Überschreiten Sie niemals die angegebene maximale Motorleisung. Stellen Sie sicher, dass alle Inspektionsdeckel und Lenzstopfen vor dem Zuwasserlassen geschlossen sind. Schleppen und geschleppt werden vermindert die Stabilität des Bootes. Verletzungen der Luftkammern/Auftriebskörper stellen eine große Gefahr dar. Brechende Wellen stellen eine große Gefahr dar. Stellen Sie sicher, dass beim Autodachtransport die maximal zulässige Dachlast eingehalten wird. Stellen Sie beim Trailertransport sicher, dass das die maximal erlaubte Zuladung nicht überschritten wird. Riggen Sie Ihr Boot entsprechend der Anleitungen im Rigging Manual auf, die bei www.rssailing.com heruntergeladen werden können. Page 4 Italiano____________________________________________________________ Introduzione. RingraziandoVi per l’acquisto di un prodotto della linea RS, desideriamo congratularci con Voi per la scelta della vostra nuova deriva RS Sailing. Siamo certi che avrete molte occasioni di essere orgogliosi del vostro acquisto e vi divertirete moltissimo, sia con semplici uscite a vela sia che decidiate di partecipare alle regate dei vari circuiti RS. Tutta la gamma RS è composta da imbarcazioni divertenti da usare e gratificanti per le loro performance; questo manuale è stato redatto per aiutarVi ad ottenere in massima sicurezza il meglio dalla vostra imbarcazione. Questo manuale non è un corso di vela. Se questa è la vostra prima deriva o se provenite da una barca sostanzialmente diversa da questa e non avete conoscenze specifiche su questo scafo, per la vostra sicurezza e comfort Vi consigliamo di accertarVi di possedere un adeguato livello di esperienza prima di prendere il largo. In caso di dubbio, il vostro rivenditore RS o la vostra Federazione Nazionale – ad esempio la Federazione Italiana Vela – potranno indirizzarVi verso scuole di vela o istruttori locali in grado di permerterVi di utilizzare il Vostro mezzo al meglio, col massimo divertimento ed al tempo stesso in massima sicurezza. Per cortesia conservate il presente manuale in posto sicuro e ricordateVi di consegnarlo assieme alla barca in caso di vendita della stessa ad un nuovo proprietario. Non imbarcare più persone / peso di quanto ammesso sulla placchetta CE e stabilito nelle caratteristiche. Assicurarsi sempre di avere a bordo il minimo numero di persone e peso necessario per raddrizzare la barca dopo la scuffia. Non utilizzare motori fuoribordo al di fuori delle specifiche ammesse. Accertarsi che tutti i tappi di ispezione ed i gavoni siano ben chiusi prima di varare la barca. Attenzione alla ridotta stabilità dell’imbarcazione durante le operazioni di traino. Vie d’acqua nelle reserve di galleggiamento rappresentano un rischio alla navigazione. E’ pericoloso navigare in condizioni di mare frangente. Verificare sul libretto di uso e manutenzione della propria autovettura il carico massimo ammissibile sul tetto prima di caricarvi la barca per un viaggio. In caso di trasporto su rimorchio, verificare sul libretto dello stesso il massimo peso per asse consentito. Armare sempre la barca come indicato sul manuale del proprietario, che in caso di necessità è disponibile sul sito www.rssailing.com Page 5 Español___________________________________________________________ Introducción Felicidades por la compra de su nuevo velero RS y gracias por elegir uno de nuestros modelos. Estamos convencidos de que disfrutará muchas horas del placer de navegar y regatear en su nuevo RS. Todas las embarcaciones de nuestra flota resultan muy excitantes y ofrecen excelentes prestaciones. Este manual se ha compilado a fin de ayudarle a obtener de su embarcación máximo placer y seguridad. Este manual no pretende instruirle sobre seguridad a bordo o en el manejo de la embarcación. Si esta es su primera embarcación o es de un tipo con el que no está familiarizado, por su seguridad y confort asegúrese de que tiene la experiencia adecuada antes de salir a navegar. Si no está seguro, le recomendamos que consulte con su distribuidor RS o con la federación territorial de vela que podrán indicarle una escuela de vela cercana o un monitor competente que le enseñe. Por favor, guarde este manual en lugar seguro y entréguelo al nuevo propietario si usted vende su embarcación. No sobrepasar el número máximo de personas autorizadas (tripulación máxima) que figuran en la placa de la CE y en la página del manual donde se encuentran las Especificaciones de la embarcación. Asegúrese de que navega siempre con la tripulación suficiente para adrizar el barco en caso de volcarlo. No exceder la potencia máxima autorizada del motor establecida en las especificaciones de la embarcación. Asegúrese de que todos los tapones y tapas de registro están bien cerrados antes de ir al agua. La estabilidad se verá reducida al remolcar o ser remolcados en el agua. Un agujero en uno de las cámaras de aire supone un serio peligro para la estabilidad. Las olas rompientes representan un serio peligro para la estabilidad. Si transporta su embarcación sobre el coche, asegúrese de que no se sobrepasa el límite de carga legal para esa baca. Si transporta su embarcación en un remolque, compruebe que no sobrepasa el límite de carga del eje de ese remolque. Apareje siempre la embarcación de acuerdo con su manual, que de ser necesario se puede descargar desde www.RSsailing.com. Page 6 Capsize Recovery from Inversion – Single handed dinghies Redresser après chavirage - en solitaire Wiederaufrichten durchgekenterter Boote – Einhandboote Raddrizzamento dopo una scuffia a 180° - barche singole Adrizamiento de una embarcación volcada quilla al sol - Embarcaciones individuales 1. 2. 3. English 1. 2. 3. Ensure the dagger/centre board is in the down position. Stand on the gunwale, hold on to the dagger/centre board and lean back. Once on its side, pull down on dagger/centre board followed by the gunwale to bring the boat upright. Reach into the cockpit and pull your self back into the boat. Français 1. 2. 3. Vérifier que la dérive est bien en position basse, monter sur le liston, attraper la dérive tout en se penchant en arrière. Une fois le bateau sur son flanc, s’appuyer sur la dérive pour attraper le liston supérieur et redresser complètement le bateau. Atteindre le cockpit via un sangle ou main courante et se hisser à l’intérieur. Deutsch 1. 2. 3. Stellen Sie sicher, dass das Schwert vollständig abgesenkt ist. Stellen Sie sich auf die Scheuerleiste, fassen Sie das Schwert nahe der Spitze und lehnen Sie sich so weit wie möglich zurück. Sobald das Boot auf der Seite liegt drücken Sie das Schwert weiter hinunter bis Sie die obere Scheuerleiste erreichen und diese so lange herunterdrücken, bis das Boot aufrecht schwimmt. Greifen Sie ins Cockpit und ziehen Sie sich in das Boot hinein. Italiano 1. 2. 3. Sinceratevi che la deriva sia nella posizione completamente abbassata, cioè completamente fuori dallo scafo. Stando in piedi sul bottazzo, aggrappatevi alla deriva ed accucciatevi all'indietro tirando senza strappi. Una volta che la barca è sul fianco a 90°, schiacciate la deriva verso il basso, indi aggrappatevi al bordo in modo da raddrizzare completamente la barca. Aggrappatevi al pozzetto e risalite in barca. Español 1. 2. 3. Asegúrate de que la orza está completamente calada. Súbete a la regala, y tira de la orza con los brazos extendidos inclinándote hacia atrás. Cuando el barco esté ya acostado sobre un lado, empuja la orza hacia abajo, subiéndote a la misma si fuera necesario, y a continuación tira de la regala hasta tener el barco adrizado. Agárrate a las cinchas u otro elemento de la bañera y tira para encaramarte de nuevo a bordo. Page 7 Capsize Recovery from Inversion – Double handed dingies Redresser après chavirage - en double Wiederaufrichten durchgekenterter Boote – Zweimannboote Raddrizzamento dopo una scuffia a 180° - barche doppie Adrizamiento de una embarcación volcada quilla al sol - Embarcacionesdobles 1. 4. 2. 3. English 1. Ensure the dagger/centre board is in the down position.The helm should stand on the gunwale, hold on to the dagger/centre board and lean back. To assist, the crew can take a jib/spinnaker sheet, stand on the gunwale and lean back. 2. Once on its side, the crew should make their way to cockpit and throw the jib/spinnaker sheet over the top gunwale. They should then lie, floating inside the cockpit, ready to be ‘scooped’ up as the boat comes upright. 3. The helm can now right the boat by lying back with their feet on the lower gunwale and pulling on the jib/spinnaker sheet. Alternatively climb on the dagger/centre board and lean back on the jib/spinnaker sheet or righting line. 4. Once ‘scooped’ up the crew can assist the helm in getting aboard. Français 1. Vérifier que la dérive est bien en position basse, le barreur monte sur le liston, attrape la dérive tout en se penchant en arrière. Pour l’assister, l’équipier peut attraper une écoute de foc ou spi et aussi se pencher en arrière depuis le liston. 2. Une fois le bateau sur son flanc, l’équipier lache les écoutes, fait le tour, va vers le cockpit de manière à ce que quand le bateau se redresse par l’action du barreur, il soit directement à l’intérieur. 3. La barreur, à l’aide d’écoute de spi ou de bouts de redressage en se penchant en arrière ou montant sur la dérive, termine de redresser le bateau. 4. Une fois à l’endoit, l’équipier aide le barreur à remonter dans le bateau. Deutsch 1. Stellen Sie sicher, dass das Schwert vollständig abgesenkt ist. Der Steuermann stellt sich auf die Scheuerleiste, fasst das Schwert nahe der Spitze und lehnt sich so weit wie möglich zurück. Der Vorschoter kann helfen, indem er ebenfalls auf der Scheuerleiste steht und sich dabei ggf. an der Gennakerschot oder dergleichen festhält. 2. Sobald das Boot auf der Seite liegt, schwimmt der Vorschoter auf die Cockpitseite. Der Steuermann drückt das Schwert weiter hinunter bis er die obere Scheuerleiste erreichen und diese so lange herunterdrückt, bis das Boot aufrecht schwimmt. Alternaziv steigt er auf das Schwert, hält sich an der Gennakerschot fest und lehnt sich so weit zurück, das das Boot sich aufrichtet. 3. Während das Boot sich aufrichtet lässt sich der Vorschoter aus dem Wasser ins Cockpit „hebeln“. Sofort nach dem Aufrichten hilft der Vorschoter dem Steuermann dabei, ins Cockpit zu gelangen. 4. Greifen Sie ins Cockpit und ziehen Sie sich in das Boot hinein. Italiano 1. Sinceratevi che la deriva sia nella posizione completamente abbassata, cioè completamente fuori dallo scafo. Il timoniere si posiziona sul bottazzo e reggendosi alla deriva si accuccia verso dietro tirando. Per favorire il raddrizzamento, il prodiere può prendere la scotta del fiocco o dello spinnaker, stando sul bottazzo e accucciato verso dietro tira anche lui. 2. Una volta che la barca è sul fianco a 90°, il prodiere lascia la scotta che stava usando per il raddrizzamento e nuota o salta verso il pozzetto della barca. Quindi aspetta là il momento in cui la barca, raddrizzandosi, lo isserà a bordo automaticamente. 3. Il timoniere può a questo punto prendere la scotta usata dal prodiere e completare l'opera di raddrizzamento spingendo sul bottazzo ed accucciandosi indietro tirando la scotta stessa oppure arrampicandosi sulla deriva e poi fare lo stesso movimento sempre aggrappato alla scotta. 4. Una volta 'pescato' dal raddrizzamento della barca, il prodiere può controllare la stessa ed aiutare la risalita a bordo del timoniere. Español 1. Asegúrate de que la orza está completamente calada. El patrón debe subirse a la regala, coger la orza y tirar inclinándose hacia atrás. A fin de ayudar, el tripulante puede subir a la regala y tirar de una escota de foque o spi, inclinándose hacia atrás. 2. En cuanto la embarcación queda acostada sobre un lado, el tripulante puede ir a la bañera y tirar la escota de foque o spi por encima de la regala superior. A continuación debe quedarse en el interior de la bañera flotando para ser embarcado automáticamente en cuanto el barco complete su adrizamiento. 3. El patrón puede ahora adrizar el barco empujando con los pies sobre la regala inferior y echándose hacia atrás mientras tira de la escota del foque o del spi o del cabo de adrizamiento situado bajo las regalas. Alternativamente puede adrizarlo subiéndose a la orza y tirando de la escota de foque o de spi o del cabo de adrizamiento. 4. Una vez en el interior de la bañera con el barco adrizado, el tripulante ayuda al patrón a subir a bordo. Page 8 Capsize Recovery from Inversion – Multihulls Ressaler d’une position complètement inversée - Multicoques Das Aufrichten bei durchgekentertem Boot - für Katamarane Raddrizzamento dopo una scuffia a 180° – Catamarani Adrizamiento de una embarcación volcada quilla al sol – Multihulls 1. 5. 3. 4. English 1. Collect the righting line and stand at the transom of one of the hulls. Leaning backwards, the boat will slowly come up into the capsize position. 2. Climb onto the lower hull, release the main and jib sheets and throw the righting line over the top hull. 3. Lean back on the righting line to begin the righting process. As the rig releases from the water, the boat will begin to right itself quickly. 4. As the boat comes upright, move quickly between the hulls and apply body wieght to the straps underneath the trampoline. 5. Once the boat is righted, climb back onboard and tidy sheets and lines before sailing away. Français 1. Attraper le bout de ressalage et mettez-vous debout arrière d’une des coques. En tirant vers l’arrière, le bateau va se mettre lentement en position intermédiaire. 2. Grimper sur la coque du bas, choquez en grand l’écoute de foc et de grand-voile, et lancer le bout de ressalage sur la coque du haut. 3. Pencher en arrière sur le bout de ressalage pour commencer le redressage. Dès que le gréement sortira de l’eau, le bateau se redressera rapidement. 4. Quand le bateau est en train de se redresser, nager pour se glisser entre les coques et se suspendre aux sangles sous le trampoline. 5. Une fois que le bateau s’est redressé, remonter à bord et ranger les écoutes et drisses avant de repartir. Deutsch 1. Nehmen Sie die Aufrichteleine und stellen Sie sich ganz ans Heck eines der beiden Rümpfe. Lehnen Sie sich so weit zurück, bis das Boot vorne hochkommt und sich auf die Seite legt. 2. Gehen Sie auf den nun unten liegenden Rumpf, lösen Sie Fock- und Grossschot und werfen Sie das lose Enbde der Aufrichteleine über den oben liegenden Rumpf. 3. Verlagern Sie an der Aufreichteleine hängend Ihr Gewicht so weit wie möglich nach hinten. Sobald das Rigg aus dem Wasser kommt, richtet sich das Boot schnell auf. 4. Sobald das Boot sich aufrichtet, halten Sie sich unter dem Trampolin an den Schlaufen fest und sorgen mit Ihrem Körpergewicht dafür, das das Boot nicht erneut kentert. 5. Klettern Sie auf das Trampolin, sortieren Sie die Schoten – und weiter geht’s. Italiano 1. Recuperare la cima per il raddrizzamento e posizionarsi in piedi sulla poppa di uno dei due scafi. Accucciandosi all’indietro, la barca lentamente si posizionerà a 90° 2. Salire sullo scafo rimasto in acqua, assicurarsi che la scotta randa e la scotta fiocco siano libere e non strozzate, indi passare la cima per il raddrizzamento sopra ed oltre lo scafo in aria 3. Accucciarsi all’indietro tirando la cima per il raddrizzamento. Non appena l’albero esce dall’acqua, la barca inizierà a raddrizzarsi velocemente. 4. Non appena la barca si raddrizza, spostarsi velocemente tra gli scafi ed appendere il proprio peso alle cinghie che si trovano nella parte sottostante al trampolino 5. Una volta che la barca è in posizione diritta, risalire a bordo e sincerarsi che cime e scotte siano in chiaro prima di riprendere a veleggiare normalmente. Español 1. BARCO INVERTIDO (Chocolatera). Coge el cabo de adrizamiento y súbete a la popa de uno de los dos cascos; échate atrás tirando del cabo para que el catamarán pase de la posición de “invertido” a “acostado” 2. BARCO ACOSTADO. Cuando el barco esté acostado sobre el agua, súbete al casco inferior, suelta las escotas de mayor y foque si estuvieran amordazadas y haz pasar el cabo de adrizamiento por encima del casco superior. 3. ADRZAMIENTO. Échate hacia atrás cogido del cabo de adrizamiento para iniciar la maniobra de desvolcar de la embarcación. En cuanto el aparejo empiece a separarse de la superficie del agua, el barco se adrizará rápidamente. 4. Cuando el catamarán se esté adrizando, cógete rápidamente de la cincha que hay debajo del trampolín y tira de ella. 5. A NAVEGAR. Una vez con el barco adrizado, sube a bordo y pon orden en cabos y escotas antes de seguir navegando. Page 9 Principal Dimensions for APB Dinghies Dimensions principales gamme loisir Technische Daten für APB-Boote Ha Dimensioni principali delle derive serie APB A1 A3 Dimensiones principales de las embarcaciones polivalentes de polietileno. A2 T Bh Class RS Tera Category C D RS Quba RS Feva RS Vision RS Venture C C C C 5.5 – 6.5 2.1 7.0 3.64 1.42 5.1 1.05 72 230 75 3 N/A 629/10 11th Oct 2011 Aa 9.0 3.2 12.6 4.6 1.75 5.98 1.15 163 360 150 4 2.5kw 15kg 628/10a 11th Oct 2011 Aa 11.0 3.8 10.5 – 14.0 4.90 2.02 6.37 1.15 225 605 680 150 7 8 2.5kw 15kg 658/11 26th Jan 2012 Aa Rowing A1 (m2) A2 (m2) A3 (m2) Lh (m) Bh (m) Ha (m) T (m) MLCC (kg) MTL (kg) CR (kg) CL MRE* ECN* DI* Mod* 2.7 – 4.8 2.87 1.23 3.85 0.8 42 135 75 75 1 1 N/A B+C Class Category RS Venture Keel C D A1 (m2) A2 (m2) A3 (m2) Lh (m) Bh (m) Ha (m) T (m) MLCC (kg) MTL (kg) CR (kg) CL MRE* ECN* DI* Mod* 11.0 3.8 10.5 – 14.0 4.90 2.02 6.37 0.3 – 0.9 298 400 545 160 5 7 2.5kw 15kg BRSSA004 1st July 2014 A Lh D D RS Venture BC C D RS CAT16 11.0 3.8 10.5 – 14.0 4.90 2.02 6.37 1.15 285 573 612 150 6 7 2.5kw 15kg 678/12 1st Aug 2012 Aa 9.98 2.35 13.32 4.65 2.35 7.0 0.4 140 320 390 85 4 5 N/A BRSSA002 28th Feb 2014 Aa C D Rowing 5.7 – 7.1 1.2 3.53 1.42 5.23 1.05 66 225 130 75 3 1 N/A 630/10a 26th Jan 2012 Aa English Code A1 A2 A3 Lh Bh Ha T MLCC Description Main sail area Jib area Spinnaker area Length of hull Beam of hull Height above Sheer Draft Unladed mass boat MTL CR Maximum total load Minimum crew for capsize CL Crew limit Français Description Deutsch Beschreibung Italiano Descrizione Español descripción Surface de grand-voile Surface de foc Surface de spinnaker Longueur de coque Largeur de coque Tirant d’air Tirant d’eau Poids du bateau à vide Segelfläche Groß Segelfläche Fock Segelfläche Gennaker Rumpflänge Rumpfbreite Höhe über Deck Tiefgang Leergewicht des Bootes Sup. velica randa Sup. velica Fiocco Sup. velica spinnaker Lunghezza scafo f.t. Baglio max Bordo libero Pescaggio Peso netto della barca Charge maximum poids minimum d’équipage pour redressage Limite d'équipage Maximale Zuladung Mindestbesatzung beim Kentern Portata massima equipaggio minimo per il raddrizzamento superficie de la mayor Superficie del foque Superficie del spinnaker Eslora Manga Altura sobre cubierta Calado Masa de la embarcación sin lastre Carga máxima tripulación mínima para el adrizamiento Maximale Personen equipaggio limite superficie de la mayor Page 10 *MRE Maximum Recommended Engine *ECN Examination Certificate Number *DI Date of Issue *Mod Module used for construction assessment Category C - Inshore: Designed for voyages in coastal waters, large bays, estuaries, lakes and rivers where conditions up to, and including, wind force 6 and significant wave heights up to, and including, 2m may be experienced. Category D - Sheltered: Designed for voyages on sheltered coastal waters, small bays, small lakes, rivers and canals where conditions up to, and including, wind force 4 and significant wave heights up to, and including, 0.3m may be experienced, with occasional waves of 0.5m maximum height, for example from passing vessels. MLCC – Unladed Mass of the Boat: The weight of the boat excluding sails, spars and removable foils. MTL – Maximum Total Load: The total weight in kg of all crew and luggage (including fuel for engines). The ML must never be exceeded. CL – Crew Limit: The maximum number of persons recommended by the manufacturer for which the boat is designed to carry when underway. When using an engine the recommended size should be adhered to and the design category is restricted to D for the RS Vision, RS Venture and RS Elite. Français *MRE puissance maximum de moteur recommandée *ECN Numéro de certificat de contrôle *DI Date d’édition *Mod Module utilisé pour l’évaluation de la fabrication Catégorie C, navigations côtières, baies, estuaires, lacs et rivières ou des vents jusqu’à force 6 et des vagues de 2 mètres peuvent être rencontrés Catégorie D, navigations en zones protégées, criques, petites baies, lacs et estuaires ou l’on peut naviguer jusqu’à force 4 et avoir à subir des vagues jusqu’à 0.3, voir 0.5 mètre en croisant des sillages de bateaux moteur. MLCC - Poids du bateau à vide: Le poids du bateau sans les voiles, les espars, les appendices démontables. MTL - Poids Maximum embarqué: Poids de l’équipage avec ses accessoires et bagages. À ne jamais dépasser. CL - Nombre d’équipiers: le nombre maximum de personnes pouvant être embarquées, recommandé par le constructeur pour le bateau en configuration normale. L’ajout d’un moteur doit se faire avec la puissance appropriée pour le modèle et l’utilisation se limite en catégorie D pour les RS Vision, RS Venture et RS élite Deutsch *MRE Maximal empfohlene Motorleistung *ECN Nummer des Untersuchungs-Zertifikates *DI Ausstellungsdatum *Mod Module used for construction assessment Kategorie C – Küstennahe Gewässer: Entwickelt zur Nutzung in küstennahnen Revieren, Buchten, Seen und Flüssen bei Bedingungen bis zu und inkl. 6 Windstärken und Wellenhöhen bis zu und inkl. 2 Metern. Kategorie D Geschützte Gewässer: Entwickelt zur Nutzung in geschützten Gewässern, kleinen Buchten, Seen und Flüssen bei Bedingungen bis zu und inkl. 4 Windstärken sowie Wellenhöhen bis zu und inkl. 0,3 Metern und zeitweise auftretenden Wellenhöhen von bis zu 0,5 Metern (beispielsweise durch vorbeifahrende Schiffe). MLCC - Leergewicht des Bootes: Bootsgewicht ohne Segel, Mast, Riggteile und herausnehmbare Ruder/Schwerter. MTL – Maximale Last: Gesamte Zuladung in kg inkl. Personen, Gepäck, Motor/Benzin etc.). Die ML darf niemals überschritten werden. CL – Crew Limit: Die vom Hersteller empfohlene maximale Anzahl von Personen, die während der Nutzung an Bord sein sollten. Bei Verwendung eines Außenbordmotors halten Sie bitte die angegebenen Größen ein und beachten Sie dass bei den Booten RS VISION, RS VENTURE und RS ELITE bei Nutzung eines Motors die Design Kategorie D gilt. Page 11 Italiano *MRE Massima Potenza raccomandata del motore *ECN Certificato di esaminazione numero *DI Emesso il *Mod Modulo usato per l’attestazione di costruzione Categoria C (in prossimità della costa) – progettate per crociere in acque costiere e grandi baie, estuari, fiumi e laghi con forza del vento inferiore o pari a forza 6 ed altezza delle onde fino a due metri. Categoria D (in acque protette) – progettate per crociere in piccolo baie, su piccoli laghi, fiumi e canali con forza del vento inferiore o pari a forza 4 ed altezza delle onde fino a 0,5 m. MLCC - Peso netto della barca: il peso della barca eccetto vele, antenne e timone/deriva quando removibili. MTL – Maximum Load (carico Massimo): Il peso complessivo totale in Kg comprensivo di persone trasportate e bagagli, incluso l’eventuale carburante per I motori. Il peso totale non può mai essere oltrepassato. CL – Crew Limit (limite d’equipaggio): Il numero Massimo di persone raccomandato dal costruttore della barca che l’imbarcazione stessa può trasportare, comandante incluso. In caso di utilizzo del motore, le specifiche dello stesso devono essere rispettate come da manual, e la categoria di utilizzo viene limitata alla Categoria D nel caso di RS Vision, RS Venture ed RS Elite. Español *MRE Potencia máxima recomendada del motor *ECN Certificado de inspección número *DI Fecha de expedición *Mod Módulo utilizado en la evaluación de la construcción Categoría C- Navegación en aguas costeras. Diseñado para navegar en aguas costeras, grandes bahías, estuarios, lagos y ríos en condiciones de viento de no más de fuerza 6 y con olas de no más de 2 metros de altura siempre que se disponga de la experiencia adecuada. Categoría D- Navgación en aguas protegidas. Diseñado para navegar en aguas protegidas, pequeñas bahías y lagos, ríos y canales en condiciones de un máximo de fuerza 4 y con un oleaje de 0,3 m o 0,5 metros de máximo ocasionalmente, cuando dicho oleaje se forme como consecuencia del paso de otras embarcaciones. MLCC - Masa de la embarcación sin lastre: Peso de la embarcación sin velas, arboladura ni apéndices sueltos. MTL (Maximum Load: “Carga Máxima”). El peso total en kilos de toda la tripulación, enseres y combustible, en caso de llevar motor. La “Carga Máxima” no debe ser nunca sobrepasada. CL (Crew Limit: “Límite de Pasajeros”) Número máximo de personas a bordo en navegación recomendado por el fabricante. Cuando utilice motor, la potencia recomendad debe estar indicada y la navegación restringida a “Categoría D” para los RS Vision, RS Venture y RS Elite. Page 12 Principal Dimensions for Single Handed Performance Dinghies Dimensions principales gamme solitaire Racing Haa Technische Daten für Einhand-Performance Boote A1 A3 Dimensioni principali delle derive in singolo serie Performance Dimensiones principales de las embarcaciones individuales de alto rendimiento. T Bh Class RS Vareo RS 100 RS 700 Category C C C A1 (m2) A2 (m2) A3 (m2) Lh (m) Bh (m) Ha (m) T (m) MLCC (kg) MTL (kg) CR (kg) CL MRE* ECN* DI* Mod* 8.0 - 8.8 8.4 – 10.2 12.5 4.3 1.83 5.68 1.1 63 175 75 2 N/A 620/10 29th June 2012 Aa 12.8 D 10.0 4.25 1.57 5.90 1.05 75 250 250 75 2 3 N/A 108/01 1st June 2003 Aa English Code A1 A2 A3 Lh Bh Ha T MLCC Description Main sail area Jib area Spinnaker area Length of hull Beam of hull Height above Sheer Draft Unladed mass boat MTL CR Maximum total load Minimum crew for capsize CL Crew limit Lh RS Aero D 16.0 4.68 1.92 – 2.33 7.25 1.05 68 125 180 75 1 2 N/A 106/01 1st Jan 2003 Aa C D 5.7 - 8.9 4.00 1.4 6.1 0.8 50 125 160 45 1 2 N/A BRSSA003 1st July 2014 A Français Description Deutsch Beschreibung Italiano Descrizione Español descripción Surface de grand-voile Surface de foc Surface de spinnaker Longueur de coque Largeur de coque Tirant d’air Tirant d’eau Poids du bateau à vide Segelfläche Groß Segelfläche Fock Segelfläche Gennaker Rumpflänge Rumpfbreite Höhe über Deck Tiefgang Leergewicht des Bootes Sup. velica randa Sup. velica Fiocco Sup. velica spinnaker Lunghezza scafo f.t. Baglio max Bordo libero Pescaggio Peso netto della barca Charge maximum poids minimum d’équipage pour redressage Limite d'équipage Maximale Zuladung Mindestbesatzung beim Kentern Portata massima equipaggio minimo per il raddrizzamento superficie de la mayor Superficie del foque Superficie del spinnaker Eslora Manga Altura sobre cubierta Calado Masa de la embarcación sin lastre Carga máxima tripulación mínima para el adrizamiento Maximale Personen equipaggio limite superficie de la mayor *MRE Maximum Recommended Engine *ECN Examination Certificate Number *DI Date of Issue *Mod Module used for construction assessment Category C - Inshore: Designed for voyages in coastal waters, large bays, estuaries, lakes and rivers where conditions up to, and including, wind force 6 and significant wave heights up to, and including, 2m may be experienced. Category D - Sheltered: Designed for voyages on sheltered coastal waters, small bays, small lakes, rivers and canals where conditions up to, and including, wind force 4 and significant wave heights up to, and including, 0.3m may be experienced, with occasional waves of 0.5m maximum height, for example from passing vessels. MLCC – Unladed Mass of the Boat: The weight of the boat excluding sails, spars and removable foils. MTL – Maximum Load: The total weight in kg of all crew and luggage (including fuel for engines). The ML must never be exceeded. CL – Crew Limit: The maximum number of persons recommended by the manufacturer for which the boat is designed to carry when underway. Page 13 Principal Dimensions for Double Handed Performance Dinghies Dimensions principales gamme double Racing Technische Daten für Zweihand-Performance-Boote Ha A1 Dimensioni principali delle derive in doppio della serie Performance A3 A2 Dimensiones principales de las embarcaciones dobles de alto rendimiento. T Bh Lh Class Category RS 200 C D RS 400 C D RS 500 C D RS 800 C D RS Elite C 2000 C A1 (m2) A2 (m2) A3 (m2) Lh (m) Bh (m) Ha (m) T (m) MLCC (kg) MTL (kg) CR (kg) CL Displacement (kg) MRE* ECN* DI* Mod* 9.13 2.76 8.29 4.0 1.83 6.08 1.13 90 220 250 150 2 3 N/A N/A 18/98 1st Jan 2003 Aa 10.96 3.93 13.94 4.52 2.0 6.45 1.13 105 220 250 150 2 3 N/A N/A 19/98 1st Jan 2003 Aa 7.5 – 9.5 3.0 – 3.6 14.0 4.34 1.58 6.04 1.15 87 212 287 150 2 3 N/A N/A 673/12 1st Oct 2012 Aa 11.77 4.92 21.0 4.8 1.88 – 2.89 7.1 1.15 88 220 250 150 2 3 N/A N/A 107/01 1st Jan 2003 Aa 16.0 7.5 25.0 7.4 1.72 8.5 1.1 1500 500 150 4 975 35kw 20kg Aa 8.66 3.04 10.12 4.44 1.77 5.94 1.13 127 240 150 3 N/A N/A BRSSA001 28th Feb 2014 Aa English Code A1 A2 A3 Lh Bh Ha T MLCC Description Main sail area Jib area Spinnaker area Length of hull Beam of hull Height above Sheer Draft Unladed mass boat MTL CR Maximum total load Minimum crew for capsize CL Crew limit Français Description Deutsch Beschreibung Italiano Descrizione Español descripción Surface de grand-voile Surface de foc Surface de spinnaker Longueur de coque Largeur de coque Tirant d’air Tirant d’eau Poids du bateau à vide Segelfläche Groß Segelfläche Fock Segelfläche Gennaker Rumpflänge Rumpfbreite Höhe über Deck Tiefgang Leergewicht des Bootes Sup. velica randa Sup. velica Fiocco Sup. velica spinnaker Lunghezza scafo f.t. Baglio max Bordo libero Pescaggio Peso netto della barca Charge maximum poids minimum d’équipage pour redressage Limite d'équipage Maximale Zuladung Mindestbesatzung beim Kentern Portata massima equipaggio minimo per il raddrizzamento superficie de la mayor Superficie del foque Superficie del spinnaker Eslora Manga Altura sobre cubierta Calado Masa de la embarcación sin lastre Carga máxima tripulación mínima para el adrizamiento Maximale Personen equipaggio limite superficie de la mayor *MRE Maximum Recommended Engine *ECN Examination Certificate Number *DI Date of Issue *Mod Module used for construction assessment Category C - Inshore: Designed for voyages in coastal waters, large bays, estuaries, lakes and rivers where conditions up to, and including, wind force 6 and significant wave heights up to, and including, 2m may be experienced. Category D - Sheltered: Designed for voyages on sheltered coastal waters, small bays, small lakes, rivers and canals where conditions up to, and including, wind force 4 and significant wave heights up to, and including, 0.3m may be experienced, with occasional waves of 0.5m maximum height, for example from passing vessels. MLCC – Unladed Mass of the Boat: The weight of the boat excluding sails, spars and removable foils. MTL – Maximum Load: The total weight in kg of all crew and luggage (including fuel for engines). The ML must never be exceeded. CL – Crew Limit: The maximum number of persons recommended by the manufacturer for which the boat is designed to carry when underway. When using an engine the recommended size should be adhered to and the design category is restricted to D for the RS Vision, RS Venture and RS Elite. Page 14 Towing Points RS Tera – Tie towline to the painter. Ensure it is led through the front carry handle. RS Quba – Tie the towline to the retractable painter at the bow. RS Feva – Tie the towline to the tack bar. RS Vision – Tie the towline to the tack bar or jib tack shackle. RS Venture & Venture Keel – Tie the towline to the bow u-bolt. RS Vareo – Tie the towline around the base of the mast. RS Elite – Tie the towline to the bow ubolt. RS Aero – Tie the towline around the mast. RS 100 – Tie the towline around the mast, as close to the deck collar as possible. RS 200 – Tie the towline around the base of the mast. RS 400 & 2000 – Tie the towline to the bow u-bolt. RS 500 – Tie the towline to the base of the mast. Ensure it is led through the tack bar. RS 700 – Tie the towline to the base of the mast. Ensure it is led through the tack bar. RS 800 – Tie the towline to the base of the mast. Ensure it is led through the tack bar. Page 15 Français Class RS Tera RS Quba RS Feva RS Vision RS Venture RS CAT16 RS Vareo RS Elite RS Aero RS 100 RS 200 RS 400 RS 500 RS700 RS 800 2000 Description du point de remorquage Attacher le bout de remorquage à l’orin. S’assurer qu’il passe par la poignée avant. Attacher le bout de remorquage à l’orin rétractable sur l’étrave. Attacher le bout de remorquage à la barre d’amure de foc. Attacher le bout de remorquage à la barre d’amure de foc ou la manille d’amure de foc. Attacher le bout de remorquage à l’anneau d’étrave. Attacher le bout de remorquage autour du pied de mat. Attacher le bout de remorquage autour du pied de mat. Attacher le bout de remorquage à la pad-eye d’étrave. Attacher le bout de remorquage à l’anneau d’étrave. Attacher le bout de remorquage autour du mat, aussi prêt de l’étambrai que possible. Attacher le bout de remorquage autour du pied de mat. Attacher le bout de remorquage à l’anneau d’étrave. Attacher le bout de remorquage au pied du mat. S’assurer qu’il passe sous la barre d’amure de foc. Attacher le bout de remorquage au pied du mat. S’assurer qu’il passe sous la barre d’amure de foc. Attacher le bout de remorquage au pied du mat. S’assurer qu’il passe sous la barre d’amure de foc. Attacher le bout de remorquage à l’anneau d’étrave. Deutsch Bootstyp RS Tera RS Quba RS Feva RS Vision RS Venture RS CAT16 RS Vareo RS Elite RS Aero RS 100 RS 200 RS 400 RS 500 RS700 RS 800 2000 Befestigungspunkt der Abschlappleine Führen Sie die Schleppleine durch den Tragegiff am Bug und knoten Sie sie am Mastbeschlag an. Tie the towline to the retractable painter at the bow. Befestigen Sie die Schleppleine am Metallbügel des Gennaker-Ausganges Befestigen Sie die Schleppleine am Aluminiumprofil am Bug Befestigen Sie die Schleppleine am U-Bolzen am Bug. Befestigen Sie die Schleppleine am Mast unten. Befestigen Sie die Schleppleine unten am Mast Befestigen Sie die Schleppleine am U-Bolzen am Bug. Befestigen Sie die Schleppleine am U-Bolzen am Bug. Befestigen Sie die Schleppleine auf Deckshöhe am Mast. Befestigen Sie die Schleppleine am Mast unten. Befestigen Sie die Schleppleine am U-Bolzen am Bug. Führen Sie die Schleppleine durch den Tack-Bar am Bug und befestigen Sie sie am Mast unten Führen Sie die Schleppleine durch den Tack-Bar am Bug und befestigen Sie sie am Mast unten Führen Sie die Schleppleine durch den Tack-Bar am Bug und befestigen Sie sie am Mast unten Befestigen Sie die Schleppleine am U-Bolzen am Bug. Italiano Class RS Tera RS Quba RS Feva RS Vision RS Venture RS CAT16 RS Vareo RS Elite RS Aero RS 100 RS 200 RS 400 RS 500 RS700 RS 800 2000 Come prendere al traino l’imbarcazione Legare la cima di traino allo stroppo di prua, assicurandosi che passi dentro la maniglia. Legare la cima di traino sullo spezzone retraibile che fuoriesce da prua. Legare la cima di traino sulla barra metallica a prua sopra la bocca del gennaker Legare la cima di traino alla barra metallica del rullafiocco oppure sul grillo della mura del fiocco. Legare la cima di traino sul garroccio esterno alla prua. Legare la cima di traino attorno alla base dell’albero. Legare la cima di traino attorno alla base dell’albero. Legare la cima di traino sul garroccio esterno alla prua. Legare la cima di traino sul garroccio esterno alla prua. Legare la cima di traino attorno all’albero, più vicino possibile al collare in coperta. Legare la cima di traino attorno alla base dell’albero. Legare la cima di traino sul garroccio esterno alla prua. Legare la cima di traino alla base dell’albero. Assicurarsi che sia passata dentro alla barra metallica sopra la calza del gennaker. Legare la cima di traino alla base dell’albero. Assicurarsi che sia passata dentro alla barra metallica sopra la calza del gennaker. Legare la cima di traino alla base dell’albero. Assicurarsi che sia passata dentro alla barra metallica sopra la calza del gennaker. Legare la cima di traino sul garroccio esterno alla prua. Page 16 Español Class RS Tera RS Quba RS Feva RS Vision RS Venture RS CAT16 RS Vareo RS Elite RS Aero RS 100 RS 200 RS 400 RS 500 RS700 RS 800 2000 Dónde hacer firme el cabo de remolque Ate el remolque al cabo previsto al efecto asegurándose de que pasa por dentro del asa de proa. Ate el cabo de remolque al cabo retráctil que asoma por proa. Ate el cabo de remolque al arco de acero de proa. Ate el cabo de remolque a la barra de proa o al grillete del puño de amura del foque. Ate el cabo de remolque al cáncamo de proa. Ate el cabo de remolque alrededor de la base del mástil. Ate el cabo de remolque alrededor de la base del mástil. Ate el cabo de remolque al cáncamo de proa. Ate el cabo de remolque al cáncamo de proa. Ate el cabo de remolque alrededor del mástil, tan cerca de cubierta como sea posible. Ate el cabo de remolque alrededor de la base del mástil. Ate el cabo de remolque al cáncamo de proa. Ate el cabo de remolque alrededor de la base del mástil, asegurándose de que pasa por dentro del arco de acero de proa. Ate el cabo de remolque alrededor de la base del mástil, asegurándose de que pasa por dentro del arco de acero de proa. Ate el cabo de remolque alrededor de la base del mástil, asegurándose de que pasa por dentro del arco de acero de proa. Ate el cabo de remolque al cáncamo de proa. Page 17 Method of Bailing Class RS Tera RS Quba RS Feva RS Vision RS Venture RS CAT16 RS Vareo RS Elite RS Aero RS 100 RS 200 RS 400 RS 500 RS700 RS 800 2000 Method of Bailing Self-draining from cockpit bung. Self-draining from cockpit bung. Self-draining from dagger board case & transom tubes. Self-draining from C/B case & transom tubes. Self-draining from cockpit bung & transom flaps. N/A Self-draining from open transom. Self-draining from cockpit sumps. Self-draining from cockpit bung & transom flaps. Self-draining from transom tubes. Self-draining from cockpit bung & open transom. Self-draining from cockpit bung & open transom. Self-draining from transom tubes. Self-draining from open transom. Self-draining from open transom. Self-draining from cockpit bung & transom flaps. NOTE: Although our boats are self-draining, we would recommend carrying a sponge on board to assist with the bailing. Français Class RS Tera RS Quba RS Feva RS Vision RS Venture RS CAT16 RS Vareo RS Elite RS Aero RS 100 RS 200 RS 400 RS 500 RS700 RS 800 2000 Méthode pour écoper Auto-videur dans le cockpit. Auto-videur dans le cockpit. Auto-videur par le puits de dérive et les ouvertures de tableau arrière. Auto-videur par le puits de dérive et les ouvertures de tableau arrière. Auto-videur par le cockpit et les clapets arrière. N/A Auto-videur par le tableau arrière ouvert. Auto-videur par le puits de vidange. Auto-videur par le cockpit et les clapets arrière. Auto-videur par les ouvertures de tableau arrière. Auto-videur par le cockpit et le tableau arrière ouvert. Auto-videur par le cockpit et le tableau arrière ouvert. Auto-videur par les ouvertures de tableau arrière. Auto-videur par le tableau arrière ouvert. Auto-videur par le tableau arrière ouvert. Auto-videur par le cockpit et les clapets arrière. NOTE: Même si nos bateaux sont auto-videurs, nous recommandons d’avoir une éponge à bord. Deutsch Bootstyp RS Tera RS Quba RS Feva RS Vision RS Venture RS CAT16 RS Vareo RS Elite RS Aero RS 100 RS 200 RS 400 RS 500 RS700 RS 800 2000 Art der Cockpit-Lenzung Selbstlenzend über Lenzstopfen im Cockpit Selbstlenzend über Lenzstopfen im Cockpit Selbstlenzend über Schwertkasten sowie Lenzrohre im Cockpit Selbstlenzend über Schwertkasten sowie Lenzrohre im Cockpit Selbstlenzend über Lenzstopfen im Cockpit sowie Folien am Spiegel N/A Selbstlenzend über offenen Spiegel Selbstlenzend über Lenzöffnungen im Cockpit Selbstlenzend über Lenzstopfen im Cockpit sowie Folien am Spiegel Selbstlenzend über Lenzrohre im Cockpit Selbstlenzend über Lenzstopfen im Cockpit sowie offenen Spiegel Selbstlenzend über Lenzstopfen im Cockpit sowie offenen Spiegel Selbstlenzend über Lenzrohre im Cockpit Selbstlenzend über offenen Spiegel Selbstlenzend über offenen Spiegel Selbstlenzend über Lenzstopfen im Cockpit sowie Folien am Spiegel HINWEIS: Auch bei selbstlenzenden Booten empfehlen wir einen Schwamm an Bord zu haben. Page 18 Italiano Class RS Tera RS Quba RS Feva RS Vision RS Venture RS CAT16 RS Vareo RS Elite RS Aero RS 100 RS 200 RS 400 RS 500 RS700 RS 800 2000 Come svuotare l’imbarcazione dall’acqua Autovuotante dal tappino nel pozzetto. Autovuotante dal tappino nel pozzetto. Autovuotante dalla cassa di deriva e dagli ombrinali a poppa. Autovuotante dalla cassa di deriva e dagli ombrinali a poppa. Autovuotante dai tappini nel pozzetto e dalle aperture nella poppa. N/A Autovuotante dalla poppa aperta. Self-draining from cockpit sumps. Autovuotante dai tappini nel pozzetto e dalle aperture nella poppa. Autovuotante dagli ombrinali a poppa. Autovuotante dai tappini nel pozzetto e dalla poppa aperta. Autovuotante dai tappini nel pozzetto e dalla poppa aperta. Autovuotante dagli ombrinali a poppa. Autovuotante dalla poppa aperta. Autovuotante dalla poppa aperta. Autovuotante dai tappini nel pozzetto e dalle aperture nella poppa. NOTA: Sebbene tutte le nostre imbarcazioni siano autovuotanti, raccomandiamo di portarsi appresso una spugna od una sassola in modo da favorire lo svuotamento. Español Class RS Tera RS Quba RS Feva RS Vision RS Venture RS CAT16 RS Vareo RS Elite RS Aero RS 100 RS 200 RS 400 RS 500 RS700 RS 800 2000 Sistema de drenaje Autodrenante a través del tapón de la bañera. Autodrenante a través del tapón de la bañera. Autodrenante a través de la caja de la orza y de las toberas de popa. Autodrenante a través de la caja de la orza y de las toberas de popa. Autodrenante a través del tapón de la bañera y de los flaps de popa. N/D Autodrenante por popa abierta. Autodrenante a través de los sumideros de la bañera. Autodrenante a través del tapón de la bañera y de los flaps de popa. Autodrenante a través de las toberas de popa. Autodrenante a través del tapón de la bañera y por popa abierta. Autodrenante a través del tapón de la bañera y por popa abierta. Autodrenante a través de las toberas de popa. Autodrenante por popa abierta. Autodrenante por popa abierta. Autodrenante a través del tapón de la bañera y de los flaps de popa. NOTA: A pesar de que nuestras embarcaciones son autodrenantes, recomendamos llevar a bordo una esponja a fin de mejorar el achique. Page 19 Declaration of conformity to EU Recreational Craft Directive 94/25/EC as amended by Directive 2003/44/EC Manufacturer: RS Sailing 19 Premier Way, Romsey, Hampshire, SO51 9DQ, UK. EU RCD Notified Bodies: Royal Yachting Association – 1681. RYA House, Ensign Way, Hamble, Hampshire, SO31 4YA, UK Trade Marque: RS Sailing Module used for construction assessment: Refer to Principal Dimensions Description of Craft ___________________________________________ Craft Identification Number of Craft (2nd line to be used for RS CAT16 only) Sail Number: _________________________ Type of Craft: Sailboat Type of Hull: Mono hull, Multi hull Construction Material: Polyethylene, GRP Type of main propulsion: Sail Type of engine: Outboard – refer to Principal Dimensions for max. engine Certificate & Statement No: Refer to Principal Dimensions and/or Rigging Manual Category, Weights & Dims: Refer to Principal Dimensions This declaration of conformity is issued under the sole responsibility of the manufacturer. I declare on behalf of the craft manufacturer that the craft mentioned above and specified in the table of principal dimensions complies with all applicable essential requirements in the way specified and is in conformity with the type for which above mentioned EC type examination certificate has been issued. Signed: Alex Newton-Southon – Technical Director Date ____________________________________ Page 20 Relevant Essential Requirements (ER) Relating to Annex 1A and 1C of the Recreational Craft Directive 94/25/EC as amended by Directive 2003/44/EC ER ER Name Standards Tech. File Location Applicable Standards 2.1 2.2 2.3 Craft Identification Number Builder’s Plate Protection from falling overboard and means of reboarding Owner’s manual Structure Stability and freeboard Buoyancy and floatation Openings in hull, deck and superstructure Flooding Manufacturers max. recommended load Anchoring, mooring, towing Yes Yes Yes RS Sailing RS Sailing RS Sailing EN ISO 10087:2006 EN ISO 14945:2004 EN ISO 15085:2003 Yes Yes Yes Yes Yes Yes Yes Yes RS Sailing RS Sailing RS Sailing RS Sailing RS Sailing RS Sailing RS Sailing RS Sailing EN ISO 10240: 2004 See Technical File EN ISO 12217 EN ISO 12217 EN ISO 12216:2002 EN ISO 15083:2003 EN ISO 14946:2001 EN ISO 15084:2003 Annex 1C – Noise emissions Refer to engine manufacturers ‘declaration of conformity’ 2.5 3.1 3.2 3.3 3.4 3.5 3.6 3.9 Page 21 Appendix Anhang Appendice Apéndice A Basic Rigging Guide for Single Handed Dinghies Ensure the boat is head to wind. Attach the main halyard to head of mainsail. Attach the clew outhaul to mainsail. Hoist the mainsail (step mast if using a sleeved sail) and store the halyard in the halyard bag. Attach the boom to the gooseneck. Attach the cunningham. Attach the rudder stock/rudder/tiller assembly, ensuring the retaining clip has located. Ensure all hatches and bungs are closed prior to launch. A Basic Rigging Guide for Double Handed Dinghies Ensure the boat is head to wind. Attach the spinnaker halyard, downhaul and tack line to the spinnaker. Pull the spinnaker into the chute and attach the spinnaker sheets. Attach the jib halyard to the head of the jib. Attach the jib sheets and lead them through the jib cleats. Hoist the jib and apply rig tension. Store the jib halyard in the halyard bag. Attach the main halyard to the head of the mainsail. Attach the clew outhaul to the mainsail. Hoist the mainsail and store the main halyard in the halyard bag. Attach the boom to the gooseneck. Attach the cunningham. Attach the rudder stock/rudder/tiller assembly, ensuring the retaining clip has located. Ensure all hatches & bungs are closed prior to launch. A Basic Rigging Guide for Keel boats Ensure the boat is head to wind. Attach the spinnaker halyard and downhaul to the spinnaker. Pull the spinnaker into the chute and attach the spinnaker sheets, ensuring they lead through the barber haulers. Attach the spinnaker pole to the boom. Apply rig tension. Attach the jib halyard to the head of the jib. Attach the jib sheets and lead them through jib cleats. Hoist the jib and store the halyard in the halyard bag. Attach the boom to the gooseneck. Attach the main halyard to the head of the mainsail. Attach the clew outhaul to the mainsail. Hoist the mainsail and store the halyard in the halyard bag. Attach the cunningham. Ensure all bilges are empty. Ensure all hatches are closed. Please note: A comprehensive commissioning and rigging guide for each individual class can be found on our website - www.RSsailing.com Page 22 Français Notions de base pour gréer un dériveur solitaire Assurez-vous que le bateau est face au vent Fixer la drisse principale sur le point de drisse de grand-voile Attacher le point d'écoute de la grand-voile Hisser la grand-voile ( en utilisant le guide) et ranger l'écoute dans le sac prévu à cet effet Fixer la bôme sur le vit de mulet Attacher le cunningham Fixez l'ensemble gouvernail / barre de gouvernail, en faisant attention de bien passer le clip de retenue S'assurer que tous les bouchons ou trappes sont fermés avant de mettre à l'eau Notions de base pour gréer un dériveur en double Assurez-vous que le bateau est face au vent Attacher la drisse, le point d'amure et passer le bout de l'avaleur dans les patchs du spinnaker, Rentrer le spinnaker dans l'avaleur et fixer les écoutes Attacher la drisse de foc sur le point de drisse du foc Attacher les écoutes de foc en les faisant passer à travers les taquets de foc Hisser le foc jusqu'à avoir la bonne tension de haubans Ranger la drisse de foc dans son sac Fixer la drisse de grand-voile sur le point de drisse de grand-voile Attacher le point d'écoute de la grand-voile Hisser la grand-voile ( en utilisant le guide) et ranger l'écoute dans le sac prévu à cet effet Fixer la bôme sur le vit de mulet Attacher le cunningham Fixer l'ensemble gouvernail / barre de gouvernail, en faisant attention de bien passer le clip de retenue S'assurer que tous les bouchons ou trappes sont fermés avant de mettre à l'eau Notions de base pour gréer un quillard Assurez-vous que le bateau est face au vent Attacher la drisse et le point d'amure du spinnaker, Rentrer le spinnaker dans l'avaleur et attacher les écoutes, en s'assurant qu'elles passent dans les barbers Fixer le tangon sur le mât Régler la tension des haubans Attacher la drisse de foc sur le point de drisse du foc Attacher les écoutes de foc en les faisant passer à travers les taquets de foc Hisser le foc et ranger la drisse de foc dans son sac Fixer la drisse principale sur le point de drisse de la grand-voile Attacher le point d'écoute de la grand-voile Hisser la grand-voile (en utilisant le guide) et ranger l'écoute dans le sac prévu à cet effet Fixer la bôme sur le vit de mulet Attacher le cunningham S'assurer que toutes les cales sont vides. S'assurer que toutes les trappes sont fermées. Veuillez noter: un service complet et guide de gréement pour chaque classe peuvent être trouvées sur notre site Web - www.RSsailing.com Page 23 Deutsch Kurzanleitung zum Aufriggen (Einhandboote) Stellen Sie den Bug in den Wind Verbinden Sie das Ende des Grossfalls mit dem Kopf des Grosssegels. Verbinden Sie den Unterliekstrecker mit dem Horn des Grossseegels Ziehen Sie das Grossegel hoch (oder stellen Sie den Mast, falls Sie ein Masttaschensegel haben). Das Grossfall stecken Sie in die Fallentasche (falls vorhanden) Verbinden Sie den Baum mit dem Mast (am Lümmelbeschlag). Verbinden Sie den Vorliekstrecker mit dem Segel. Hängen Sie die Ruderanlage in die Ruderbeschläge ein und vergewissern Sie sich, dass sie gesichert ist. Vergewissern Sie sich, dass alle Inspektionsdeckel und Lenzstopfen geschlossen sind. Kurzanleitung zum Aufriggen (Zweihandboote) Stellen Sie den Bug in den Wind Schlagen Sie den Gennaker an. Ziehen Sie den Gennaker in die Gennakertrompete. Verbinden Sie Fockfall und Fock. Bringen Sie die Fockschoten an und führen Sie sie in die Schotklemmen. Setzen Sie die Fock und sorgen Sie für Riggspannung. Verstauen Sie die Fockschot in der Fallentasche. Verbinden Sie das Ende des Grossfalls mit dem Kopf des Grosssegels. Verbinden Sie den Unterliekstrecker mit dem Horn des Grossseegels Ziehen Sie das Grossegel hoch (oder stellen Sie den Mast, falls Sie ein Masttaschensegel haben). Das Grossfall stecken Sie in die Fallentasche (falls vorhanden) Verbinden Sie den Baum mit dem Mast (am Lümmelbeschlag). Verbinden Sie den Vorliekstrecker mit dem Segel. Hängen Sie die Ruderanlage in die Ruderbeschläge ein und vergewissern Sie sich, dass sie gesichert ist. Vergewissern Sie sich, dass alle Inspektionsdeckel und Lenzstopfen geschlossen sind. Kurzanleitung zum Aufriggen (Kielboote) Legen Sie das Boot mit dem Bug in den Wind. Schlagen Sie den Spinnaker an und ziehen sie ihn in die Spi-Trompete. Stecken die den Spinnakerbaum in die Aufnahmen am Grossbaum. Sorgen Sie für Riggspannung. Verbinden Sie Fockfall und Fock. Bringen Sie die Fockschoten an und führen Sie sie in die Schotklemmen. Setzen Sie die Fock und sorgen Sie für Riggspannung. Verstauen Sie die Fockschot in der Fallentasche. Verbinden Sie den Baum mit dem Mast (am Lümmelbeschlag). Verbinden Sie das Ende des Grossfalls mit dem Kopf des Grosssegels. Verbinden Sie den Unterliekstrecker mit dem Horn des Grossseegels Ziehen Sie das Grossegel hoch (oder stellen Sie den Mast, falls Sie ein Masttaschensegel haben). Das Grossfall stecken Sie in die Fallentasche (falls vorhanden) Verbinden Sie den Baum mit dem Mast (am Lümmelbeschlag). Verbinden Sie den Vorliekstrecker mit dem Segel. Hängen Sie die Ruderanlage in die Ruderbeschläge ein und vergewissern Sie sich, dass sie gesichert ist. Vergewissern Sie sich, dass die Bilge leer ist und alle Inspektionsdeckel geschlossen sind. Hinweis: Eine einfache Anleitung zum Aufriggen finden Sie auch unter - www.RSsailing.com Page 24 Italiano Guida di base per armare una deriva di tipo ‘singolo’ Assicurarsi che la barca sia prua al vento Fissare la drizza alla testa della randa Legare la base della randa al tesabase Issare la randa (oppure issare l’albero in caso di randa ‘a calza’) e riporre la drizza nella sua tasca Fissare la trozza del boma al suo supporto Legare il cunningham Montare il timone ed agganciarlo alla barca sincerandosi che il meccanismo di sicura sia in posizione Verificare che tutti i tappi siano chiusi prima di varare la barca! Guida di base per armare una deriva tipo ‘doppio’ Assicurarsi che la barca sia prua al vento Armare il gennaker/spinnaker fissando drizza, eventuale retriever e cima della mura Introdurre il gennaker/spinnaker nella sua calza e legare le scotte Fissare la drizza fiocco sulla testa del fiocco Legare le scotte fiocco e passarle attraverso i passascotte e gli strozzatori appositi Issare il fiocco applicando la corretta tensione all’albero Riporre la drizza fiocco nell’apposita sacca Fissare la drizza alla testa della randa Legare la base della randa al tesabase Issare la randa e riporre la drizza nella sua tasca Fissare la trozza del boma al suo supporto Legare il cunningham Montare il timone ed agganciarlo alla barca sincerandosi che il meccanismo di sicura sia in posizione Verificare che tutti i tappi siano chiusi prima di varare la barca! Guida di base per armare una barca a chiglia Assicurarsi che la barca sia prua al vento Armare lo spinnaker fissando drizza e retriever Recuperare lo spinnaker nella sua calza e legare le scotte passandole nei barber Attaccare il tangone sul boma Applicare la corretta tensione all’albero Fissare la drizza fiocco sulla testa del fiocco Legare le scotte fiocco e passarle attraverso i passascotte e gli strozzatori appositi Issare il fiocco e riporre la sua drizza nell’apposita sacca Fissare la trozza del boma al suo supporto Fissare la drizza alla testa della randa Legare la base della randa al tesabase Issare la randa e riporre la drizza nella sua tasca Legare il cunningham Verificare che le sentine siano asciutte Verificare che i tappi siano chiusi Una guida esaustiva per ogni singola classe può essere trovata sul nostro sito - www.RSsailing.com Page 25 Español Guía básica para aparejar un velero monoplaza Asegúrate de que el barco está proa al viento. Ata la driza al puño de driza de la mayor. Fija el puño de escota a la botavara. Iza la mayor (arbola el mástil si usas una vela enfundada) y aduja la driza en su bolsa. Conecta la botavara al pinzote. Pasa el cabo del Cunningham. Cuelga el timón asegurándote de que el clip de seguridad está bien colocado. Asegúrate de que todos los tambuchos y tapones están bien cerrados antes de poner el barco a flote. Guía básica para aparejar un velero doble. Asegúrate de que el barco está proa al viento. Ata la driza, la cargadera y el puño de amura del asimétrico. Ponle las escotas y mete el spi en la chupona. Fija el puño de amura y ata el puño de driza del foque a su driza. Ata las escotas a su puño y pásalas por los escoteros hasta las mordazas. Iza el foque y aplica tensión a la jarcia. Aduja la driza y métela en su bolsa. Ata la driza al puño de driza de la mayor. Fija el puño de escota a la botavara. Iza la mayor y aduja la driza en su bolsa. Conecta la botavara al pinzote. Pasa el cabo del Cunningham. Cuelga el timón asegurándote de que el clip de seguridad está bien colocado. Asegúrate de que todos los tambuchos y tapones están bien cerrados antes de poner el barco a flote. Guía básica para aparejar un velero quillado. Asegúrate de que el barco está proa al viento. Ata la driza, la cargadera y el puño de amura del asimétrico. Mete el spi en la chupona y ponle las escotas asegurándote de que pasan por los barbers. Coloca el tangón junto a la botavara. Aplica tensión a la jarcia. Fija el puño de amura y ata el puño de driza del foque a su driza. Ata las escotas a su puño y pásalas por los escoteros hasta las mordazas. Iza el foque y aduja la driza en su bolsa. Conecta la botavara al pinzote del mástil. Ata la driza de la mayor al puño de driza. Fija el puño de escota a la botavara. Iza la mayor y aduja la driza en su bolsa. Pasa el Cunningham. Asegúrate de que la sentina está seca. Asegúrate de que todos los tambuchos están bien cerrados. Recuerda que dispones deuna completa guía de aparejado y puesta a punto de cada modelo en nuestra web www.RSailing.com Page 26
Scarica