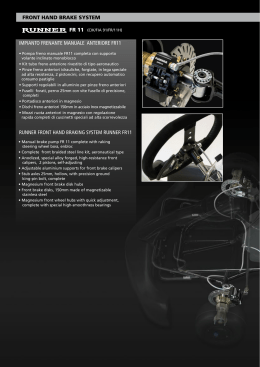
Manuale di Uso e Manutenzione
Installation & Service manual
Italiano Pagina 11-5
English Page 66-10
ITALIANO
Congratulazioni per aver scelto i freni FRM DBR. E’ necessario leggere questo manuale prima di usarli
Identificazione Freni
• Questo manuale riguarda il modello 2012 DBR XC Enduro dotati di bulloneria in acciaio per il fissaggio di pinze, dischi, pompe, e
tappo serbatoio, tubazioni con treccia in acciaio inox, pastiglie freno Sinterizzate e dischi in acciaio Air Rotor
Avvertenze e Norme di Sicurezza
• I freni FRM DBR devono essere istallati da un meccanico professionista che utilizzi la attrezzatura idonea. Ignorando questa
importante avvertenza, è necessario seguire scrupolosamente le istruzioni del manuale
• AVVERTENZA: Per il montaggio dei freni a disco è indispensabile l’utilizzo di una chiave dinamometrica
• Verificare con frequenza i serraggi delle viti delle pinze e dischi, come da dati riportati sul presente manuale.
• Telai e forcelle devono essere predisposti per freni a disco con supporti International Std. o Post-Mount. Non tentare di montare
impianti frenanti su forcelle e/o telai non predisposti, allestendo adattatori artigianali
• Prima di partire per una uscita in bici verificare su una superficie piana che ambedue i freni funzionino
• Azionando i freni, i dischi si riscaldano considerevolmente; non toccare i dischi appena scesi di sella
• In caso di bagnato la frenata tende a ridursi; calcolare il maggior spazio di frenata in caso di pioggia
• Verificare che la posizione della leva che attiva il freno anteriore sia dal lato dove si è abituati ad usarla. Invertire la posizione della
leva se la posizione non è quella giusta
• Lubrificando catena e cambio, specialmente se si utilizzano aerosol, proteggere i dischi con uno straccio od un pezzo di cartone, per
evitare contaminazioni. Non toccare i dischi freno con le mani unte
• Dischi o pastiglie unte limitano grandemente la qualità della frenata. Pulire con acqua e alcool, oppure detergenti specifici, quali il
Brake Cleaner Morgan-Blue/FRM, in caso di contaminazione. Non spruzzare i detergenti su pinze e pompe, perché le sostanza
chimiche presenti possono danneggiare le tenute in gomma. Smontare la ruota dalla bici per pulire i dischi.
• Se la bici rimane capovolta per un certo tempo, è possibile che bolle d’aria provenienti dal serbatoio della pompa risalgano lungo dal
tubo fino alla pinza. In tal caso pompare alcune volte sulle leve freno prima di iniziare una discesa. Se, nonostante questo, la corsa
alla leva fosse lunga, premerla per alcuni minuti per permettere all’aria di risalire nel serbatoio. Se il problema non dovesse risolversi,
fare riferimento alla sezione “Rabbocco del Fluido e Spurgo dell’Aria”
• Usare solo ricambi originali FRM. Per codici ricambi scaricare lo “Spare Part Manual” dalla home page di www.frmbike.biz
Rodaggio
Rodaggio IMPORTANTE !!
• Tutti i freni a disco hanno necessità di un periodo di rodaggio.
• A pastiglie nuove pedalare in pianura a 25-30km/h e frenare con ambedue i freni fino ad uno stop quasi totale. Ritornare alla velocità
iniziale e ripetere la procedura per una trentina di volte. Si affronta poi una discesa a velocità più elevata con alcune potenti frenate di
non più di 2-3 secondi, distanziate da periodi di raffreddamento di 5-6 secondi
Olio Idraulico
• Utilizzare solo oli DOT 5,1 o 4,0. Suggeriamo l’olio originale Motul DOT 5,1, ma in caso di bisogno, qualsiasi olio idraulico da freni in
queste gradazioni è compatibile. NON MESCOLARE OLI DOT 5,0 CON DOT 5,1: non sono compatibili tra di loro. NON USARE MAI
OLIO MINERALE: questo olio compromette le tenute e rende inutilizzabile il sistema frenante
• Utilizzare solo olio proveniente da contenitori appena aperti. I DOT assorbono l’umidità atmosferica. Confezioni aperte molte volte
contengono olio contaminato da acqua, che ad alta temperatura bolle formando bolle di gas (vapour-lock), con conseguente
allungamento della corsa della leva freno. Lasciare il tappo del contenitore aperto per il minor tempo possibile o non aprirlo in luoghi
umidi. Suggeriamo l’uso di confezioni monodose (60cc) di olio fornito dalla FRM.
• Indossare guanti protettivi in lattice e occhiali da lavoro
• Se l’olio dovesse venire a contatto con gli occhi sciacquare con acqua e rivolgersi ad un Pronto Soccorso
• Con inalazione prolungata uscire all’aperto e respirare aria fresca. Con nausea rivolgersi al Pronto Soccorso
•
Versare l’olio idraulico esausto nei contenitori disponibili da distributori, meccanici o centri raccolta differenziata
Lubrificante
• Per la lubrificazione delle guarnizioni in gomma di pinza e pompante utilizzare solo grasso siliconico per guarnizioni in EPDM.
Pastiglie Frenanti
• Le pastiglie freno sono del tipo compatibile Shimano XT-XTR (M06 e M07)
• Pastiglie fornite di serie con i freni DBR XC Enduro:
Sinterizzate (Metalliche): supporto in acciaio. Sono le pastiglie più aggressive e di lunga durata. Si suggerisce il loro montaggio in
condizioni di bagnato. Richiedono un periodo di rodaggio più lungo. Peso 22gr a coppia
• Pastiglie alternative e compatibili
Organiche: supporto in alluminio. Molto leggere: 8gr. Adatte per uso X-Country in condizioni di asciutto. Consumo piuttosto veloce
Semi-metalliche: supporto in acciaio. Frenata più pastosa e regolare. Consumo più veloce delle metalliche. Peso 18 gr a coppia
• Pastiglie e dischi NON sono garantiti contro la normale usura
-1-
Compatibilità
• Il sistema frenante è fornito preassemblato e pieno di fluido idraulico Motul Dot 5,1
• L’impianto frenante è fornito senza adattatori. Adattatori anteriori o posteriori vanno scelti in relazione al diametro disco
Diam. Disco
160mm
180mm
203mm
Forcella Post-Mount
X
Adattatore AU31
-
Posteriore Post-Mount
X
X
-
Posteriore Internat. Std
Adattatore AU02
Adattatore AU04
-
Attrezzi necessari
Kit Spurgo (Siringa con raccordo, confezione monodose olio DOT5,1, distanziale)
Chiavi Torx 25
Chiavi a brugola da 2,5 - 4 - 5mm
Cacciagomme in plastica
Chiave aperta da 7 - 8 - 10mm
Cacciavite a lama piccolo
Chiave Dinamometrica
Pinzettine a becchi
Raggiatura Ruote
• Non usare mai una raggiatura di tipo totalmente radiale su ruote per freni a disco. Raggiature in seconda od in terza sono preferibili. I
raggi in trazione dovrebbero sempre uscire dalla faccia esterna della flangia.
• Ruote già assemblate sono sempre preferibili a ruote costruite artigianalmente, in quanto le problematiche riferibili all’uso dei dischi
sono state analizzate e risolte dai costruttori
Installazione dischi
• I dischi Air-Rotor sono compatibili con tutti gli impianti frenanti. Installare i dischi con la faccia laserata verso l’esterno e
l’orientamento come da freccia
• Applicare frenafiletti medio sulle viti di fissaggio dei dischi. Avvitarle con chiave Torx 25
• Stringere progressivamente le sei viti in sequenza 1-3-5-2-4-6, finendo con una coppia di 5Nm. Controllate la planarità del disco,
facendo girare la ruota. Dopo un paio di uscite ricontrollare le coppie di serraggio
Scambiare le Pompe
• Le leve freno (pompe) sono montate di serie con il seguente schema:
Leva Destra – Freno Posteriore Leva Sinistra – Freno Anteriore
• Per scambiare la posizione delle leve freno è necessario svitare il raccordo (1) alla pompa con una chiave aperta da 8mm. Fare
attenzione alla rondella di tenuta (2) posta sotto il connettore
• Tenendo i tubi verticali, senza scuoterli per non versare olio, riconnetterli alla leva opposta
• Serrare leggermente il bullone di fissaggio con una chiave aperta da 8mm. Coppia di serraggio 7Nm
Installazione Pompe
• Infilare sul manubrio, comandi cambio, pompe e manopole (usare alcool per infilarle le manopole)
• Fissare il morsetto delle pompe nella posizione desiderata (generalmente a 40 - 45°) e quindi bloccare la vite di fissaggio con una
chiave a brugola da 4mm. Coppia di serraggio 3-4Nm
• Le pompe funzionano in qualsiasi posizione variabile tra l’orizzontale e la verticale. E’ necessario posizionarle orizzontali solo durante
lo spurgo (vedi Rabbocco del Fluido e Spurgo dell’Aria)
Installazione Pinze
• Prima di montare le pinze (1) controllate che ambedue i pistoni siano nella giusta
posizione di partenza. Se non lo fossero inserire al posto delle pastiglie uno
spessore da 10mm. Nel Kit Spurgo è compreso questo specifico distanziale
• Con una pinza a becchi sfilare la molla di sicurezza del perno dei pattini freno.
Svitarlo con un cacciavite a lama e sfilare i pattini dal corpo
• Tirare alcune volte le leve freno per portare i pistoni alla corretta distanza.
• Rimontare i pattini con il perno di fissaggio e la molla
• Se necessario, montare l’adattatore Post-Mount (2), assicurandosi che la freccia sia
rivolta verso l’alto. Vedi tabella nella precedente sezione “Compatibilità”
• Applicare frenafiletti medio sulle viti (3 e 4) degli adattatori (2) e delle pinze (1)
• Fissare le viti degli adattatori (3) serrandole a 8Nm
• Fissare le pinze (1) direttamente alla forcella o agli adattatori Post-Mount forcella e
telaio, a seconda dei casi, senza per ora serrare definitivamente le due viti di
fissaggio (4). Assicurarsi della presenza delle rondelle (5) sotto la testa delle viti di
fissaggio delle pinze (1)
• Per il fissaggio definitivo delle pinze riferirsi al paragrafo “Centratura dei Pattini”
-2-
5
4
1
3
4
3
2
Orientamento Tubazioni
• Orientare il tubo idraulico allentando appena (1/8 di giro) la vite di fissaggio del connettore
a Banjo (1) con una chiave da 8mm, serrandola poi a 5Nm dopo aver orientato al meglio
la tubazione
• Controllare che la lunghezza dei tubi idraulici sia sufficiente per la dimensione della forcella
e del telaio. Ruotare il manubrio completamente nelle due direzioni e schiacciare la forcella
per verificare che la tubazione non tiri sulle sue estremità e non venga schiacciata durante
la escursione della forcella Agire anche sulla sospensione posteriore, nel caso di una full,
sgonfiando completamente l’ammortizzatore. I tubi non devono mai tirare sulle loro
estremità di fissaggio, ne formare curve con un diametro di curvatura inferiore a 50mm.
Se troppo lunghi, li si può accorciare, come da successivo paragrafo
• Fissare la tubazione al telaio ed alla forcella per mezzo degli appositi passaggi o con
stringhe da elettricista
1
Accorciare le Tubazioni
• Il connettore della pompa è smontabile. Il connettore della pinza è pressato sul
tubo e quindi non smontabile
• Svitare il bullone (1) alla pompa con chiave aperta da 8mm
• Fare attenzione alla rondella di tenuta (2) posizionata sotto il bullone
• Con chiavi aperte da 8 e 10mm allentare il dado (3) e svitarlo completamente.
Tirare il tubo idraulico fino a che si separa dal suo connettore (1). Sfilare la ogiva
(4) usata. Mantenere il tubo in verticale per non perdere olio
• Posizionare il tubo per trovare la lunghezza giusta, ruotando il manubrio nelle due
1
direzioni.
2
• Tagliare il tubo a 90° con un taglierino ben affilato (non usare utensili seghettati).
Infilare una NUOVA ogiva (4) alla sua estremità. Due ogive nuove sono incluse nella confezione dei freni
• Forzare il tubo nel beccuccio del connettore fino in fondo ed accostare l’ogiva nella sua sede del connettore
• Ungere ogiva (4) e filetti del connettore (1) con il grasso siliconico
• Avvitare il dado di fissaggio (3) e serrare il connettore contro il dado con la chiavi da 8 e 10mm
• Inserire la rondella di tenuta (2) nel connettore (1) ed avvitarlo alla pompa, serrandolo a 7Nm
3
4
Centratura dei Pattini
• Montare le ruote infilando i dischi tra i pattini.
• Assestarle nei forcellini e serrare i rapidi
• Allentare le viti di fissaggio (1) in modo che la pinza (2)
possa spostarsi sul suo supporto
• Agire sulla leva freno (4) e, mentre la si tiene premuta,
serrare le viti di fissaggio delle pinze
• Rilasciare la leva freno e fare girare la ruota. Non dovrebbe
avvertirsi alcun contatto del disco sui pattini. In caso
contrario ripetere l’operazione alcune volte Serrare
definitivamente le viti di fissaggio a 8Nm. Dopo il primo
periodo di rodaggio è necessario ripetere questa facilissima
operazione per centrare nuovamente i pattini rispetto ai
dischi con tutto il sistema assestato ed i pattini rodati
3
1
4
2
Regolare le leve freno
• E’ possibile regolare la posizione della leva freno in modo da variarne
la distanza rispetto al manubrio
• Regolare la vite a pomello (1). Avvitandola, la leva (2) si avvicina al
manubrio
1
2
-3-
Sostituzione Pastiglie
• Quando le pastiglie sono consumate (non dovrebbe rimanere meno di 0,5mm di
materiale frenante), o unte oppure nel caso in cui la mollettina di ritorno interferisca
1
con il disco, sostituire le pastiglie freno
• Rimuovere la ruota dalla bici, sfilare la molla di sicurezza (1) dal perno di fissaggio (2)
3
delle pastiglie (3) e svitarlo con un cacciavite a lama
• Sfilare la coppia di pastiglie dalla pinza
• Posizionare le pompe in modo che il serbatoio dell’olio sia orizzontale
• Con un cacciagomme in plastica spingere i pistoni leggermente entro le loro sedi per
2
recuperare lo spazio per i pattini nuovi
• Con uno straccio imbevuto in alcool pulire i pistoni
• Inserire tra i due pistoni uno spessore da 10mm o l’apposito distanziale incluso nel Kit
Spurgo. Premere sulla leva freno per fare in modo che i due pistoni ne vengano a
contatto, quindi smontare il distanziale
• Installare una nuova coppia di pattini e fissarli con il proprio perno e mollettina di sicurezza
• A questo punto seguire le istruzioni riportate nel capitolo “Centratura dei Pattini”
• CONSIGLIABILE: Smontare il coperchio e la membrana del serbatoio dell’olio della pompa. Riempire la vaschetta con olio nuovo e
riposizionare la membrana. Raccogliere con uno straccio la piccola quantità di olio fuoriesce dal serbatoio. Richiudere il coperchio.
Rabbocco del Fluido e Spurgo dell’Aria
•
•
•
•
•
•
•
1
• Procurarsi il Kit Spurgo FRM
• Indossare guanti di lattice ed occhiali
• Sistemare la bici sul cavalletto di lavoro. Posizionare la
3
leva freno in modo tale che il serbatoio dell’olio sia
orizzontale al terreno
• Smontare le pastiglie freno per evitare che si
contaminino con l’olio, infilare tra i due pistoni
l’apposito spaziatore in plastica (3 Figura A) del Kit
Figura B
Spurgo e fissarlo con il perno di fissaggio (2 figura A)
• Riempire la siringa del Kit Spurgo di olio Motul DOT 5,1 aspirando da
un contenitore di olio nuovo. Tenere la siringa verticale ed espellere
l’aria
• Svitare con la chiave a brugola da 2,5mm le viti (1Figura C) del
coperchio serbatoio (2 Figura C) e togliere il coperchio e la membrana
in gomma sottostante. Ideale è infilare la leva in un sacchetto di
plastica in modo che olio che dovesse traboccare si raccolga nel
sacchetto
• Svitare Vite di Spurgo sulla pinza. Innestare il connettore siringa nel
foro della Vite Spurgo e immettere olio (Figura B). Mentre si
comprime, osservare l’olio crescere nella vaschetta pompa. Far
traboccare olio, insistendo in modo da essere sicuri che eventuali
bolle di aria contenute all’interno delle tubazioni abbiano modo di
fuoriuscire. Non immettere mai aria nel sistema idraulico
• Azionare diverse volte le leve freno per riempire le camere interne e
immettere altro olio dalla siringa per riempire fino all’orlo il serbatoio
Posizionare la membrana in gomma nella vaschetta del serbatoio, facendone fuoriuscire un poco di olio
Avvitare il coperchio (2 Figura C) e serrare le viti (1 Figura C)
Con un elastico tirare la leva freno bloccandola contro il manubrio (Figura C). In tal modo i fori di
passaggio tra impianto idraulico e serbatoio vengono chiusi, permettendo di spurgare l’aria
eventualmente rimasta intrappolata nella pinza.
Tenendo la siringa in verticale estrarre lentamente il pistone dalla siringa per creare una leggera
depressione nell’impianto. ATTENZIONE: una depressione troppo elevata potrebbe far aspirare aria dalla
tenuta del pistone, che è disegnato per lavorare sotto pressione e non in depressione, per cui usate
moderazione. Si vedranno bollicine di aria uscire dalla pinza e risalire l’olio nella siringa. Ripetere
diverse volte dando colpetti alle tubazioni ed alla pinza per rimuovere bollicine di aria ferme al loro
interno. La siringa diventa sempre più dura mentre l’aria viene aspirata.
Svitare il connettore siringa. Avvitare la Vite di Spurgo serrandola a 2Nm
Pulire accuratamente i residui di olio sulla pompa e sulla pinza con uno straccio
Premere la leva freno. Non si deve avvertire alcuna spugnosità. In tal caso ripetere l’operazione di fino a
-4-
Figura A
2
2
1
Figura C
che tuta l’aria sia stata estratta dall’impianto
• Smontare il distanziale in plastica e rimontare le pastiglie freno. Avvitare il perno di fissaggio, (2 Figura A) e bloccarlo con la sua clip
di sicurezza (1 Figura A)
• Azionare nuovamente le leve freno e controllare che non ci siano perdite di olio in nessun punto dell’impianto
Sostituzione Fluido Idraulico
• Quando il fluido idraulico scolorisce si consiglia di sostituirlo. La sostituzione va fatta almeno ogni 2 anni
• Svuotare completamente l’impianto. Posizionare la leva freno in modo che il serbatoio olio sia orizzontale, svitare le viti che fissano il
coperchio e togliere sia il coperchio che la membrana in gomma sottostante
• Smontare le pastiglie freno seguendo le istruzioni precedenti
• Svitare la Vite di Spurgo sulla pinza. Innestare il connettore del Kit di Spurgo nel foro della vite di spurgo ed aspirare con la siringa
tutto l’olio possibile, premendo con un cacciagomme in plastica sui pistoni della pinza in modo da espellere l’olio
• Svitare il connettore del kit spurgo e lasciare scolare l’olio, facendo in modo che il foro di uscita sia nel punto più basso. L’olio
idraulico è molto aggressivo per cui tamponare con uno straccio e pulire accuratamente tutte le parti eventualmente contaminate.
• Smaltire l’olio idraulico esausto nei contenitori disponibili da distributori, meccanici o centri raccolta differenziata
• Aspirare nella siringa olio Motul DOT 5,1 da una confezione nuova. Avvitare il connettore della siringa al foro della Vite di Spurgo sulla
pinza e premere il pistone della siringa per riempire il circuito idraulico fino a che l’olio non abbia riempito quasi completamente la
vaschetta della leva freno
• Seguire le istruzioni del capitolo “ Rabbocco del Fluido e spurgo dell’Aria”
Tabella Coppie Serraggio
Vite a Brugola M6x18 fissaggio pinza
Vite Spurgo Pinza
Bullone fissaggio Banjo tubazione su pinza
Viti brugola M5x10 fissaggio pompa
Viti brugola M4x10 fissaggio tappo serbatoio
Bullone raccordo tubazione su pompa
Viti M5x10 Torx 25 fissaggio dischi
Acciaio
Ergal
Acciaio
Acciaio
Acciaio
Acciaio
Acciaio
8Nm
2Nm
5Nm
4Nm
2Nm
5Nm
5nm
Garanzia
I prodotti FRM sono garantiti contro difetti di materiale e costruzione per un periodo di 2 anni dalla data di acquisto del primo utilizzatore, certificata
dallo scontrino fiscale del negozio. La garanzia decade nel caso in cui la manutenzione ordinaria o straordinaria consigliata in questo manuale non sia
stata eseguita
OBBLIGHI: in caso di vizio, FRM si impegna ad effettuare la sostituzione o la riparazione, a sua discrezione dell’elemento riconosciuto difettoso. Per essere
accettato, il difetto deve essere comunicato dal legittimo proprietario al negoziante dove il prodotto è stato acquistato e da quest’ultimo, dopo averlo
verificato, alla FRM Nel caso in cui la FRM non riconosca l’esistenza del difetto o stabilisca che questo è dovuto ad una delle cause riportate nel seguente
paragrafo, la sostituzione non è dovuta ed il componente viene restituito a spese del destinatario. LIMITI: la garanzia non copre i danni risultanti da trasporto,
giacenza, incidenti, negligenze, colpi o cadute, mancato rispetto delle informazioni del libretto istruzioni, montaggio errato o con prodotti non compatibili,
cattiva manutenzione, usura normale, modifiche o alterazioni del prodotto. La Garanzia non copre le parti soggette a normale usura (cuscinetti, paraolio,
pattini freno, dischi, ecc.)
Via Mattei 18/a
48025 Riolo Terme (Ra)
ITALY
Tel +39 0546 70310 fax 74623
e- mail pubblico: [email protected]
Ordini Italia: [email protected]
e-commerce dalla home page di:
www.frmbike.biz
-5-
ENGLISH
Thank you for purchasing the DBR brake system. Please read this manual before riding your bike
Brake Identification
Identification
• This manual describes the 2012 DBR XC Enduro model, fitted with steel hardware to attach calipers and rotors, pumps and reservoir
cap, hydraulic hose braided in stainless steel wire, sinterised pads and steel Air Rotors
Safety Instructions
• Service of these brakes should be performed by qualified professional mechanics who utilise the correct tools and know how this
product works. Ignoring this important safety warning FRM nor its Distributors are responsible for any possible damage
• Verify the correct torque of all fasteners with frequency. Torque ratings are supplied with this manual.
• Frame and fork must be suitable for disc brake system. Post-Mount adapters must be compatible with the correct fork brake system
and rotor diameter. Never modify adapters in order to adapt this brake system to frames, forks or wheel not built for this purpose.
• Before each ride check the brakes for proper functioning, the brake pads for wear and the hoses for fluid leak.
• Disc rotors get very hot when used, never touch calipers or rotors immediately after use.
• In case of wet weather the braking performance of all brake systems is vastly reduced. Moderate your speed.
• Check to ensure that the front brake is on the side of the handlebar you are accustomed to having it on. If the lever is on the other
side, sudden braking can cause you serious injury. Have a professional mechanic swap the lever position if incorrect.
• Protect the disc rotors with a clean rag or a piece of cardboard when oiling chain and drive train with aerosol lubes to avoid
contaminations. Do not touch the disc rotors with greasy hands.
• The braking performance is severely limited by rotors or pads contaminated with oil or grease. Clean with water, isopropyl alcohol or
brake detergents such as Morgan Blue/FRM Brake Cleaner. Do not spray brake detergents directly on calipers or pumps as their
chemical agents can damage the rubber seals. Disassemble the wheel from the bike to clean the disc rotors
• If, by any chance, the bike should be left, for a relatively long time, upside-down, air bubbles coming from the reservoir might travel
along the hydraulic hose up to the brake calipers. In this case 4-5 applications of the brakes are advisable before riding the bike. If
the brake lever still feels spongy, keep it applied for a few minutes giving the air time to travel back along the hose to the pump
reservoir. If the problem persists, refer to the “Bleeding” section of this manual.
• Use original FRM spare parts only. Select them from the “Spare Part Manual” downloaded from the home page of www.frmbike.biz
Break In Period IMPORTANT !!
• All disc brakes need bedding in before they reach the maximum performance.
• This requires at least 30-40 applications of the brakes at a speed of 25-30km/h to an almost complete stop. After this procedure the
break in period can be completed with short (2-3 seconds) brakes on a downhill road, followed by cooling periods of 5-6 seconds
Hydraulic Oil
• Use DOT 5,1 or 4,0 only. We suggest the use of the approved Motul DOT 5,1 oil, but hydraulic oils of the same grade, made by
different manufacturers are compatible. NEVER MIX DOT5,0 AND 5,1 OILS: they are not compatible. NEVER USE MINERAL OILS
WITH THIS BRAKE SYSTEM: mineral oil is not compatible with this seals and will compromise functioning of the system.
• Never use oil which has been bled out of the system. Old oils coming from opened bottles contain water absorbed from the air. At
the high temperatures reached by the calipers, moisture may boil and form air bubbles (vapour-lock) causing the brake lever to feel
spongy. Open the oil bottle for the least possible time. Avoid humid places. Use mono-dose bottles (60cc) as supplied by FRM
• All possible oil leakages from hoses or pump reservoirs must be repaired immediately. An oil leak can cause serious accidents
• Always wear suitable gloves and protective goggles when using brake fluids
• If brake fluid comes in contact with the skin, wash immediately with warm water and soap
• If the product comes in contact with the eyes, call a doctor immediately
•
Always dispose of the used oil in the appropriate containers that can be found at petrol stations, mechanical workshops etc.
Seals Lubrication
• Use silicon grease for EDPM seals (all rubber type seals that can be found on our brake systems).
• Use of an inappropriate type of grease may compromise the integrity of the seals and damage the system.
Brake Pads
• Brake pads are Shimano XT-XTR (M06 and M07) compatible.
• FRM pads can be selected from three current designs:
Organic pads with light alloy backing. Good for X-Country in dry conditions. These pads wear out quite fast, but are hyper light.
Weight 8gr per pair. Original equipment on DBR XC Team brakes
Sinterised (Metallic) pads with steel backing. More aggressive and longer lasting. Suggested with wet weather. They require a
longer break in period. Weight 22g. per pair. Original equipment of DBR XC Enduro brakes
Semi-metallic pads with steel backing. More uniform and progressive braking effect. They wear out faster than sintered pads.
Weight 18g. per pair
• Brake pads and rotors are not warranted against wear.
-6-
Compatibility
• This disc brake system is supplied fully assembled and bled, i.e. containing DOT 5,1 brake fluid.
• This brake system is supplied without adaptors. They must be chosen between three different designs supplied by FRM
Rotor Dia.
160mm
180mm
203mm
Fork - Post-Mount
X
Adaptor AU31
-
Frame - Post-Mount
X
X
-
Frame - Internat. Std
Adaptor AU02
Adaptor AU04
-
Tools
Bleed Kit (Syringe with adapter, plastic pad spacer, 60ml of DOT5,1 oil)
Torx 25 and Torx 15 keys
Allen keys: 2,5 - 4 - 5mm
Plastic tyre lever
Open wrench 7- 8 -10mm
Small screwdriver
Dynamometric wrench
Beak pliers
Wheel Spoking
• Never use wheels with radial lacing on both sides with disc brakes. 2 Cross or 3 Cross lacing with traction spokes facing outboard.
• Assembled wheels are always preferable to wheels built by unskilled wheel builders as the various problems due to the use of disc
brake systems have been analysed and addressed by the wheel manufactures
Disc Rotor Installation
• Our Air-Rotors are compatible with most disc systems from other manufacturers. Install these rotors with the laser etched side
facing outboard and the orientation as per the arrow.
• Use one drop medium thread-lock compound on the fixing bolts and tighten the bolts with a Torx 25 key.
• Progressively tighten with the following sequence: 1-3-5-2-4-6. End to a torque of 5Nm. Check for the rotor planarity by spinning the
wheel. After a few rides check for the correct torque of the bolts.
Brake Lever Exchange
• Brake levers (pumps) are supplied as follows:
Right Pump – Rear Caliper
Left Pump – Front Caliper
• In case you prefer to switch the brake lever position, unscrew the hose connectors with an 8mm open wrench. Pay attention to the
copper washer (2) underneath the connecting bolt.
• While keeping the hose vertical as it contains fluid and will leak out if it swings freely, screw the connector to the opposite pump.
• Tighten the hose connecting bolt (1) to a torque of 7Nm.
Brake Lever (Pump) Installation
Installation
•
•
•
Slide shifters, pumps and grips onto the handlebar.
Attach the lever assembly to the handlebar in the desired position and angle, tighten the fixing bolt to a torque of 4Nm with an Allen
key of 4mm
Pumps work at any angle from horizontal to 45°. The pump need only be horizontal when bleeding the system (see “Bleeding
Procedure” section).
Caliper Installation
• Before attaching the calipers to the fork or frame, ensure that the brake pads are at the
correct distance from one another. A 10mm thick spacer helps to set the pistons to the
correct distance (included in The Bleed Kit)
• With the aid of small beak pliers remove the tiny spring from the pin that keeps the
brake pads in position. Unscrew the pin with a small screwdriver. Slide the brake pads
out of the caliper body.
• Install the 10mm thick plastic spacer in place of the pads and pull the brake lever
several times to set the pistons against the spacer.
• Reinstall the brake pads with their fixing pin and spring.
• If necessary, install the Post-Mount adapter (2), ensuring that its’ arrow follows the
disc rotation. Consult the chart in the previous paragraph “Compatibility”.
• Apply one drop of Medium Threadlock Compound on the fixing bolts (3 and / or 4).
• Attach the calipers (1) directly to the fork or to their adaptors (depending on the fork
disc mount type), as well as to the frame, without tightening their fixing bolts (4). Be
sure that the steel washer (5) is seated underneath the bolt head.
• Positioning of the calipers will be explained in the paragraph “Centring the Caliper”
-7-
5
4
1
3
4
3
2
Rerouting the Hose
• The banjo connector can be rotated to achieve better hose routing. Loosen the banjo bolt (1)
1/8 of a turn with an 8mm open wrench and, whilst holding the hose connector in preferred
position, re-tighten the bolt to a torque of 7Nm.
• Check that both hoses are long enough for the length of the fork and the frame size. The
hoses need to be attached to the fork and frame in such a way that no interference with the
free flow of fluid through the hose may occur. The hose should not bend in curves any
smaller than 50mm diameter. Check to make sure that the handlebar turns freely and that the
hose does not interfere with any moving parts in the front and rear (if present) suspensions
when compressed. An incorrectly mounted hose or a hose that comes into contact with
moving parts can interfere with the braking performance and cause serious accidents. In
case the hose is too long proceed as indicated in the following paragraph “Shortening the
Hose”
• Attach the hose to the fork or frame through the specific fittings or electric strips.
1
Shortening The Hose
• The hose connector at the pump dismountable. The banjo connector at the caliper
3
is pressed and cannot be separated from the hose.
• Loosen the pump connecting bolt (1) with an 8mm open wrench.
• Pay attention to the copper washer underneath the connecting bolt.
• With the aid of 8mm and 10mm open wrenches loosen and unscrew the
compression nut (3). Pull the hydraulic hose away from the connecting bolt (1).
4
Slide the compression bushing (4) off of the hose. Keep the hose vertical as it
contains fluid and will leak out if you allow it to swing freely.
1
• Identify the part of the hose to be cut away, whilst turning the handlebar to both
2
positions to check length.
• Cut the hose at 90° with a sharp cutter (never use knives with serrated blades).
• Slide a brand NEW compression bushing (4) onto the hose (two spares are included with the brake system).
• Push the hose onto the protruding needle of the connecting bolt (1) until it touches it’s inner wall. Slide the compression bushing (4)
along the hose until it rests against the connecting bolt (1).
• Lubricate the compression bushing (4) and the thread of the connecting bolt (1) with silicon grease
• Screw the compression nut (3) onto the connecting bolt (1) and tighten them to compress the bushing (4)
• Screw the connecting bolt (1) to the pump body making sure that the copper washer is set between them
• Tighten at a torque of 7Nm
Centring the Caliper
• Install the wheels with disc rotors on the bike. Check for the
perfect setting of the hub axle on the fork/frame dropouts
and tighten the quick release lever
• Loosen the caliper fixing bolts (1) so that the caliper body
(2) can move and auto align with the disc rotor
• Pull the brake lever and, keeping it pressed, tighten the fixing
bolts (1)
• Release the pressure from the brake lever and turn the
wheel. It should turn freely and the rotor should not come
into contact with the brake pads. If it does not turn freely,
repeat the procedure a second time
• Tighten the bolts to a torque of 8Nm. After the break in
period, repeat this easy procedure in order to better centre
the disc rotors on the well bedded pads
3
1
4
2
Finger Reach
• The lever position can be adjusted in order to set its’ distance from
the handlebar
• Adjust the position of the lever (2) using the adjustment screw (1).
Turning clockwise brings the lever closer to the handlebar
-8-
1
2
Changing the Brake Pads
• When brake pads are worn out (no less than 0,5mm of brake compound should ever
be present on the pad backing), contaminated with oil or when the pad spring comes
1
in contact with the rotors, replace the brake pads
• Remove the wheel from the bike, remove the retaining spring (1) of the pad pin and
3
unscrew the pad pin (2) with a small screwdriver
• Remove the brake pads (3) from the caliper body
• Loosen the brake lever and position it horizontally
• With a plastic tyre lever or a screwdriver push the pistons back
2
• Clean the pistons inside the caliper with a rag soaked in spirit
• Insert a 10mm spacer between the pistons (this spacer is included in the Bleed Kit.
See Figure A, Nr 3). Pull the brake levers several times to move the pistons in contact
with the spacer
• Insert the NEW pads, and fix them with the fixing pin (2) and its retaining spring
• Follow the instructions of paragraph “Centring the Caliper”
• RECOMMENDED: Remove the cap of the pump and the rubber diaphragm. Fill the pump reservoir with fresh oil (DOT5,1), reinstall
the diaphragm (fluid will overflow) and the cap. Tighten fixing bolts to 2Nm
Bleeding Procedure
1
Purchase the FRM Bleed Kit
Wear gloves and protective goggles
Remove the wheels
3
Position the brake levers horizontally
Remove the brake pads as they risk being
contaminated by hydraulic oil, insert in their place the
plastic spacer (Figure A, Nr 3) included with the Bleed
Kit and fix it with the Pad Pin ( Figure A, Nr 2)
Figure B
• Fill the Bleed Kit syringe with fresh Motul DOT 5,1 oil.
Keep the syringe vertical and push out the air bubbles
• Unscrew the reservoir cap bolts (Figure C, Nr 2) with 2,5mm Allen key,
remove the cap (Figure C, Nr 1) and the rubber diaphragm. It is
advisable to put the brake lever into a plastic bag so that the hydraulic
fluid which might overflow does not drip onto the floor.
• Unscrew the bleed bolt from the caliper. Screw the syringe into its’ hole.
Pump oil into the system through the syringe (Figure B). Whilst pumping
into the system observe the fluid as it fills the pump reservoir. Overflow
the brake fluid until no more air bubbles appear in the reservoir. Pay
attention to not pump air into the system through the syringe
• Pull the brake levers several times so that the brake fluid can fill up all
chambers of the master cylinder. Fill the reservoir with more fluid if
necessary
• Position the rubber diaphragm on the reservoir (fluid will overflow)
• Reinstall the reservoir cap (Figure C, Nr 2) on the pump. Tighten the
fixing bolts at 2Nm.
Use a rubber band to hold the brake lever (Figure C) pulled. In this case the oil ports between the brake
system and the reservoir are closed and air eventually trapped into the hydraulic system can be bled
Whilst keeping the syringe vertical, pull its plunger upward (Figure C) in order to create a depression and
suck out any air contained in the system. Repeat this operation 3-4 times, making sure that any air
present in the form of bubbles has been expelled from the caliper and collected in the syringe. Gently tap
the caliper body with the plastic handle of a screwdriver to force the air bubbles out. WARNING: The
master cylinder seal is devised to work when pressurised and not when depressurised, which means that
pulling the syringe plunger too hard might cause a blow-by. Do not over-pull
When all air bubbles are sucked into the syringe, push gently on the plunger to be sure that brake fluid has
replaced the air
Unscrew the syringe connector and reinstall the bleed bolt to a torque of 2Nm
Carefully clean the overflow of oil from the pump with a clean rag
Pull the brake lever a few time to check the system strength and the absence of air. Repeat the bleed
procedure if the lever feels spongy
Remove the plastic spacer and reassemble the brake pads. Fix them with the fixing pin (Figure A, Nr 2)
•
•
•
•
•
•
•
•
•
•
•
•
-9-
Figura A
2
2
1
Figure C
and its retaining spring (Figure A, Nr 1)
• Pull the brake lever and check for any oil leakage from the hydraulic system
ATTENTION: To make sure that the Bleeding Process has functioned correctly, the brake levers should be pulled very tightly and fixed
down with plastic ties. The bike should then be left with the levers like this in a vertical position overnight.
Change
Change of the Brake Fluid
• The brake fluid must be replaced when exhausted. It must be replaced every two years when used regularly or once a year when
used by racers with extensive bike use
• Clean the old oil from the hydraulic system:
Position the brake levers horizontally and remove both the cap and the rubber diaphragm
Remove the brake pads following the instructions in paragraph “Bleeding Procedure”
Unscrew the bleed bolt from the caliper and attach the syringe. Suck all oil from the hydraulic system pulling the syringe plunger,
whilst compressing the caliper pistons all the way into their bores, in order to expel all the fluid from the system
Unscrew the syringe connector and leave the fluid to drain freely. Brake fluid is quite aggressive, so clean all contaminated parts
with a clean rag
• Always dispose of the used oil in the appropriate containers that can be found at petrol stations, mechanical workshops etc. Don’t
disperse of in nature. Good bikers love nature!
• Follow the instructions in paragraph “Bleeding Procedure”
Bolt Torque Chart
Allen M6x20 – Caliper Fixing Bolt
Bleed Bolt
Banjo Bolt
Allen M5x10 – Pump Fixing Bolt
Allen M4x10 – Pump Cap Fixing Bolt
Hose Connector to the Pump
Torx 25 M5x10 – Rotor Fixing Bolt
Steel
Light Alloy
Steel
Steel
Steel
Steel
Steel
8 Nm
2 Nm
7Nm
5 Nm
2 Nm
5 Nm
5 Nm
Warranty
FRM products are guaranteed against any defects for a period of 2 years from the date of purchase by the first owner, registered in a dealer shop.
OBLIGATIONS: In case of defects, FRM pledge to replace or repair, at their discretion, the part recognised as defective. To be accepted, the rider compliant
must be communicated to FRM through the dealer/importer after his own control. If FRM after sales checking reveals that the damage is due to one of the
reasons mentioned in the following paragraph, the replacement is no longer accepted and the defective item is sent back to the plaintiff who supports the
shipping fees.
LIMITATIONS: The guarantee does not cover damage resulting from transportation, warehousing, accidents, negligence, impact or falls, non-compliance with
the information in the instruction manuals, assembly errors, assembly using non-compatible products, bad maintenance, modifications or alterations to the
product. The guarantee does not cover parts and components subject to normal wear and tear such as ball-bearings, bushings, seals, brake pads, disc rotors,
etc.
Via Mattei 18/a
48025 Riolo Terme (Ra)
ITALY
Phone +39 0546 70310 fax 74623
General e-mail : [email protected]
Foreign orders: [email protected]
e-commerce from the home page of www.frmbike.com
www.frmbike.biz
- 10 -
Scarica