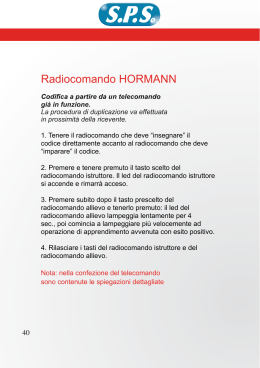
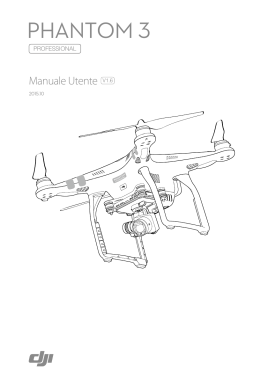
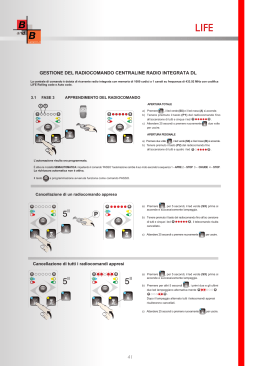
La ditta costruttrice declina ogni responsabilità per guasti e anomalie dell’antifurto e/o dell’impianto elettrico della Vostra autovettura dovuti ad una
non corretta installazione e/o al mancato rispetto delle caratteristiche tecniche indicate.
L’antifurto ha esclusivamente funzione dissuasiva contro eventuali furti.
The manufacturer is not liable for any kind of injury to person or damage
to property and/or electrical equipment of the vehicle due to incorrect
installation.
The system must only be considered a deterrent agaist theft.
MANUALE UTENTE BRIDGE
BRIDGE USER MANUAL
DELTA ELETTRONICA s.p.a.
via Astico 41 - 21100 VARESE - ITALY
www.cobra.it
06DE1426B 10/00
sgn1426A.p65
1
03/10/00, 18.45
Gentile cliente,
Nel ringraziarla per la scelta fatta la informiamo che questo prodotto è un sistema di antifurto tecnologicamente avanzato,
rispondente agli standards di prestazioni definiti dalle case automobilistiche e conforme alle direttive comunitarie.
A Lei, gentile utente, dopo l’installazione del sistema saranno stati consegnati i radiocomandi, la EMERGENCY KEY CARD
(contenente il suo PIN-CODE), le CHIAVI DI EMERGENZA (se previste) ed il manuale utente.
Il manuale è suddiviso in 6 parti:
Pagina 3 __________
4 __________
5 __________
6 __________
8 __________
9 __________
INTRODUZIONE
COMPLEMENTI DI PROTEZIONE
ISTRUZIONI IN BREVE
FUNZIONI AVANZATE
COSA FARE IN CASO DI EMERGENZA
MANUTENZIONE E RICERCA GUASTI
Legga il manuale con attenzione: trarrà la massima soddisfazione dal prodotto acquistato.
Le consigliamo inoltre di conservare questo manuale insieme ai documenti dell’auto per una più facile consultazione in caso di
necessità
Qualora si manifesti un problema non risolvibile con i suggerimenti della sezione 6 (pag.9/10), si rivolga direttamente al suo
installatore di fiducia.
sgn1426A.p65
2
03/10/00, 18.45
1 - INTRODUZIONE
NOTE
Questo sistema di allarme anti-intrusione è controllato da un radiocomando con codice ad alta sicurezza.
Questa tecnologia offre un elevatissimo grado di protezione contro ogni tentativo di riproduzione del codice.
Il radiocomando permette di azionare il sistema ad una distanza di 5 - 10 metri.
In alcune circostanze si può verificare una riduzione della portata a causa di interferenze generate da altre fonti (es. radioamatori che
operano nella stessa banda).
In caso di mancato funzionamento avvicinarsi il più possibile al veicolo. Se il radiocomando continua a non funzionare eseguire la
procedura di risincronizzazione (capitolo 6.2 pag. 9).
Se é prevista la chiusura dei vetri da radiocomando vi raccomandiamo di effettuare questa operazione restando vicini al veicolo in
modo tale che si verifichi in condizioni di sicurezza.
Il sistema è dotato della funzione
di autoapprendimento, che
permette di semplificare tutte le
operazioni di aggiunta o
sostituzione di radiocomandi solo
con il consenso dell'utente. La
procedura è descritta nel
manuale di installazione.
Art.
Sensore
volumetrico ad
ultrasuoni
Protezione
rottura vetri
Blocco
motore
Autoalimentato
Accensione luce
di cortesia
Protezione
perimetrica
7928
•
opzionale
multiplo
•
•
•
8188
•
opzionale
multiplo
•
•
•
8168
•
opzionale
singolo
•
•
•
8115
•
opzionale
singolo
no sirena
•
•
7918
•
opzionale
singolo
•
•
•
7913
•
opzionale
singolo
7908
•
opzionale
no blocco
•
•
7903
•
opzionale
no blocco
•
•
•
1.1 - CODICE PERSONALE PIN
Ogni allarme Bridge ha un PIN-CODE che può essere utilizzato per il disinserimento di emergenza, per questo motivo le suggeriamo
di tenerlo sempre con sè. Nel caso il vostro sistema sia dotato di chiavi elettroniche il disinserimento di emergenza non richiede
l’immissione del codice PIN, che è sempre necessario per programmare nuovi radiocomandi o nuove chiavi elettroniche. Il PINCODE è riportato sulla EMERGENCY KEY CARD fornita nella confezione.
Senza il PIN-CODE ed almeno una chiave di emergenza (se già abbinata al sistema) non sarà possibile aggiungere o sostituire
radiocomandi al prodotto.
22
3
BRIDGE
sgn1426A.p65
3
BRIDGE
1 - INTRODUZIONE
03/10/00, 18.45
NOTE
2 - COMPLEMENTI DI PROTEZIONE
L’antifurto da Lei acquistato può essere completato, per aumentare il livello di protezione alla sua vettura, dai seguenti moduli:
5452 Modulo antisollevamento
Ad antifurto inserito, attraverso un sensore speciale, l’antisollevamento protegge il veicolo dai tentativi di traino e sollevamento e di
conseguenza dai furti di accessori di valore come ad esempio i cerchi in lega ed i pneumatici.
5462 Modulo iperfrequenza
Ad antifurto inserito, tramite l’emissione di raggi a iperfrequenza, il modulo, posizionato e nascosto all’interno dell’auto, assicura la
protezione volumetrica dell’abitacolo.
Particolarmente indicato per vetture cabriolet e spider, mantiene inalterato il livello di protezione nel caso si lascino i vetri o il tettuccio
aperti.
2980 Modulo alzavetri
All’inserimento dell’antifurto i vetri elettrici della Vostra vettura si chiuderanno automaticamente. È adatto a qualsiasi tipo di auto con
vetri elettrici.
Kit chiavi elettroniche con pannello
Chiavi elettroniche supplementari per l’inserimento / disinserimento dell’antifurto. Prive di batteria, funzionano per contatto.
Svolgono la funzione di emergenza con grande facilità di uso.
4
21
2 - COMPLEMENTI DI PROTEZIONE
sgn1426A.p65
4
BRIDGE
BRIDGE
03/10/00, 18.45
If both radio controls are lost you will still be able to proceed with
emergency deactivation.
Please refer to the emergency procedure chapter (see page 18).
6.4 - LOSS OF THE PERSONAL CODE (PIN)
As the personal code combined to the electronic emergency
key represent the only possible access to the system they should
not be left in the unattended vehicle. If lost please contact your
dealer.
3.2 - PROTEZIONE
6.5 - TROUBLE SHOOTING
Radio control will not arm/disarm the system
Solution A:
Solution B:
Solution C:
Radio control battery may be flat.
(chapter 6.1 page 19).
Radio control may have lost
synchronisation with the unit. (chapter 6.1
page 19).
Perform the emergency procedure to
disarm the system (page 18) and then
contact your dealer.
Alarm has triggered for no apparent reason
Solution A:
Solution B:
If the alarm has been triggered in your
absence a ‘status history’ will be displayed
by the LED warning light (chapter 4.5 page
17).
If showing ultrasonic or hyperfrequency
triggering please check that all windows,
sunroof and air vents are closed and ensure
that there are no loose moving objects left
in the vehicle if the problem persist contact
your dealer.
If showing direct contact trigger (doors, boot
and bonnet) one of the switches may
require adjustment. Contact your dealer.
mod. 7777
B
FUNZIONI RADIOCOMANDO
mod. 7779
A
Tasto A
Inserimento
•
Disinserimento
•
Interruzione allarme
•
Tasto B
3.3 - INTERRUZIONE DI UN ALLARME IN CORSO
•
Allarme panico
•
Disattivazione sensore
volumetrico ultrasuoni
•
Disattivazione modulo iperfrequenza
o antisollevamento (solo 8100)
•
Quando il sistema é in allarme é possibile disattivare la sirena
ed il lampeggio delle frecce premendo una volta uno dei due
tasti del radiocomando.
Questa operazione interrompe il ciclo di allarme, ma il sistema
rimane nello stato di inserito. Per disinserire completamente il
sistema occorre premere una seconda volta il tasto 'A' del
radiocomando.
3.1 - INSERIMENTO
3.4 - DISINSERIMENTO
• Premendo il tasto 'A' del radiocomando si bloccano le porte
(se il veicolo è dotato di chiusura centralizzata).
• Gli indicatori di direzione lampeggiano due volte. *
• Il buzzer emette due segnali acustici (se attivato). *
• Le protezioni diventeranno attive trascorsi 40 secondi
• Il LED lampeggia.
* Un numero maggiore di lampeggi degli indicatori di direzione
abbinati a segnali acustici indicano un’ anomalia nel sistema.
E’ necessario verificare al disinserimento attraverso le
segnalazioni del LED quale è la causa dell’anomalia occorsa
(riferitevi al capitolo 4.5 pag. 7)
• Premendo il tasto 'A' del radiocomando si sbloccano le porte.
• Gli indicatori di direzione lampeggiano una volta.
• Il buzzer emette un segnale acustico (se attivato).
• Le protezioni si disattivano immediatamente.
• Il LED si spegne.
Nota: Se è avvenuto un allarme, il buzzer e gli indicatori di
direzione daranno 4 segnali, anzichè 1 (riferitevi al
capitolo 4.5 - pag. 7).
20
5
6 - MAINTENANCE AND TROUBLE SHOOTING
sgn1426A.p65
B
A
Con il sistema inserito l'apertura del cofano, del bagagliaio o di
una delle porte genera un ciclo di allarme acustico e visivo di
30 secondi circa. Per i prodotti che prevedono il sensore
volumetrico (ultrasuoni e/o iperfrequenza) verrà originato
l’allarme a seguito di intrusione nell'abitacolo.
A fine ciclo il sistema resta attivo.
A sistema attivato non è possibile effettuare l’avviamento del
motore (versioni con blocco motore).
5
BRIDGE 8100
BRIDGE
3 - ISTRUZIONI IN BREVE
03/10/00, 18.45
ISTRUZIONI IN BREVE
6.3 - IF BOTH RADIO CONTROLS ARE LOST
3.5 - ACCENSIONE LUCE DI CORTESIA (se prevista)
Al disinserimento dell'allarme si accende automaticamente la
luce di cortesia per circa 20 secondi. La luce si spegne al termine
della temporizzazione o all'accensione della chiave quadro.
4.1 - INSERIMENTO AUTOMATICO ANTIAVVIAMENTO (se
previsto)
Il blocco motore si inserisce automaticamente circa 60 secondi
dopo l'apertura della porta lato guida e comunque 255 secondi
dopo aver spento il motore. Il LED comincia a lampeggiare.
Non avviene la chiusura automatica delle porte.
È impedito l'avviamento del motore; per disinserire il sistema
dovete premere uno dei due tasti del radiocomando o contattare
la chiave elettronica di emergenza. Il disinserimento sarà
confermato dallo spegnimento del LED.
Trascorsi altri 120 secondi, il blocco motore si re-inserirà
nuovamente se non sarà stato utilizzato il radiocomando o se
non sarà stata attivata la chiave quadro.
4.3 - ANTIDISTRAZIONE (se attivata)
La funzione antidistrazione provoca l'inserimento automatico
del sistema di protezione se, dopo un disinserimento con
radiocomando, la porta, il cofano o baule non siano stati aperti
entro 2 minuti. Non viene attivata la chiusura automatica delle
porte, mentre vengono ripristinate tutte le protezioni attivate
con l'ultimo inserimento da radiocomando.
4.4 - ALLARME PANICO
mod. 7777
B
B
mod. 7779
A
A
4.2 - DISATTIVAZIONE DEL SENSORE VOLUMETRICO
AD ULTRASUONI
6
possibile disattivare il sensore volumetrico perché non si
verifichino allarmi.
1) Attivare il sistema premendo il tasto ‘A’ del radiocomando.
2) Premere il tasto ‘B’ del radiocomando entro 40 secondi.
3) Qualora sia installato un sensore a iperfrequenza o
antisollevamento, è possibile ottenere il disinserimento
momentaneo premendo due volte consecutivamente il tasto
‘B’ entro 40 secondi (solo per 8100).
Il ricevimento del segnale è confermato da un segnale
acustico del buzzer. Il sensore é stato escluso; restano attive
tutte le altre protezioni.
I sensori si riattiveranno automaticamente al successivo
inserimento del sistema per mezzo del radiocomando.
Se desiderate inserire il sistema di protezione lasciando i vetri
aperti o se un passeggero resta all’interno dell’abitacolo è
Ogni qual volta premete il tasto 'B' del radiocomando, trascorsi
40 secondi dall’inserimento, si genera un ciclo di allarme della
durata di 10 secondi (suono della sirena e lampeggio degli
indicatori di direzione). Per la linea 8100 il ciclo di allarme ha la
durata di 30 secondi. Per interrompere l’allarme panico premete
uno dei tasti del radiocomando.
6
6.1 - RADIO CONTROL BATTERY LOW
When the radio control battery becomes low, the radio control
LED will blink in an irregular way or once only instead of
remaining permanently ON until the button is released. Replace
the battery.
1. To change the battery, open the radio control as indicated
in the figure, levering in the zone marked “OPEN”.
2. Remove the battery as indicated.
3. Wait for 10 seconds.
4. Open the pack with the new battery. Only touch it on its
sides.
Insert the new battery, remembering to comply with the
polarity indications (+sign upwards, as shown in the figure).
5. Close the radio control and press button 'A' twice to check
the correct operation of the system.
Do this operation standing close to the vehicle engine
compartment.
6. Dispose the old battery in the special container.
If the remote control battery is not flat, but the radio control
doesn’t work, proceed as follows staying as close as possible
to the vehicle.
A) Press both buttons on the radio control until the LED goes
OUT. Release them.
(The LED will come ON permanently).
B) Press button 'A' of the radio control standing by the engine
compartment the LED will flash. The re-synchronisation
procedure has been completed.
C) Press button 'A' of the radio control again to verify the
correct operation of the system
19
4 - FUNZIONI AVANZATE
sgn1426A.p65
6.2 - RE-SYNCHRONIZE THE RADIO CONTROLS
BRIDGE
BRIDGE
6 - MAINTENANCE AND TROUBLE SHOOTING
03/10/00, 18.45
4.5 - MEMORIA DI ALLARME
RADIO CONTROL DOES NOT WORK PROPERLY
(the alarm does not operate)
Al disinserimento il sistema avvisa di un avvenuto allarme con
quattro segnali degli indicatori di direzione e del buzzer (anche
se disattivato).
Prestate attenzione alle segnalazioni del LED che saranno
disponibili fino a che non verrà acceso il quadro.
Le diverse segnalazioni individuano quale é stata la causa dell'
allarme.
WHAT TO DO IN CASE OF EMERGENCY
IS AN ELECTRONIC EMERGENCY KEY PROGRAMMED ?
YES
D
Y CAR
CY KE
GEN
EMER
Put the emergency electronic key in connection with the
emergency panel for about 1 second. The LED will go OFF.
NO
The PIN-CODE you can find on the EMERGENCY KEY CARD
included in the kit, will give you the access to the system.
PIN-CODE is unique, different system by system, and protects
all the security procedures.
1. Turn the ignition key ON and then OFF three times within 5
seconds.
2. The LED will flash once for 3 seconds signalling that you
can insert the PIN-CODE.
3. After the LED goes OFF, switch the ignition ON and count
the LED blinks up to the number which is the first digit of
your PIN then switch the ignition OFF and ON again.
Repeat the same procedure for all the digits.
4. In case of any mistake just wait for ten seconds with the
ignition key OFF and then start again at step 1.
5. If the code is correct to your PIN the system will disarm.
SEGNALAZIONE DEL LED
CAUSA DELL’ALLARME
1 lampeggio
apertura porte, cofano, baule
2 lampeggi
intervento di un sensore
supplementare
3 lampeggi
intervento del sensore
volumetrico ad ultrasuoni
4 lampeggi
tentativi di avviamento
(chiave quadro)
5 lampeggi
Intervento sensore
assorbimento di corrente
(tranne 8100)
6 lampeggi
avvenuto taglio cavi di
alimentazione
7 lampeggi
errata comunicazione blocco
motore seriale
8 lampeggi
errata comunicazione sirena
seriale
18
7
5 - WHAT TO DO IN CASE OF EMERGENCY
sgn1426A.p65
7
BRIDGE
BRIDGE
4 - FUNZIONI AVANZATE
03/10/00, 18.45
4.5 - ALARM MEMORY
IL RADIOCOMANDO NON FUNZIONA
(l’antifurto non si disinserisce)
If an alarm trigger has occurred the buzzer (even if it is not
programmed ON) and the turn indicators will give four signals
instead of one when the system is disarmed.
The alarm trigger description is displayed by LED blinking, which
will be shown until the ignition key is turned ON. See the table
below.
COSA FARE IN CASO DI EMERGENZA
AL VOSTRO ANTIFURTO È ABBINATA UNA CHIAVE DI EMERGENZA ?
SI
D
Y CAR
CY KE
GEN
EMER
Inserire per circa 1 secondo la chiave di emergenza nel pannello.
Il LED si spegne. Il sistema si disinserisce.
NO
Munitevi del codice personale (PIN) riportato sulla
EMERGENCY KEY CARD contenuta nella confezione.
Il PIN è un codice personale e diverso per ogni sistema, che vi
consente di accedere alle procedure per le quali deve essere
garantita la sicurezza:
1. Accendere e poi spegnere il quadro ruotando la chiave di
accensione per 3 volte entro 5 secondi.
2. Il sistema risponde con un lampeggio del LED di 3 secondi per
segnalarvi che potete inserire il vostro codice personale (PIN).
3. Dopo che il LED si é spento accendere il quadro e lasciare
che il LED lampeggi per un numero di volte corrispondenti al
valore della prima cifra del vostro PIN-CODE, poi spegnere
il quadro.
Ripetere la medesima procedura per le altre cifre.
4. Se avete il dubbio di aver commesso un errore lasciate
passare 10 secondi circa con la chiave di accensione in
posizione di quadro spento, senza effettuare alcuna
operazione, poi ricominciate dal punto 1.
5. Quando il PIN-CODE viene riconosciuto il sistema si
disinserisce.
LED SIGNAL
ALARM DESCRIPTION
1 blink
doors, bonnet, boot have
been opened
2 blinks
additional sensor triggered
3 blinks
ultrasonic volumetric sensor
triggered
4 blinks
attempts to start
(ignition key)
5 blinks
drop voltage sensor triggered
(not for 8100)
6 blinks
vehicle’s power supply
interruption
7 blinks
external engine cut off
comunication error
8 blinks
external siren comunication
error
8
17
5 - COSA FARE IN CASO DI EMERGENZA
sgn1426A.p65
8
BRIDGE
BRIDGE
4 - ADVANCES FUNCTIONS
03/10/00, 18.45
3.5 - ILLUMINATED ENTRY (if programmed)
4.2 -
The courtesy light will be illuminated for 20 seconds when the
alarm is disarmed. The light will go OFF when the timer has
elapsed or when the ignition key is turned ON.
The volumetric sensor can be deactivated if you want to leave
the windows open or if someone remains in the passenger
compartment.
4.1 - AUTOMATIC ARMING (if specified)
1) Arm the system pressing button 'A' of the radio control.
2) Press button 'B' on the radio control within 40 seconds.
3) If hyperfrequency or level monitor sensors are fitted, it is
possible to deactivate them by pressing ‘B’ button twice
within 40 seconds
To confirm that the signal has been received, there will be
an acoustic signal of the buzzer. The sensors have been
inhibited; all other functions remain activated.
Sensors will be automatically armed on the next arming of
the system.
The unit will automatically arm 60 seconds after the driver’s
side door has been opened or 255 seconds after the engine is
switched off, which ever is the sooner.
The LED will flash.
The doors will not automatically lock.
Immediately activation occurs the engine will be immobilised.
Press button ’A’ or button ‘B’ of the radio control or use the
emergency key to deactivate the system. The LED will go out
to confirm that the system has been deactivated.
After 120 seconds, the system will auto re-arm if a radio control
is not used or the ignition is not switched ON.
DEACTIVATING THE VOLUMETRIC SENSOR
4.3 - AUTO RE-ARM (If specified)
When activated this function will automatically re-arm the
system two minutes after it has been disarmed, via the radio
control, if none of the doors, boot or bonnet have been opened.
The system will not lock the doors.
4.4 - PANIC ALARM
mod. 7777
B
B
mod. 7779
A
A
Each time button 'B' on the radio control is pressed, except for
during the 40 seconds after the alarm has been armed, a 10
seconds alarm cycle will be generated, the siren will sound and
the turn indicators will flash.
The panic alarm time for the 8100 range is 30 seconds.
Press any button to interrupt the panic alarm.
6.2 - MALFUNZIONAMENTO DEL RADIOCOMANDO
(Esecuzione della procedura di risincronizzazione)
6.1 - PILA DEL RADIOCOMANDO SCARICA
Se con uno dei tasti premuti il LED lampeggia per breve tempo
oppure in modo irregolare significa che la pila si sta scaricando.
Provvedere alla sostituzione della pila.
1. Per cambiare la pila aprire il guscio del radiocomando come
indicato in figura, avendo cura di far leva nella zona indicata
con “OPEN”.
2. Togliere la pila estraendola come indicato.
3. Attendere 10 secondi ca.
4. Inserire la pila nuova avendo cura di toccarla con le dita
solo sulle pareti laterali. Rispettare la polarità, come indicato
in figura.
5. Richiudere il guscio e premere 2 volte il tasto A del
radiocomando verificando la risposta del sistema.
Effettuare la prova ad una distanza di 1 metro circa dal
vano motore del veicolo.
6. Gettate la pila scarica negli appositi contenitori di raccolta.
16
9
4 - ADVANCES FUNCTIONS
sgn1426A.p65
Se il radiocomando non funziona, verificato che la pila sia carica,
effettuare ad una distanza il più vicino possibile al veicolo le
seguenti operazioni:
A) Premere entrambi i tasti del radiocomando fino a che il
LED diventa da lampeggiante a spento. Rilasciare i tasti (il
LED si accende in modo fisso).
B) Premere il tasto A del radiocomando e verificare che il LED
lampeggi. La procedura di risincronizzazione é terminata.
C) Premere nuovamente il tasto A del radiocomando per
verificare che il prodotto funzioni correttamente.
9
BRIDGE
BRIDGE
6 - MANUTENZIONE RICERCA GUASTI
03/10/00, 18.46
In caso di smarrimento di entrambi i radiocomandi sarete
comunque in grado di effettuare un disinserimento di emergenza
(pag.8).
6.4 - SMARRIMENTO DEL CODICE PERSONALE (PIN)
Poiché il codice personale (PIN) rappresenta una possibilità di
accesso al sistema, non deve essere lasciato incustodito
all'interno del veicolo. In caso di smarrimento rivolgetevi al
Vostro installatore di fiducia.
3.2 - PROTECTION
6.5 - RICERCA GUASTI
Il radiocomando non inserisce/disinserisce il sistema
Soluzione A: la pila potrebbe essere scarica
(capitolo 6.1 pag.9).
Soluzione B: il radiocomando ha perso il sincronismo con
la centrale (capitolo 6.1 pag.9).
Soluzione C: effettuate la procedura di emergenza per
disinserire il sistema (pag.8) e poi
rivolgetevi al Vostro installatore di fiducia.
Si è verificato un allarme ingiustificato
al disinserimento il LED segnala con una
serie di lampeggi quale è stata la causa
dell’allarme (capitolo 4.5 pag.7).
Soluzione A:
Soluzione B:
Se si è trattato di un allarme causato dal
sensore volumetrico ad ultrasuoni verificate
che finestrini, tettuccio apribile e bocchette
dell’aria fossero chiuse e che non ci fossero
oggetti in movimento all’interno della
vettura. Se il problema persiste rivolgetevi
al Vostro installatore.
Se si è trattato di un allarme per apertura
porte, cofano o baule probabilmente uno
dei pulsanti necessita di essere regolato.
Rivolgetevi al Vostro installatore di fiducia.
mod. 7777
B
RADIO CONTROL FUNCTION
mod. 7779
A
Button A
Arm
•
Disarm
•
Siren interrupt
•
Button B
3.3 - INTERRUPTING AN ALARM IN PROGRESS
•
Panic alarm
•
Ultrasonic sensor exclusion
•
Hyperfrequency or level
monitor modules exclusion (only 8100)
•
3.1 - ARMING
• Press the button 'A' of the radio control to lock the doors (if
the vehicle has a central locking system).
• The turn indicators will blink twice. *
• The buzzer will beep twice (programmed). *
• The protections activate after a 40 seconds timer has elapsed.
• The LED will flash.
* A different number of blinks and beeps (also if they are not
programmed) means that there is a failure in the system.
It is necessary to look the led warning light (chapter 4,5 page
17) to know the reason of the failure.
10
If the system generates an alarm, the siren can be deactivated
by pressing button 'A' on the radio control once. The turn
indicators will also stop blinking but the alarm system remains
armed. Thus, if the system is activated (siren sounding), press
the button twice to unlock the vehicle. The first press will stop
the siren, the second will disarm the system and unlock the
doors.
3.4 - DISARMING
•
•
•
•
•
Press button 'A' on the radio control to open the doors.
The turn indicators will blink once.
The buzzer will beep once (if programmed).
The protections deactivate immediately.
The LED will go OFF.
Note: If an alarm has occurred the buzzer and the turn
indicators will give four signals instead of one (see Alarm
Memory chapter on page 17).
15
6 - MANUTENZIONE RICERCA GUASTI
sgn1426A.p65
B
A
When armed the system will generate an acoustic and visual
30 second alarm when the bonnet, boot or one of the doors is
opened. Systems with the volumetric sensor (ultrasonic and/or
hyperfrequency) will generate the alarm in case of intrusion.
The system remains activated at the end of the cycle. When
the system is armed it is not possible to start the engine.
(systems with engine cut off).
BRIEF INSTRUCTIONS
6.3 - SMARRIMENTO DEI RADIOCOMANDI
10
BRIDGE
BRIDGE
3 - BRIEF INSTRUCTIONS
03/10/00, 18.46
2 - ADDITIONAL PROTECTION
NOTE
You can increase the protection level of the system with the following additional sensors:
5452 Level monitor module
When the system is armed, this sensor will detect the vehicle being jacked up to tow it away or steal the wheels.
5462 Hyperfrequency module
When the system is armed, a microwave emission from the hyperfrequency module hidden in the passenger compartment will
ensure the volumetric protection of the vehicle.
For use on convertible vehicles, the volumetric protection will be stable even with the soft top, windows or sunroof left open.
2980 Window lift module
When the radio key ‘A’ button is pressed to arm the system, the car electric windows will raise automatically. It can be fitted to any car
with electrical windows.
930 Electronic emergency keys and receptacle
Electronic emergency keys to arm and disarm the system. These battery-less touch keys operate by touch to the receptacle, allowing
an easy to use emergency override function.
11
14
2 - ADDITIONAL PROTECTION
sgn1426A.p65
11
BRIDGE
BRIDGE
03/10/00, 18.46
Dear customer,
Congratulation on purchasing this product which has been design and manufactured to the highest automotive standards utilising
the latest technology for total reliability.
Please ensure you retain the EMERGENCY KEY CARD (containing the PIN-CODE), the ELECTRONIC EMERGENCY
KEYS (where supplied) and the user manual in a secure place.
The manual is divided into 6 parts:
Pag.
13 __________ INTRODUCTION
14 __________ ADDITIONAL PROTECTION
15 __________ BRIEF INSTRUCTION
16 __________ ADVANCED FUNCTIONS
18 __________ WHAT TO DO IN CASE OF EMERGENCY
19 __________ MAINTENANCE AND TROUBLE SHOOTING
We kindly ask you to read this manual to get the full benefit of the system.
Your dealer will be pleased to clarify any queries you may have with the system or its operation.
IMPORTANT WARNING
The Cobra 8188, 8168, 7928, 7928HF, 7908 and 7918 are MIRRC Thatcham listed security systems. If the instalation of these
products are modified or altered from the standard specification, or non compliant accessories are fitted, the insurance approval
will be invalidated.
1 - INTRODUCTION
The anti-intrusion alarm system is operated by a high-security radio control that utilises the latest generation of dynamic code. This
new technology offers an extremely high level of protection against any attempt to reproduce the code.
The radio control allows the system to be activated at a distance of 5-10 meters from the vehicle.
Other radio sources may cause interference which can reduce the effective range of the radio controls.
If the system can not be set/unset using the radio control try again close to the vehicle. If they still do not operate check if the radio
control is properly synchronized (chapter 6.2 page 19).
If automatic window closing is connected it is recommended you to stay close to the vehicle while the windows are moving to
ensure safety and security.
The system have a protected selflearning feature which allows you
to add or replace radio or
electronic emergency keys.
The procedure is described in the
fitting instruction.
Art.
Ultrasonic
volumetric
protection
Glass break
protection
Engine
cut-off
Tamper
Courtesy
light
Perimetric
protection
7928
•
optional
multiple
•
•
•
8188
•
optional
multiple
•
•
•
8168
•
optional
single
•
•
•
8115
•
optional
single
no siren
•
•
7918
•
optional
single
•
•
•
7913
•
optional
single
7908
•
optional
no engine cut off
•
•
7903
•
optional
no engine cut off
•
•
•
1.1 - PERSONAL PIN CODE
Each Bridge alarm system has a PIN-CODE that can be used to emergency override the system and for this reason we suggest you
always keep it with you. Where the system is equipped with electronic emergency keys the PIN-CODE will not operate the system
in case of emergency but it is required to add new radio controls or electronic keys. The PIN-CODE is printed on the included
EMERGENCY KEY CARD. Without the PIN-CODE and one electronic key (if programmed) it will not be possible to add or replace
radio keys to the system.
13
BRIDGE
sgn1426A.p65
12
1 - INTRODUCTION
03/10/00, 18.46
Scarica