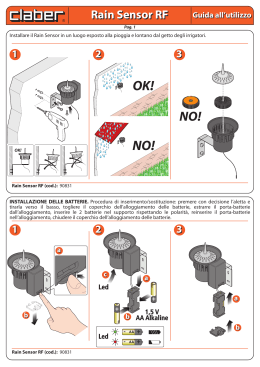
AVVERTENZE
6
6
6
6
6
6
6
6
6
6
6
Utilizzare solo batterie alkaline da 9 volt
Collegare i poli delle batterie separatamente
Verificare lo stato delle batterie a inizio stagione
Accertarsi che la centralina sia completamente avvitata in modo da
mantenere la tenuta della guarnizione
Attendere 30 sec tra un'apertura e una chiusura manuale per dare
tempo al condensatore di ricaricarsi
Pressione statica o di funzionamento minima 0,4 bar - massima 10 bar
Si garantisce il perfetto funzionamento della Rain Evo1 solo se montata su
elettrovalvole Rain
Effettuare la normale manutenzione periodica delle elettrovalvole
E' consigliabile rimuovere la centralina durante il periodo invernale
Durante la programmazione, se non viene premuto alcun tasto per più
di 20 secondi, la centralina tornerà alla schermata iniziale e verranno salvati
solo i dati già confermati
I dispositivi di aspersione dell'acqua devono essere installati all'aperto
e in luoghi muniti di scarico
Non disperdere nell'ambiente, non smaltire come rifiuto urbano ed effettuare raccolta separata.
Richiedere informazioni al fornitore per il recupero e lo smaltimento al momento dell'acquisto di un nuovo dispositivo.
R AIN EVO 1
Caratteristiche
Centralina a Batteria
Battery Controller
Programmateur à piles
Programador a pila
Non utilizzare in maniera impropria il dispositivo o alcuna delle sue parti poiché
potrebbe avere effetti dannosi e pericolosi per la salute e per l'ambiente.
RAIN S.p.A. - 20023 CERRO MAGGIORE (Mi) Italy - Via Kennedy, 38/40
http://www.rain.it - E-mail: [email protected]
1
2
3
4
5
6
7
8
9
10
11
Centralina completamente stagna
Alimentata a batteria
Funzionamento manuale programmabile
Due irrigazioni giornaliere
Calendario settimanale
Programmazione semplice e guidata
Funzione Low Battery
Funzione congelamento programmi (Off Rain)
Funzione count down
By pass sensore pioggia
Coperchio di protezione in gomma
ISTRUZIONI
Congelamento programmi (Off Rain)
DESCRIZIONE
Con questa funzione è possibile congelare i programmi sospendendo
l’irrigazione senza variare alcun dato impostato.
Rain Evo rappresenta la terza generazione di centraline a batteria introdotte dalla Rain
S.p.A. nel mercato dell’irrigazione.
Premere il tasto + per attivare e disattivare la funzione; il display apparirà come in figura
6
Lo sviluppo di questo nuovo prodotto è rivolto alla qualità ed alla facilità di utilizzo, l’alta
qualità dei materiali utilizzati e l’attenzione rivolta alla realizzazione del software ne fanno
un prodotto d’avanguardia nel campo delle centraline a batteria.
Facile ed intuitiva, la programmazione è resa particolarmente flessibile dalla possibilità di
gestire l’irrigazione attraverso un calendario settimanale.
Collegamento sensore pioggia
La centralina Rain Evo1 dispone di un cavo rosso da interrompere
per collegare un comune sensore pioggia a due fili.
In caso di pioggia, la centralina bloccherà l’irrigazione e sul display
comparirà il simbolo come in figura.
Lasciare inalterato il cavo qualora non si volesse dotare la centralina
di sensore pioggia.
Funzione Low Battery
Qualora le batterie fossero scariche apparirà sul display il simbolo come
in figura. Da questo momento in poi la centralina non permetterà più
l'apertura della valvola.
Pertanto è necessario cambiare le batterie e reimpostare nuovamente
la centralina.
5
La centralina Rain Evo1 dispone di un collegamento per il sensore pioggia, tale dispositivo dovrà essere di tipo meccanico a due fili e dovrà essere collegato ai due fili rossi della
centralina; in assenza di sensore, i fili del by pass devono rimanere collegati, infatti un
eventuale scollegamento provocherebbe una situazione di OFF RAIN che equivale ad irrigazione annullata.
La centralina Rain Evo1 necessita per il suo funzionamento di due batterie alkaline da 9
volt, che devono essere inserite nell'apposito alloggio dopo aver collegato la centralina
all’elettrovalvola; questo procedimento consente alla centralina di mettere la valvola in
posizione di chiusura.
Istruzioni per la programmazione della
centralina Rain Evo1
Impostazione dell’orario d’inizio della prima
irrigazione e della seconda
Per la programmazione della centralina Rain Evo1 servono 3 tasti:
6
6
Il tasto Æ (enter) serve per aprire le singole schermate di programmazione
e per confermare i dati inseriti
Ill tasto + (incr.) serve per incrementare i dati inseriti
Il tasto , (Man./Back) serve per attivare l’apertura manuale e ritornare alla
schermata precedente
6
6
6
Premere il tasto Æ per far lampeggiare l'unità dei minuti
Premere il tasto + per impostare l'unità dei minuti dell'orario
d'inizio del primo ciclo d'irrigazione e programmare i restanti dati
operando come gia fatto per l'ora corrente
Note:
Per impostare la mezzanotte bisogna digitare 00 come orario e non 24.
Note:
Se si rimane inattivi in una schermata per più di 20 secondi la centralina passerà
automaticamente nella videata principale (ora attuale).
Impostazione della durata della prima irrigazione
e della seconda
Impostazione dell’ora e del giorno corrente
Se si desidera mantenere inattiva la zona, lasciare in posizione OFF.
Premendo il tasto Æ si attivano i tre zeri che consentiranno d'impostare la durata
del tempo d'irrigazione.
Una volta collegate le batterie la centralina impiega qualche secondo per resettarsi,
successivamente sul display appariranno il simbolo di un orologio e quattro zeri di cui
uno, quello dei minuti, lampeggerà.
6
6
6
Premere il tasto + per aumentare l'unità dei minuti dell'ora corrente
Premere il tasto Æ per far lampeggiare le decine dei minuti
Con il tasto + impostare la decina dei minuti dell'ora corrente
Seguire la stessa procedura per unità ore e decine ore
Premere il tasto Æ per far lampeggiare la barretta posta sui giorni
della settimana
Premere il tasto + per fare scorrere la barretta e posizionarla sul
giono desiderato
Premere il tasto Æ per confermare la scelta e passare all’operazione successiva
6
6
6
6
6
6
6
I e II irrigazione
L'impostazione della durata avviene in minuti (tempo minimo 1 min. - tempo
massimo 360 min.)
Premere il tasto Æ per far lampeggiare l'unità dei minuti
Digitare la durata d'irrigazione desiderata operando nel solito modo:
tasto Æ per passare alla cifra successiva e tasto + per modificare la cifra
Note:
Se si desiderasse riportare in OFF l’impostazione data, basta riportare a
zero le tre cifre.
Note:
Per impostare la mezzanotte bisogna digitare 00 come orario e non 24.
1
2
Impostazione del giorno d’irrigazione
Durante il ciclo di irrigazione il display mostrerà la seguente
figura (count down):
E' possibile scegliere in quali giorni della settimana si vuole irrigare:
Tempo residuo
di irrigazione
Premendo il tasto Æ la barretta sopra il giorno lampeggerà
Premendo il tasto + si scorrono i giorni della settimana
Premendo il tasto , si inverte l’impostazione corrente
6
6
6
Pertanto: il tasto , consente di inserire i giorni di irrigazione lì dove non era
presente alcuna impostazione, o escluderli lì dove erano stati precedentemente
impostati.
Al termine dell'operazione premere il tasto Æ per confermare la programmazione
prescelta, se le impostazioni sono corrette premere il tasto + per
tornare alla schermata principale (orario attuale).
Viceversa per modificare premere il tasto Æ e procedere come precedentemente
descritto.
Irrigazione attiva
A questo punto la vostra centralina sarà stata programmata e il display mostrerà
la seguente figura:
Programmi inseriti
Apertura manuale
Ora corrente
La centralina Rain Evo1 dispone di una apertura manuale preimpostata di 3 min., per variare la durata basta
agire sul tasto + ed aumentare il valore preimpostato da un minimo di 1 min. fino ad un massimo di 360 min.
Giorno corrente
Giorni di irrigazione
6
6
6
Nel caso in cui si desiderasse apportare delle modifiche alla programmazione :
6
Premere il tasto , per aprire manualmente la valvola
Se si desidera mantenere i minuti preimpostati (3 min.) attendere 20 sec. e la
centralina partirà automaticamente
Se si vogliono variare i minuti di apertura, premere il tasto +; confermare il
nuovo valore con il tasto Æ
Per interrompere il ciclo manuale premere di nuovo il tasto ,
Il tasto Æ consente di rientrare nella programmazione
Il tasto + consente di posizionarsi nella schermata da modificare
6
6
3
4
ATTENTION
N'utiliser qu'avec des piles alcalines 9 volts
Connecter les pôles des piles séparément
Vérifier l'état des piles en début de saison
Contrôler que le programmateur soit totalement vissé afin de garantir la tenue du joint
Attendre 30 sec entre une ouverture et une fermeture manuelle afin de permettre au
condensateur de se recharger
Pression statique ou de fonctionnement minimale 0,4 bar - maximale 10 bar
On ne garanti le parfait fonctionnement de Rain Evo que si monté sur électrovalves Rain
Effectuer un entretien normal périodique des électrovalves
Il est préférable d'enlever le programmateur pendant la période hivernale
Pendant la programmation, si on n'utilise aucune touche pendant plus de 20 secondes,
le programmateur retournera à l'affichage initial et ne seront sauvegardées que les
données déjà confirmées
Les dispositifs d'aspersion d'eau doivent être installés à l'extérieur ou en lieu muni
d'écoulement
Ne pas répandre dans l'environnement, ne pas traiter comme déchet urbain et effectuer un tri sélectif.
Au moment de l'achat d'un nouveau dispositif, demander au fournisseur les informations nécessaires pour la récupération et pour le traitement.
R AIN EVO 1
Caractéristiques
Programmateur à piles
Centralina a Batteria
Battery Controller
Programador a pila
Ne pas utiliser le dispositif et ses composants de façon non conforme, cela pourrait
être dangereux pour la santé et pour l'environnement.
RAIN S.p.A. - 20023 CERRO MAGGIORE (Mi) Italy - Via Kennedy, 38/40
http://www.rain.it - E-mail: [email protected]
1.
2.
3.
4.
5.
6.
7.
8.
Programmateur totalement étanche
Alimentation à piles
Fonctionnement manuel programmable
Deux arrosages journaliers
Calendrier hebdomadaire
Programmation simple et guidée
Fonction Low Battery (piles déchargées)
Fonction de sauvegarde des programmes
(Off Rain)
9. Fonction count down (cadran actif)
10. By-pass senseur pluie
11. Couvercle en gomme
INSTRUCTIONS
Sauvegarde des programmes (Off Rain)
DESCRIPTION
Cette fonction permet de sauvegarder les programmes en suspendant l'arro
sage sans modifier les données insérées.
Rain Evo représente la troisième génération de programmateurs à piles commercialisé par
la Rain S.p.A. sur le marché de l'arrosage.
Appuyer sur la touche + pour activer et inactiver la fonction ; le cadran
se présentera comme sur la figure
Ce nouveau produit a été développé avec une attention particulière à la qualité et à la
facilité d'utilisation. La qualité élevée des matériaux utilisés et l'attention portée à la réalisation du logiciel en font un produit d'avant-garde parmi les programmateurs à piles.
La possibilité de gérer l'arrosage à travers un calendrier hebdomadaire rend la programmation particulièrement flexible.
Branchement du pluviomètre
Le programmateur Rain Evo1 dispose d'un fil rouge à connecter pour bran
cher un pluviomètre pluie ordinaire à deux fils.
En cas de pluie, le programmateur bloquera l'arrosage et sur le cadran appa
raîtra le symbole montré sur la figure.
Ne pas toucher au fil rouge si on ne veut pas utiliser le pluviomètre.
Fonction Low Battery
En cas de piles déchargées sur le cadran apparaîtra le symbole montré sur la
figure. A partir de ce moment le programmateur ne permettra plus l'ouverture
de l'électrovalve.
Il est donc nécessaire de changer les piles et de procéder à un nouveau
réglage du programmateur.
5
Le programmateur Rain Evo1 dispose d'une porte pour pluviomètre, ce dispositif devra être
mécanique à deux fils et devra être connecté aux deux fils rouges du programmateur. En
absence du pluviomètre, les fils du by-pass doivent rester connectés pour éviter une situation de OFF RAIN qui équivaut à un arrosage annulé.
Le programmateur Rain Evo1 nécessite pour son fonctionnement de deux batteries alcalines de 9 volts qui doivent être mises en place après avoir connecté le programmateur à
l'électrovalve ; ceci permet au programmateur de mettre l'électrovalve en position de fermeture.
Instructions pour la programmation du
minuteur Rain Evo1
Réglage de l'heure de départ des deux arrosages
Trois touches servent pour la programmation du minuteur Rain Evo1 :
Appuyer sur la touche
pour faire clignoter l'unité des minutes
Appuyer sur la touche + pour augmenter l'unité des minutes et programmer
les autres données comme pour l'heure actuelle
La touche (envoi) pour ouvrir les affichages de programmation et pour
confirmer les données insérées
La touche + (incr.) sert à augmenter les données insérées
La touche (Man./Back) sert à activer l'ouverture manuelle et à retourner à
l'affichage précédent
Note :
Pour obtenir minuit comme horaire il faut régler l'heure sur 00 et non sur 24
Note :
Si on reste inactifs sur un affichage pendant plus de 20 secondes le programmateur
passe automatiquement à l'affichage principal (heure actuelle).
Réglage de la durée des deux arrosages
Réglage de l'heure et de la date actuelle
Pour maintenir inactif, laisser en position OFF.
En appuyant la touche on active les trois zéros qui permettent de régler la durée
du temps de arrosage.
Après la mise en place des piles, le programmateur a besoin de quelques secondes pour
se réinitialiser, en suite sur l'écran apparaît le symbole d'une montre et quatre zéros dont
un , celui des minutes, clignote.
I e II arrosages
Le réglage de la durée est en minutes (temps minimum 1 min. - temps maximum 360 min.)
Appuyer sur la touche pour faire clignoter l'unité des minutes
Régler la durée de l’arrosage de la même façon :
touche pour passer au chiffre successif et touche + pour modifier le chiffre
Appuyer sur la touche + pour augmenter l'unité des minutes
Appuyer sur la touche pour faire clignoter la dizaine des minutes
Avec la touche + régler la dizaine des minutes
Suivre la même procédure pour l'heure
Appuyer sur la touche pour faire clignoter le trait positionné en dessous des
jours de la semaine
Appuyer sur la touche + pour déplacer le trait sous le jour choisi
Appuyer sur la touche pour confirmer le choix et passer à l'opération suivante
Note :
Pour retourner en position OFF, reporter à zéro les trois chiffres.
Note :
Pour obtenir minuit comme horaire il faut régler l'heure sur 00 et non sur 24
1
2
Réglage des jours d'arrosage
Pendant le cycle d'arrosage le cadran montrera l'image suivante
(count down) :
On peut choisir les jours de la semaine dans lesquels irriguer :
Temps résiduel
d'arrosage
En appuyant sur la touche le trait positionné en dessous du jour clignote
En appuyant sur la touche + on déplace le trait sous les jours de la semaine
En appuyant sur la touche on inverse le réglage
La touche permet d'insérer les jours d'arrosage exclus en debut de programma
tion, ou d'exclure les jours réglés en premier.
A la fin de l'opération appuyer sur la touche pour confirmer la programmation
choisie, si les données sont correctes appuyer sur la touche + pour retourner à l'af
fichage principal (heure actuelle).
Vice-versa pour modifier appuyer sur la touche et suivre la procédure déjà
décrite.
Arrosage actif
Votre minuterie est donc programmée et le cadran montrera l'image suivante :
Programmes
insérés
Ouverture manuelle
Heure actuelle
Le programmateur Rain Evo1 dispose d'une ouverture manuelle préétablie de 3 min., pour modifier la durée il suffit d'utiliser
la touche verte pour augmenter la durée d'un minimum de 1 min. à un maximum de 360 min.
Date actuelle
Pour modifier la programmation :
Jours d'arrosage
Appuyer la touche pour ouvrir manuellement l'électrovalve
Pour maintenir le réglage préétabli (3 min.) attendre 20 sec. et le programmateur partira automatiquement
Pour modifier les minutes d'ouverture appuyer sur la touche + ; confirmer la
nouvelle valeur avec la touche
Pour interrompre le cycle manuel appuyer de nouveau sur la touche
La touche permet de retourner à la programmation
La touche + permet de se positionner sur l'affichage à modifier
3
4
ADVERTENCIAS
6
6
6
6
6
6
6
6
6
6
6
Emplee solamente pilas alcalinas de 9 voltios
Conecte por separado los polos de las pilas
Verifique el nivel de carga de las pilas al principio de la temporada
Controle que el programador esté perfectamente roscado para asegurar la
estanqueidad de la junta
Espere 30 segundos entre la apertura y el cierre manual para que el
condensador pueda recargarse
Presión estática o de funcionamieto: mínima 0,4 bar - máxima 10 bar
Se garantiza el perfecto funcionamiento del programador a pilas Rain Evo
sólo si se instala en electroválvulas RAIN
Efectúe el mantenimiento normal de las electroválvulas
Se aconseja quitar el programador durante la estación invernal
Durante la programación, si no se pulsa ningún botón durante 20 segundos, el
programador volverá a la pantalla inicial y serán grabados solamente los datos
ya confirmados
Los aspersores deben instalarse al aire libre
No tire el equipo en el medio ambiente ni en los contenedores urbanos de basura
orgánica. Deposítelo en los puntos de reciclaje o ecoparques autorizados.
Solicite información al proveedor con respecto a la recogida de un equipo en desuso cuando adquiera otro nuevo.
R AIN EVO 1
Programador a pilas
Centralina a Batteria
Battery Controller
Programmateur à piles
No manipule el equipo o alguno de sus componentes electrónicos ya que podría causar daños a su salud o al medio ambiente.
RAIN S.p.A. - 20023 CERRO MAGGIORE (Mi) Italy - Via Kennedy, 38/40
http://www.rain.it - E-mail: [email protected]
Características
1. Programador completamente estanco
2. Alimentación a pilas
3. Funcionamiento manual programable
4. Dos riegos diarios
5. Calendario semanal
6. Programación simple y guiada
7. Función "Low Battery"
8. By Pass para el sensor de lluvia
9. Función de pausa de programas (Off Rain)
10. Función de cuenta atrás
11. Tapa protectora de goma
INSTRUCCIONES
Pausa de programas (Off Rain)
DESCRIPCION
Con esta función es posible detener el riego y congelar (anular temporalmente)
los programas sin modificar la programación.
Rain Evo representa la tercera generación de programadores a pilas introducidos por Rain
S.p.A. en el mercado del riego.
Pulsar el botón verde para activar y desactivar la función. En pantalla aparecerá el símbolo OFF
6
Conexión del sensor de lluvia
El programador Rain Evo puede conectarse a un sensor de lluvia mecánico
de dos hilos. El sensor tiene que ser conectado a los dos hilos rojos del programador.
El desarrollo de este producto se ha centrado en la calidad, facilidad de uso, elevada calidad de los materiales empleados en su fabricación y la atención dedicada a la realización
del software. Todo ello hace que este producto esté a la vanguardia en el campo de los
programadores a pilas.
Fácil e intuitivo. La programación es particularmente flexible gracias a la posibilidad de
manejar el riego mediante un calendario semanal.
El programador Rain Evo puede conectarse a un sensor de lluvia mecánico de dos hilos y
tiene que ser conectado a los dos hilos rojos del programador. Sin el sensor de lluvia, los
hilos de conexión tienen que ser enlazados ya que una posible desconexión provocaría
una situación de OFF RAIN que equivale a la cancelación del riego.
El programador Rain Evo necesita para su funcionamiento dos pilas alcalinas de 9 voltios,
que tienen que ser introducidas después de haber conectado el programador a la electroválvula. Este procedimiento permite al programador resetearse y cerrar la electroválvula.
Función Low Battery
(aviso de pila baja)
Si las baterías están descargadas, en pantalla aparecerá el símbolo LOW
y la electroválvula se cerrará.
Cambie las pilas y programe de nuevo el programador.
5
Instrucciones para la programación del
Rain Evo
Ajuste de la duración del tiempo de riego
Para la programación del controlador Rain Evo se utilizan solo 3 botones:
Si se desea mantener inactivo el sector de riego, dejar en posición OFF.
Pulsar el botón azul y se activarán tres ceros que permitirán programar la duración
del tiempo de riego. SIMBOLO DE UN RELOJ DE ARENA.
El botón azul (enter) sirve para pasar de pantalla de programación y para
confirmar los datos introducidos
El botón verde (incr.) sirve para modificar o incrementar los datos introducidos
El botón gris (Man./Black) sirve para confirmar el calendario semanal, para
activar la apertura manual y volver al la pantalla anterior
6
6
6
6
6
6
Riego I y II
Ajuste en minutos (mínimo de 1 minuto - máximo de 360 minutos)
Pulsar el botón azul para que parpadee la unidad de los minutos
Ajustar la duración del riego siguiendo el procedimiento habitual, esto es,
botón verde para modificar y botón azul para confirmar y para pasar a la
cifra siguiente
Nota:
Durante la programación, si no se pulsa ningún botón durante 20 segundos, el programador
volverá a la pantalla inicial y serán guardados solamente los datos ya confirmados.
Nota:
para seleccionar OFF, ajuste a 0 el valor de la duración del riego.
Ajuste de la hora y del día de la semana
Una vez se hayan conectado las pilas, el programador se resetea, aparecerá en el display el
SIMBOLO DE UN RELOJ y el minutero parpadeará.
Pulsar el botón verde para modificar los minutos
Pulsar el botón azul para hacer parpadear las decenas de minuto
Pulsar el botón verde para incrementar las decenas de minuto
Seguir el mismo procedimiento para unidad hora y decena de hora
Pulsar el botón azul para hacer parpadear la barra bajo los días
Pulsar el botón verde para desplazar la barra y posicionarla bajo el día deseado
Pulsar el botón azul para confirmar la selección y pasar a la operación siguiente
6
6
6
6
6
6
6
Ajuste de la hora de inicio del riego
6
6
Nota:
00 corresponde a la medianoche.
Pulsar el botón azul para hacer parpadear la unidad de minutos
Pulsar el botón verde para modificar la unidad de los minutos y el botón azul
nuevamente para confirmar y pasar de pantalla siguiendo el procedimiento
habitual
Nota:
00 corresponde a la medianoche.
1
2
Selección de los días de riego
Durante el riego, en pantalla aparecerá el símbolo de una
MANO / ASPERSOR
Para seleccionar el día de riego:
Tiempo restante
de riego
Pulsar el botón azul para que parpadee la barra bajo el día de la semana
Pulsar el botón verde para desplazar la barra bajo los días de la semana
Pulsar el botón gris para seleccionar el día de riego. Aparecerá el SIMBOLO
DE UNA GOTA bajo el día de riego seleccionado
6
6
6
Nota: el botón gris sirve para seleccionar/eliminar días de riego de la semana
Al termino de la operación pulsar el botón azul para confirmar la programación elegida
y el botón verde para volver a la pantalla principal (hora actual)
Riego activo
AHORA vuestro programador estará listo y en pantalla aparecerán:
Programas
Apertura Manual
Hora actual
El programador Rain Evo esta programado para una apertura manual de 3 minutos. Para modificar la duración, pulse el botón
verde y aumente el valor, desde un mínimo de 1 minuto hasta un máximo de 360 minutos. Confirme con el botón azul.
Día actual
Días de riego
6
6
6
Pulsar el botón gris para abrir manualmente la electroválvula
Si espera durante 20 segundos, el programador pasará a la programación
automática de 3 minutos
Para interrumpir el riego manual, pulsar otra vez el botón gris
Si se desea modificar la programación:
El botón azul permite cambiar la programación
El botón verde selecciona la pantalla que se desea modificar
6
6
3
4
WARNING
6
6
6
6
6
6
6
6
6
6
6
Use 9 volt alkaline batteries only
Connect battery poles one by one
Check the current battery level at the beginning of the season
Be sure that controller is completely screwed in order to grant gasket sealing
Wait for 30 seconds between manual opening and closing in order to let
recharge the condenser
Static or working pressure minimum 0.4 bar - maximum 10 bar
A properly working is granted only if the controller is installed on Rain electric
valves
Effect the usual periodical maintenance of the electric valves
It is suggested to remove the controller during winter season
During programming session, after 20 seconds without pushing any button the
controller will come back to the first screen and will be saved only the
confirmed information
Water sprinkling devices must be installed in the open and in places supplied
with exhaust
Do not disperse in the environment, do not swallow as urban refusal and make separate collection.
Require information to the supplier for the recovery and draining upon the purchase of a new devise.
R AIN EVO 1
Technical Features
Battery Controller
Centralina a Batteria
Programmateur à piles
Programador a pila
Do not use in a wrong manner a device or some of its parts since it could have
demaging and dangerous effects for the health and for the environment.
RAIN S.p.A. - 20023 CERRO MAGGIORE (Mi) Italy - Via Kennedy, 38/40
http://www.rain.it - E-mail: [email protected]
1
2
3
4
5
6
7
8
9
10
11
Completely waterproof
Battery powered
Manual and programmable working
Two daily irrigations
Weekly Calendar
User friendly programming
Function "Low Battery"
Freeze program function (Off/Rain)
Function “Count Down”
Sensor Connection
Rubber protection cover
ISTRUCTIONS
Freeze program function (Off/Rain)
DESCRIPTION
With this function is possible to stop watering and freeze the program without
change the setting.
Rain Evo represents the third generation of battery controller introduced by Rain S.p.A. in
the irrigation market.
Press the + button to active and inactive the setting, the display will
appear as the figure.
The development of this new product is relative to the quality and easy-to-use; high quality of material and the attention given to the realization of the software make this product
to be in the van of the battery controllers market.
6
Easy and intuitive, the programming is particularly flexible thanks to the possibility of
manage the irrigation through a weekly calendar.
Connecting a rain sensor
To connect a two wires sensor cut the red wire of Rain Evo .
When weather condition dictates, the controller stops watering and on the
display will appear an icon as the figure.
Leave unchanged the wire if you don't connect rain sensor.
“Low Battery” function
When batteries are discharged, an icon as the figure will appear on the
display and the valve will remain stopped.
Change the batteries and set the controller again.
5
The battery controller Rain Evo1 can be connected to the rain sensor, this device has to be
of mechanical type with two wires and has to be connected to the two red wires of the
controller; without the rain sensor the connection wires have to be kept connected, a possible disconnection could cause a situation of OFF RAIN what is the same of cancelled irrigation.
The Rain Evo1 is powered by two 9 volt batteries. Put them in the apposite accommodation after having connected the controller to the electric valve, this allows the controller to
reset and put it in close position the valve.
Programming the controller Rain Evo
Setting Watering Start Times
In order to program Rain Evo you need only 3 buttons:
6
6
The Æ button (enter) to move from a screen to another one and to confirm
the set information.
The + button (incr.) to modify or increase data.
The , button (Man./Back) to confirm the weekly calendar, to active the
manual open and to come back to the previous screen.
6
6
6
Press the Æ button and the units minutes will flash.
Press the + button to set minutes units of first watering start times and follow the same procedure to set the other units of current hour.
Note:
To get midnight you should set 00 as time and not 24.
Note:
During programming session, after 20 seconds without pushing any button the controller will
come back to the first screen and will be saved only the confirmed information.
Setting Length of Watering
Setting the Date and Time
Leaving in OFF position the program, the area will be inactive.
Press the Æ button and the three zeros for the setting of the length watering will be
active .
Once batteries are connected, first the controller auto resets, than the display will appear as
the figure; the minutes icon starts flashing.
6
6
6
Press the + button to increase the units minutes
Press the Æ button and the tens minutes icon starts flashing.
With + button increase tens minutes
Follows the same procedure for hour unites and hour tens
Press the Æ button and the slash under the weekly days starts flashing
Press the + button to move the slash under the current day
Press the Æ button to confirm and proceed to the next operation
6
6
6
6
6
6
6
I and II irrigation
The set of the length is in minutes (time minimum 1 min. - time maximum
360 min.)
Press the Æ button and the minutes units start flashing.
Set the length of watering following the usual procedure: + button to set
and Æ button to confirm and proceed to the next operation.
Note:
To reach the OFF position set at zero the length watering.
Note:
To get midnight you should set 00 as time and not 24.
1
2
Setting Days to water
The display appears as the figure during irrigation (count down).
Choose the specific day in which irrigate:
Irrigation
count down
Press the Æ button and the slash under the day starts flashing
Press the + button to move the slash under the day selected
Press the , button to change the current set up
6
6
6
Therefore: , button to set or remove the watering days.
At the end press the Æ button to confirm all your settings and the + button
to come back to the main screen (current hour).
To change your settings press the Æ button and follow the procedure above
described.
Run Watering
Now your controller is programmed and the display will appear as the figure
Your settings
Manual Watering
Current hour
Rain Evo has set a manual watering of 3 minutes, to change the length press the + button and modify the setting,
from minimum 1 min. to maximum of 360 min.
Current day
Watering Days
6
6
6
To change your setting:
6
Press the , button to open manually the valve.
To change the minutes of watering, press the + button and confirm with Æ
button.
Otherwise after 20 sec., the controller will start automatically with the 3 minutes of watering.
Press , button to stops the manual watering.
Æ button to go into the setting
+ button to go in the screen you would change
6
6
3
4
Scarica